Crochet Pig In A Granny Square Blanket Pattern


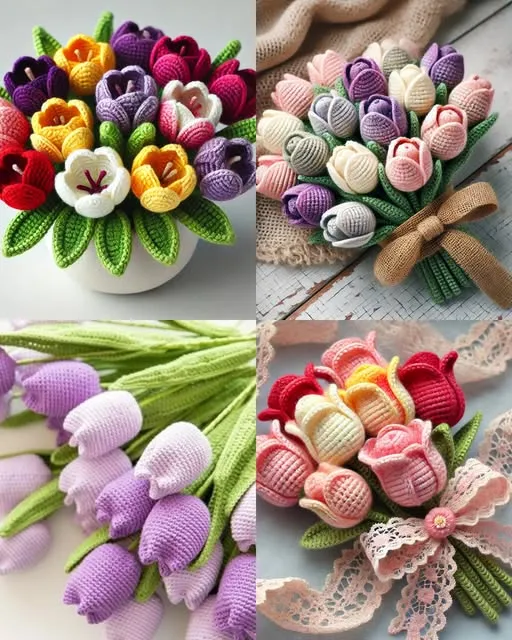
How to Crochet Tulips – Tutorial and Ideas is a creative and relaxing project that allows crafters to bring the beauty of spring flowers to life using only yarn and a crochet hook.
These delicate blossoms can brighten any space, whether used in home décor, as gifts, or for special occasions. Crochet tulips are versatile, timeless, and a fantastic way to explore color, texture, and pattern.
Whether you are a beginner or an experienced crocheter, this tutorial will guide you step by step on how to make realistic tulip flowers and offer inspiring ideas on how to use them creatively.
By learning this craft, you’ll discover how easy and rewarding it is to crochet these elegant blooms while improving your crochet skills.
Creating crochet tulips is not just about following a pattern—it’s about enjoying the artistic process. Each petal and leaf you make becomes part of a beautiful handmade flower that will never wilt. The best part is that you can personalize your tulips with different colors and yarn textures, turning each one into a unique piece of art. From pastel tones to vibrant reds and yellows, crocheted tulips can match any style or season. This flexibility makes them perfect for decorations, keychains, bouquets, and even accessories like brooches or hair clips.
If you have ever admired tulips for their simple yet elegant form, learning how to crochet tulips will let you enjoy their charm all year round. Crocheting these flowers can also be a mindful and calming activity that helps reduce stress while allowing your creativity to flourish. You’ll find joy in shaping petals, crafting stems, and assembling them into lifelike flowers that will impress anyone who sees them. Let’s explore the step-by-step tutorial and discover creative ideas for your handmade tulip creations.
Before you begin your crochet tulip project, gathering the right materials is essential for achieving beautiful results. You’ll need medium-weight yarn in your favorite tulip colors—pink, yellow, red, white, or purple are classic options. For the leaves and stems, green yarn works best. Use a crochet hook that matches your yarn weight, typically between 2.5 mm and 3.5 mm for delicate flowers. You’ll also need scissors, a yarn needle, and optional floral wire or pipe cleaners to shape and support the stems.
Choosing high-quality yarn makes a big difference in how your tulips look and feel. Cotton yarn creates crisp petals with defined edges, while acrylic yarn gives a softer, more flexible texture. Experimenting with different yarns will help you achieve the style you prefer. For beginners, using light-colored yarns is recommended since they make it easier to see your stitches as you work.
A crochet tulip pattern usually involves working with basic stitches like chains, single crochet, and double crochet. Don’t worry if you’re new to these techniques—once you start, the rhythm of crocheting becomes very enjoyable. Keep your tension consistent to ensure that all your petals look even and symmetrical.
If you plan to make several tulips, it’s helpful to create one sample flower first to test your color combination and petal shape. Then, once you’re happy with your design, you can make more tulips to form a complete bouquet or arrangement. Using floral wire in the stem allows your tulips to stand upright, giving them a realistic look.
Finally, remember that crocheting tulips is about creativity. Feel free to add small variations, like slightly curling the petals or adding extra leaves. The more you experiment, the more your handmade tulips will reflect your personal style.
To begin your crochet tulip, start with a magic ring and make six single crochet stitches into it. Close the ring tightly to form the base of the flower. Then, continue crocheting in rounds to create the tulip bud. Increase gradually by adding more stitches in each round until the base reaches your desired width. The number of rounds you crochet will determine how open or closed your tulip appears.
Next, you’ll work on shaping the petals. A traditional tulip has six petals, but you can make more or fewer depending on your preferred look. Each petal can be crocheted separately and then sewn onto the base, or you can crochet them directly from the top of the bud. To form a petal, chain a few stitches, then work single and double crochet stitches in ascending and descending order to create a curved shape.
Once your petals are complete, use a yarn needle to sew them securely around the bud. Adjust the positioning so they overlap naturally, just like real tulip petals. This part requires a bit of patience, but it’s also where your flower truly comes to life. If you want your tulip to be more realistic, you can slightly shape the petals with your fingers after assembling them.
For the stem, take green yarn and crochet a long chain to your preferred length. Then, work single crochet stitches along the chain to make it thicker. You can insert floral wire inside the stem for stability, especially if you plan to display your tulips upright. Attach the stem to the base of the flower and secure it tightly.
To make the leaves, chain a few stitches and work single and half-double crochet stitches to create an elongated oval shape. You can make two or three leaves per stem for a fuller look. Attach them along the stem at different heights for a natural appearance.
Your crochet tulip is now complete! Once you’ve finished one, it becomes easier to make more, and soon you’ll have a stunning collection of colorful tulips ready for any craft project or decoration.
There are countless ways to use your crochet tulips beyond simple floral arrangements. One popular idea is to make a full crochet bouquet as a long-lasting alternative to real flowers. These bouquets can be given as gifts for birthdays, Mother’s Day, weddings, or anniversaries. The recipient will appreciate the time and effort you put into crafting each flower by hand.
Crochet tulips also make charming home decorations. You can place them in vases, hang them as garlands, or attach them to wreaths for seasonal décor. Their vibrant colors add a touch of warmth and freshness to any room. For springtime decorations, mix your tulips with crochet daisies and roses to create a beautiful floral display.
If you enjoy making smaller crochet projects, turn your tulips into accessories. Attach a single tulip to a brooch pin, hair clip, or keychain for a unique handmade touch. You can even use them as embellishments on bags, hats, or scarves. This transforms simple accessories into artistic statements that showcase your creativity.
Another wonderful idea is to incorporate crochet tulips into baby gifts or nursery décor. Soft pastel tulips can be used on blankets, mobiles, or wall art for a gentle, whimsical touch. Handmade decorations like these are meaningful keepsakes that families treasure for years.
Tulips can also be used in craft fairs or online shops if you enjoy selling your handmade creations. Because they are lightweight and non-perishable, they’re easy to ship and appeal to a wide audience of crochet lovers and flower enthusiasts.
Finally, crochet tulips can serve as a source of inspiration for teaching others. Hosting crochet workshops or sharing your process on social media helps spread creativity while connecting with a global community of crafters.
When making crochet tulips, small details can make a big difference. One useful tip is to keep your stitches even and firm, especially around the flower base, to maintain a clean shape. Using a stitch marker can help you keep track of rounds and avoid uneven edges.
Blocking your finished tulips lightly can enhance their appearance. This technique involves gently shaping and drying the petals so they stay open and symmetrical. You can do this by pinning them into shape and spraying them with water or starch.
Experimenting with different yarn colors and textures can also elevate your tulip designs. Metallic or glitter yarn adds a touch of sparkle, while velvet yarn gives your tulips a soft, luxurious finish. Try combining different shades of the same color to create a more natural gradient effect.
If you want to make miniature tulips, use thinner yarn and a smaller hook. For larger flowers, use bulky yarn for a bold and decorative result. Adjusting yarn size lets you tailor your tulips for various projects.
Storing your crochet tulips properly ensures they stay beautiful for years. Keep them away from direct sunlight to prevent color fading and dust them occasionally to maintain their vibrancy.
Lastly, enjoy the process! Crocheting tulips isn’t just about the final product—it’s a relaxing, creative hobby that brings joy and satisfaction. Every flower you make carries a bit of your artistic personality.
1. What type of yarn is best for crochet tulips?
Cotton yarn is ideal because it provides structure and keeps the petals crisp. Acrylic yarn also works well for softer results.
2. How long does it take to crochet one tulip?
A beginner might take about an hour, while experienced crocheters can finish one in 30 minutes.
3. Can I make crochet tulips without wire stems?
Yes, but using floral wire helps the tulips hold their shape, especially if you plan to display them in a vase.
4. How many petals should a crochet tulip have?
Typically, six petals create a natural look, but you can adjust the number to your liking.
5. Can I mix different colors in one tulip?
Absolutely! Blending shades adds depth and makes your crochet tulips look more realistic.
6. Are crochet tulips suitable for beginners?
Yes. They use basic stitches, making them an excellent project for new crocheters who want to practice shaping.
7. How do I clean my crochet tulips?
Use a soft brush or damp cloth to remove dust gently. Avoid soaking them in water.
8. Can I sell my handmade crochet tulips?
Yes, they are perfect for craft fairs, online stores, or as custom gifts.
9. What can I use crochet tulips for besides decoration?
They can be turned into brooches, hair clips, bookmarks, or embellishments for clothing and accessories.
10. How can I make my tulips look more realistic?
Use natural tulip colors, slightly shape the petals, and add shading effects with two-tone yarn.
Learning how to crochet tulips opens up endless creative possibilities. From making stunning bouquets to decorating your home or personal accessories, these handmade flowers bring warmth and charm wherever they go. With a bit of patience and imagination, you can craft tulips that look just as beautiful as real ones—yet last forever.
We hope this tutorial has inspired you to try your own crochet tulip project. If you enjoyed this guide, leave your honest opinion and share your suggestions for future tutorials. Your feedback helps make every new creation even more beautiful and inspiring!


