Crochet Pig In A Granny Square Blanket Pattern


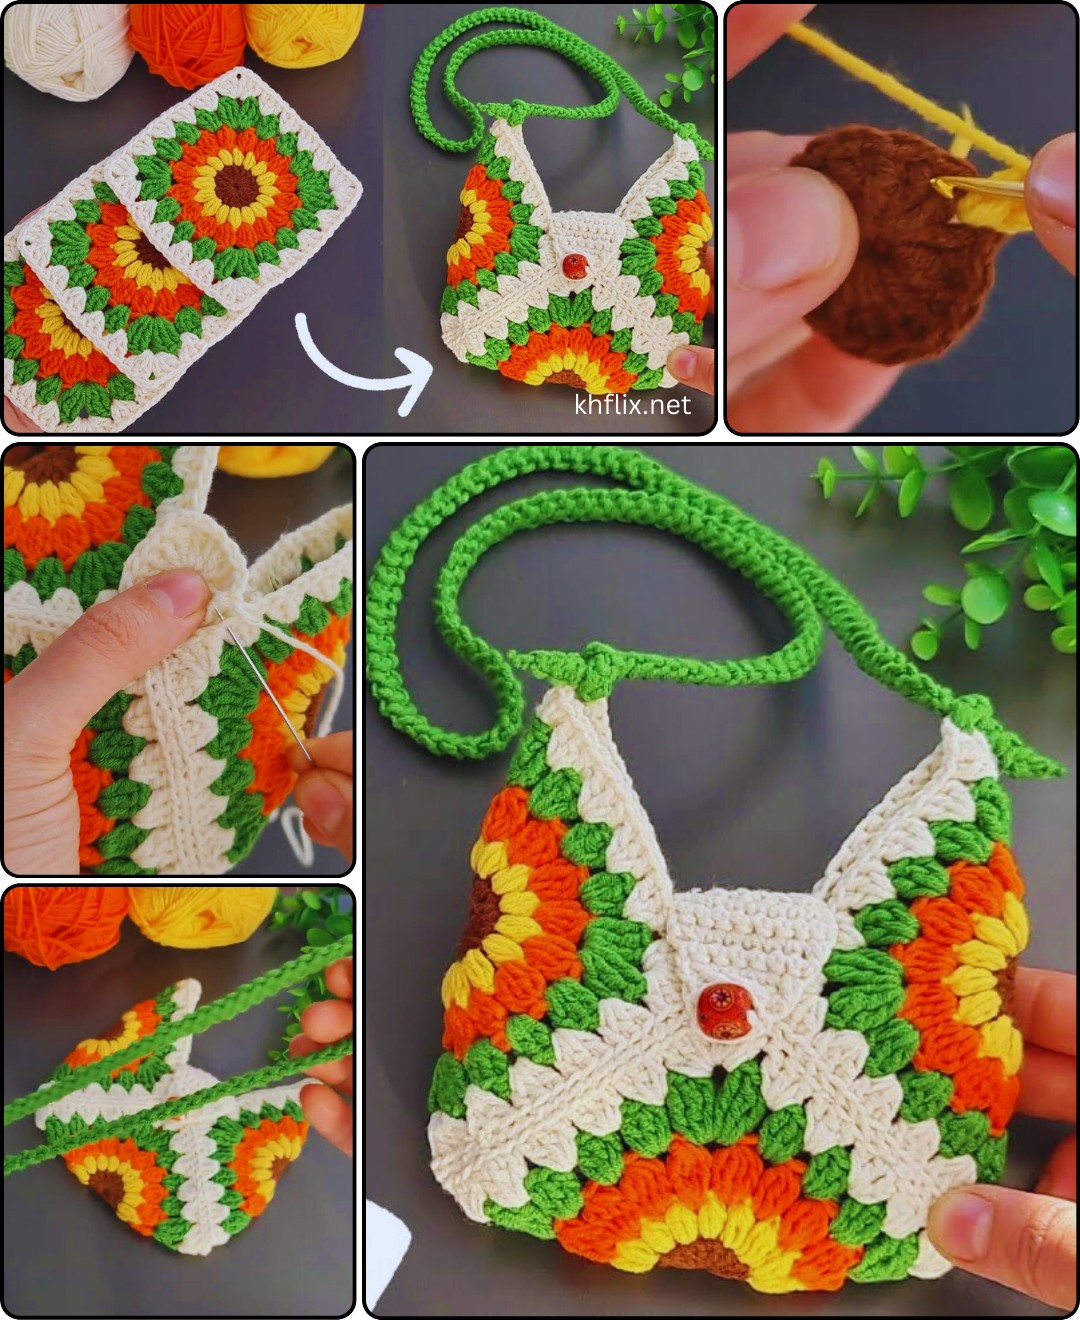
How to Make a Crochet Mini Bag Purse Keychain – Step-by-Step Tutorial is the perfect guide for anyone who loves small, cute, and practical crochet projects.
These mini bag keychains are not only adorable accessories but also functional pieces that can hold coins, lip balm, or even tiny keepsakes.
Whether you’re a crochet beginner looking for a simple project or an experienced crafter seeking something quick and satisfying, this tutorial will walk you through the process step by step.
One of the greatest things about creating a crochet mini bag purse keychain is that it allows you to express your personal style while using up leftover yarn from other projects.
These little bags can be made in countless color combinations, from elegant neutrals to bright, playful shades. They make excellent handmade gifts, craft fair items, or unique additions to your personal collection. You can hang them on handbags, backpacks, or car keys for a touch of handmade charm.
In this How to Make a Crochet Mini Bag Purse Keychain – Step-by-Step Tutorial, we’ll explore all the details you need to craft your own mini purse — from choosing the right materials and creating the base to adding finishing touches like handles, buttons, and decorative elements. You’ll be surprised how quickly and easily you can complete this project, even with basic crochet skills. Let’s get started and create your new favorite mini accessory!
Before beginning your project, it’s important to gather everything you need. The success of your crochet mini bag purse keychain depends on choosing the right materials that will help it look cute, durable, and well-made. Luckily, this project requires only a few simple supplies that are affordable and easy to find.
Start with your yarn. Lightweight or cotton yarn is ideal for small crochet pieces because it holds shape well and gives a neat finish. You can experiment with bright colors or create elegant tones depending on your taste. Small projects like this are great for using leftover yarn scraps.
Next, you’ll need a crochet hook. A 2.5mm to 3.5mm hook size usually works well for mini projects. The smaller hook helps you make tight stitches that give structure to your little bag. Also, have a pair of scissors for cutting yarn and a tapestry needle for weaving in ends or attaching parts.
You will also need a small keychain ring or lobster clasp to attach to your bag once it’s finished. Optional items include a button, bead, or mini zipper for decoration or closure. If you’d like to make your bag extra stiff, a small piece of felt or interfacing can be used as a liner inside the bag. With these tools ready, you’re prepared to start your crochet mini bag purse keychain journey.
Let’s begin crafting! Follow these steps carefully to create your own crochet mini bag purse keychain that’s both cute and functional. Each step is easy to follow and perfect for crocheters of all levels.
Step 1: Make the Base of the Bag
Start with a magic ring or chain four and join to form a circle. Crochet single or half-double crochet stitches around to form a small oval base. Work two to three rounds to make it slightly larger, depending on how big you want your mini bag.
Step 2: Build the Bag Body
Once the base is ready, stop increasing and crochet evenly around in single crochet stitches to build the height of the bag. Continue working in rounds until it’s about an inch tall. You can change colors halfway for a striped effect.
Step 3: Create the Top Edge
When you reach the desired height, crochet one round of slip stitches to make the top firm and even. This adds structure to the opening and gives a clean edge to your mini bag.
Step 4: Add the Handle or Strap
To make a handle, chain a few stitches (usually between 10 and 15) and attach both ends to the top sides of your bag using slip stitches. For a longer strap, make a longer chain and attach the ends diagonally to form a crossbody look.
Step 5: Attach the Keychain Ring
Using your tapestry needle, sew the keychain ring or lobster clasp securely onto one side of the handle. Make sure it’s tight enough to hold, but not too stiff to prevent movement.
Step 6: Add Finishing Touches
Now is the fun part! You can sew on a small button or bead as decoration, or even crochet a mini flower or bow to attach. If you want the bag to close, use a loop and button closure. Once done, weave in all yarn ends neatly. Your crochet mini bag purse keychain is ready!
One of the most enjoyable parts of making crochet mini bag purse keychains is the freedom to customize each piece. You can create dozens of unique designs by playing with colors, textures, and patterns. These variations make every keychain special and perfect for gifting or selling.
Try pastel colors for a cute and soft look, or bold contrasting shades for something more modern. You can even create theme-based mini purses — like Christmas red and green, summer beach tones, or elegant black and gold combinations. Adding embellishments such as small tassels or pearls gives each bag a personalized touch.
You can also experiment with different stitch patterns. For example, use half-double crochets for a smooth texture or puff stitches for a soft, bubbly finish. Adding a small lining inside with fabric glue or sewing helps make your mini bag sturdier and more professional-looking. With a little creativity, you can turn this simple project into a beautiful accessory that stands out wherever you go.
If this is your first time making a crochet mini bag purse keychain, don’t worry! The pattern is simple and forgiving. Even if your stitches are not perfect, the end result will still look adorable. The key is to practice consistent tension and keep your stitches tight enough to hold shape.
Beginners can start with a single color to make things easier. Once comfortable, try combining multiple shades or adding stripes. The project is small enough that you can experiment freely without wasting much yarn.
You can also personalize your keychain by adding initials or small crocheted charms. Try making matching mini bags for friends or family, each in their favorite colors. It’s a fun way to share your creativity and improve your crochet skills.
Lastly, don’t rush the process. Enjoy the slow, mindful rhythm of crochet — it’s relaxing and satisfying to see your tiny bag take shape stitch by stitch.
1. What type of yarn is best for making a crochet mini bag purse keychain?
Cotton or lightweight acrylic yarn is ideal because it provides structure and holds its shape well. Avoid stretchy yarns that may cause the bag to lose form.
2. Can I use leftover yarn from other projects?
Yes! This project is perfect for using leftover yarn scraps. Small amounts of yarn are all you need for each mini bag.
3. How long does it take to make one crochet mini bag purse keychain?
Typically, it takes between 30 minutes to one hour, depending on your skill level and design complexity.
4. Do I need to line the bag?
Lining is optional. However, using a small piece of felt or interfacing can make your mini bag more durable and stable.
5. Can I sell the crochet mini bag purse keychains I make?
Absolutely! These make great handmade products for craft fairs or online shops, as long as the pattern you follow is free for commercial use.
6. How can I attach the keychain securely?
Sew the metal ring firmly onto the handle or bag using strong yarn or thread to ensure it stays in place.
w that you’ve learned How to Make a Crochet Mini Bag Purse Keychain – Step-by-Step Tutorial, you can create endless variations of this cute accessory.
With just a bit of yarn, creativity, and patience, you can turn a simple crochet project into a stylish, handmade piece. These mini bags are great for gifts, personal use, or even small business projects.
We hope this guide inspired you to start your own crochet mini bag purse keychain collection. Don’t forget to share your experience — leave a sincere opinion and your suggestions on what tutorial you’d like to see next! Your feedback helps make each new project even better.


