Crochet Pig In A Granny Square Blanket Pattern


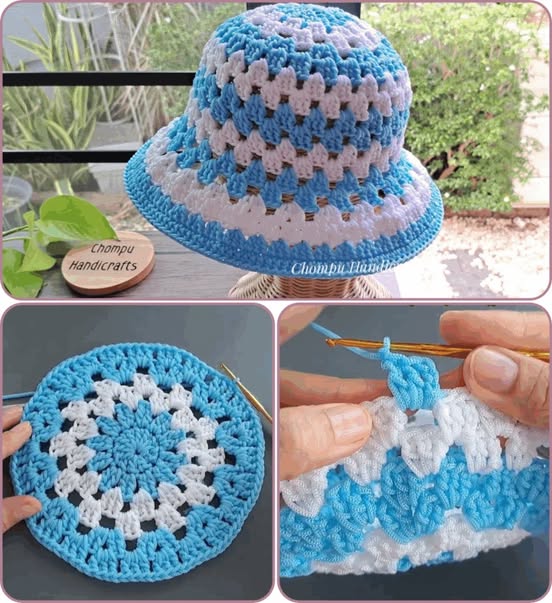
How to Make Crochet Sun Hat Tutorial is a delightful and creative guide for anyone who wants to stay stylish while enjoying sunny days.
Whether you’re heading to the beach, gardening, or taking a relaxing walk outdoors, a handmade crochet sun hat offers both fashion and function. This easy tutorial will help you make a beautiful and comfortable hat that protects you from the sun while adding a touch of personality to your outfit.
What makes this crochet sun hat tutorial so enjoyable is its simplicity and flexibility. You can customize the size, color, and design according to your personal taste, making each hat unique.
From boho-inspired patterns with wide brims to minimalist designs perfect for daily wear, this project allows you to unleash your creativity while practicing your crochet skills. Even if you’re a beginner, you’ll be surprised at how easy and fun it is to complete your own hat in just a few hours.
In this How to Make Crochet Sun Hat Tutorial, we’ll walk through every step in detail — from selecting the right materials and tools to mastering the stitches that form the perfect hat shape. By the end, you’ll have a stylish, handmade accessory that not only shields you from the sun but also showcases your love for crochet and handmade fashion. Let’s get started and create your new favorite summer hat!
Before beginning your How to Make Crochet Sun Hat Tutorial, make sure you have the right materials and tools. Using suitable yarn and hooks is essential for achieving the best shape and texture. The good news is that you don’t need many items, and most are easy to find at any craft or yarn store.
You’ll need lightweight cotton yarn, which is perfect for summer wear because it’s breathable and durable. Choose a light color, such as beige, cream, or pastel shades, to help reflect sunlight and keep your head cool. Cotton also gives the hat structure, helping it hold its shape even after multiple uses.
Next, select your crochet hook. Most crochet sun hat patterns use a 3.5mm to 4mm hook, but always check your yarn label for recommendations. Using the right hook ensures that your stitches are tight enough to create a sturdy brim but flexible enough for comfort.
Additional tools include scissors for trimming yarn ends, a tapestry needle for weaving in loose threads, and a stitch marker to help you keep track of your rounds. Optional accessories like a decorative ribbon, button, or small flower appliqué can be added later for a personal touch. With your materials ready, it’s time to start crocheting!
The steps in this How to Make Crochet Sun Hat Tutorial are simple and beginner-friendly. Each stage helps you gradually build the shape of the hat from the crown to the brim. You’ll mainly work in the round, which makes the process smooth and continuous.
Step 1: Start with a Magic Ring
Begin by creating a magic ring and working single crochet stitches into it. This forms the center of your hat’s crown. Tighten the ring gently to close the hole completely.
Step 2: Build the Crown
Continue working in the round, increasing your stitches evenly with each round. Typically, you’ll add about six stitches per round to maintain a flat circle. Once your circle reaches the desired diameter for the crown (usually 16–18 cm for adults), stop increasing.
Step 3: Form the Sides
Now that the crown is done, work evenly in single crochet rounds without increases. This forms the sides of the hat, which determine its height. For a typical sun hat, about 10–12 rounds are ideal, but you can adjust depending on how deep you want the hat to sit.
Step 4: Crochet the Brim
The brim is what gives your crochet sun hat its beautiful shape. Start increasing stitches again gradually. For a stiff and wide brim, increase more frequently; for a floppy, relaxed style, add fewer increases. Continue crocheting until the brim reaches your preferred width, usually between 5–10 cm.
Step 5: Finish and Decorate
Once your brim is complete, fasten off the yarn and weave in any loose ends. You can add decorations such as a crocheted flower, ribbon, or bow for an extra touch of charm. If you want a stiffer brim, apply fabric starch or a mixture of glue and water, then let it dry flat.
One of the best things about How to Make Crochet Sun Hat Tutorial projects is how easily they can be customized. You can change colors, textures, or even shapes to make your hat stand out and match your personal style.
Try using gradient or multicolored yarn for a playful, summery look. You can also crochet stripes using two or more contrasting colors for a trendy design. For a feminine touch, add a crocheted flower or lace border along the brim.
If you want your hat to have a more structured look, use raffia yarn instead of cotton. Raffia creates a firm texture that helps the brim hold its shape even in windy weather. This variation is especially popular for beachwear.
To create a casual bohemian style, use neutral or earthy tones like sand, olive, or tan. Add a decorative band made of jute twine or fabric around the crown for extra flair. The possibilities are endless, and every version will reflect your unique personality.
Even though How to Make Crochet Sun Hat Tutorial patterns are simple, there are a few tips that can make your project look professional and last longer. Following these suggestions ensures your hat maintains its shape and comfort.
Always check your gauge before starting. If your stitches are too loose, the hat may not hold its form. Too tight, and it might feel uncomfortable. Adjust your hook size if necessary.
Block your hat once it’s finished. Wet-blocking helps smooth out uneven stitches and gives your hat a polished, even appearance. Simply dampen it, shape it on a flat surface or head form, and let it dry naturally.
Consider adding an elastic band inside the edge of the hat for a more secure fit, especially if you plan to wear it outdoors. It prevents the hat from flying away on windy days.
Finally, store your crochet sun hat properly. Avoid folding or crushing it; instead, keep it hanging or stuffed with soft fabric to maintain its shape. These small steps will help your handmade creation last for many sunny seasons to come.
1. What is the best yarn for a crochet sun hat?
Cotton yarn is the best choice for crochet sun hats because it’s breathable, durable, and holds its shape well under the sun.
2. Can beginners make a crochet sun hat?
Yes! This How to Make Crochet Sun Hat Tutorial is beginner-friendly, using basic stitches like single crochet and double crochet.
3. How long does it take to make a crochet sun hat?
Depending on your speed, it usually takes about 3–5 hours to complete a hat from start to finish.
4. Can I make the brim stiffer?
Yes. Apply fabric starch, or mix glue and water to lightly coat the brim, then shape and dry it flat for a firm finish.
5. How can I size the hat correctly?
Measure your head circumference and adjust the number of crown increases until the fit feels comfortable.
6. Can I wash my crochet sun hat?
Hand wash it gently in cool water and let it air dry flat to keep its shape and texture intact.
Now that you’ve completed this How to Make Crochet Sun Hat Tutorial, you have everything you need to design your very own sun hat that’s both stylish and practical.
You’ve learned how to select the best materials, follow each step of the pattern, and customize your design for a perfect fit.
Whether you’re making one for yourself or as a thoughtful handmade gift, your crochet sun hat will surely become a favorite accessory for warm, sunny days. We’d love to hear your thoughts — share your honest opinion and any suggestions you have for improving future tutorials!


