Crochet Pig In A Granny Square Blanket Pattern


A crochet yoke is one of the most elegant and versatile elements you can add to a handmade garment. Whether you are designing a blouse, dress, or sweater, a crochet yoke not only gives structure to the piece but also adds beauty and personality.
Many crocheters love creating yokes because they allow endless design possibilities, from delicate lace patterns to bold textures that highlight your craftsmanship.
Learning how to make crochet yoke is an essential skill for anyone who wants to elevate their crochet projects. Unlike basic square or rectangular pieces, yokes are designed to shape garments around the neckline and shoulders, ensuring a perfect fit.
The best part is that you can adapt this technique to suit different styles, yarns, and levels of difficulty, making it accessible for both beginners and advanced crocheters.
Beyond being decorative, a crochet yoke serves a practical purpose. It distributes the weight of the garment evenly and allows flexibility in sizing, which is why it is so popular in modern crochet fashion. With the right stitch patterns, colors, and finishing touches, your crochet yoke can transform a simple top into a stunning handmade piece that you’ll be proud to wear or gift.
A crochet yoke is the section of a garment that sits around the neckline and shoulders, usually forming the upper part of a blouse, sweater, or dress. Unlike separate collars, the yoke is integrated into the garment and often worked in the round. This construction technique provides a seamless look, making the garment comfortable and visually appealing.
There are two main types of crochet yokes: round yokes and square/rectangular yokes. Round yokes are the most common, worked from the top down in continuous rounds, gradually increasing stitches to create the desired width. Square or rectangular yokes, on the other hand, are worked flat and then joined, offering a more geometric design.
Another key point in understanding how to make crochet yoke is the role of stitch patterns. Lacy stitches are often chosen for summer tops, giving the garment an airy and breathable quality, while denser stitches are ideal for winter wear, offering warmth and structure. The choice of stitch affects not only appearance but also comfort.
Yarn weight also plays a role in shaping a crochet yoke. Lighter yarns produce delicate designs, perfect for elegant blouses, while thicker yarns create bold, cozy yokes suitable for cold-weather garments. Selecting the right yarn ensures your project matches the occasion and season.
Fit is another aspect to keep in mind. Because yokes sit around the neck and shoulders, measuring carefully is essential. A well-fitted yoke ensures the garment looks professional and feels comfortable. Incorrect sizing can cause stretching or an awkward fit that ruins the overall look.
Finally, yokes often serve as the centerpiece of a garment. Even with simple body stitches, a detailed yoke instantly becomes the highlight. This is why crocheters often experiment with colors, lace motifs, or textured stitches in the yoke section to make their projects stand out.
The first step in making a crochet yoke is selecting your pattern. Beginners should start with simple designs, such as double crochet increases, while experienced crocheters can experiment with lace or motif-based yokes. Having a clear design in mind prevents mistakes later on.
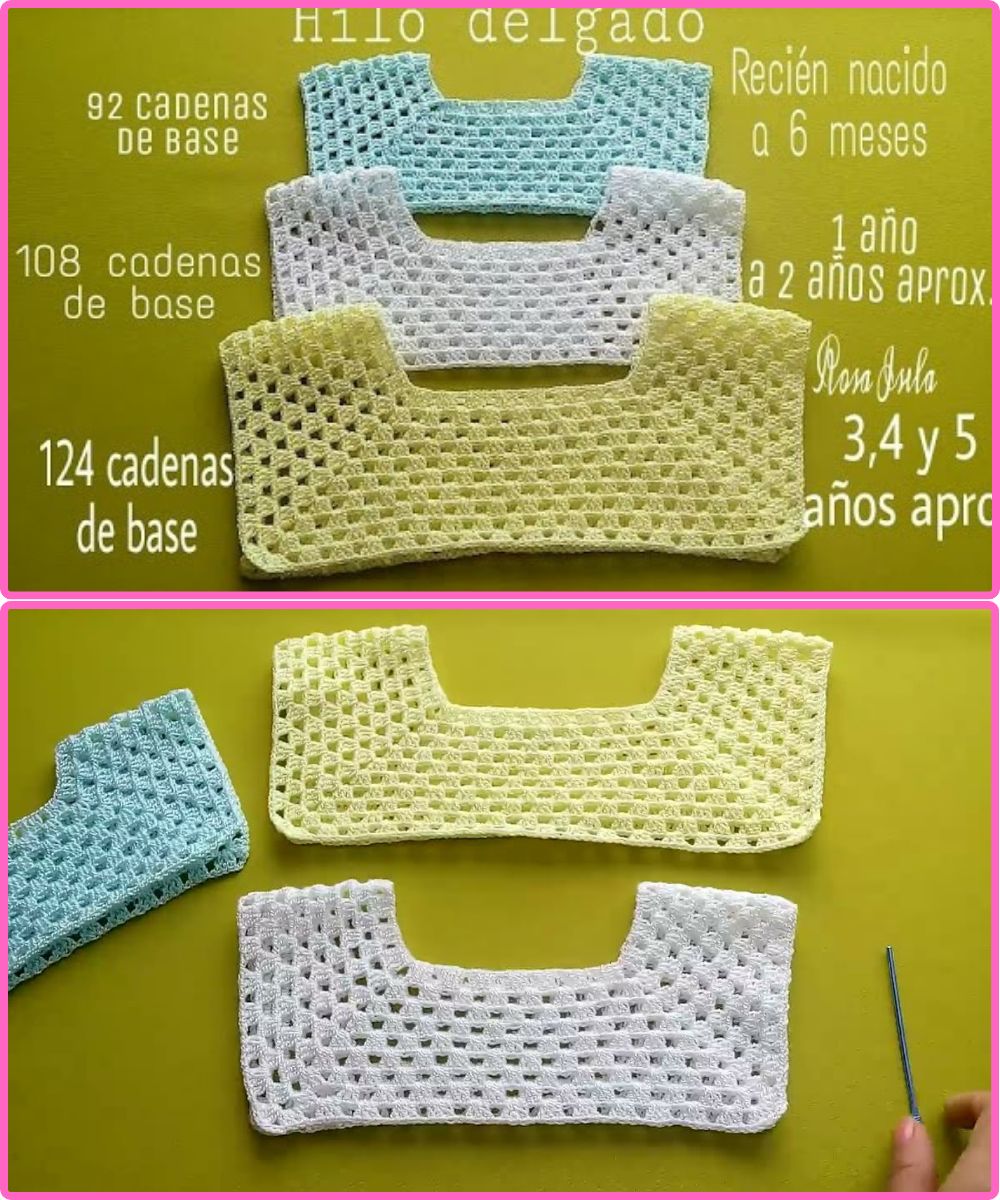
Start by making a foundation chain that matches the neckline measurement. For top-down round yokes, this usually involves creating a chain and joining it into a circle. For flat or square yokes, begin with a row of stitches that will form the base of the neckline.
Once the foundation is set, the next step is increasing stitches to create the widening shape of the yoke. Round yokes typically follow a regular increase pattern (such as adding stitches evenly every few rows), while square yokes may require increases at the corners to maintain shape.
Stitch choice is crucial at this stage. Simple stitches like double crochet or half-double crochet make for easy shaping, while shells, fans, or lace stitches add decorative elements. Crocheters can also experiment with color changes, striping, or combining textured stitches to give the yoke unique character.
After the yoke reaches the desired depth (usually from neckline to just above the bust or shoulder), you separate the stitches for sleeves and body. This process depends on whether you’re making a blouse, sweater, or dress. For sleeveless tops, the yoke transitions directly into the body section. For garments with sleeves, you leave gaps or chains where the arms will later be worked.
Finish the yoke by ensuring smooth transitions. Adding a round of single crochet or slip stitches around the neckline creates a neat edge, while decorative edging such as picots or scallops can enhance the design. Once the yoke is complete, you can continue working the rest of the garment with consistent stitches.
One of the joys of learning how to make crochet yoke is experimenting with different design ideas. For a delicate look, consider a lace yoke with open stitches such as chains, shells, and fans. This works beautifully for summer tops or evening blouses that need a touch of elegance.
For a bold and cozy garment, textured stitches like bobbles, clusters, or cables make the yoke stand out. These designs add dimension and warmth, making them perfect for sweaters and winter dresses. The texture naturally draws attention to the neckline area, adding sophistication.
Color play is another way to customize a crochet yoke. Using contrasting colors for the yoke and body creates a striking visual effect. Ombre yarns or gradient patterns also look stunning, as they flow naturally from the neckline down. For holiday or festive garments, bright reds, greens, or metallic yarns can bring seasonal cheer.
Motif-based yokes are another creative approach. Instead of crocheting in rounds, you can join motifs like squares, circles, or flowers to form the yoke. This method allows incredible design flexibility, letting you mix different motifs for a one-of-a-kind piece.
You can also add embellishments for extra charm. Beads, sequins, or even small embroidery details can be incorporated into the yoke, giving the garment sparkle and uniqueness. These little touches make handmade pieces feel even more special.
Lastly, consider functional variations. Some yokes include button closures at the back or front, which not only make the garment easier to wear but also add a stylish detail. Others use ties, ribbons, or lace-up features that double as decoration and adjustability.
To perfect your crochet yoke, start with accurate measurements. Measure your neckline and shoulders carefully before beginning. A yoke that is too tight will feel uncomfortable, while one that is too loose may not hold its shape.
Gauge swatches are essential. Since yarn weight and hook size can dramatically change the fit, crocheting a test swatch ensures that your stitches match the pattern’s requirements. Skipping this step often leads to sizing issues later.
Choose the right hook for the job. A slightly larger hook can make lace stitches more open and delicate, while a smaller hook keeps dense stitches tight and structured. Experimenting before starting the yoke helps achieve the desired result.
Blocking is another secret to success. Once the yoke is complete, lightly blocking it (pinning and shaping while damp) helps open up stitches and smooth uneven edges. This is especially important for lace designs, which truly shine after blocking.
If you’re new to yokes, start with simple patterns and gradually move to advanced ones. A basic double crochet yoke teaches the fundamentals of increases and shaping, while later projects can introduce complex lace motifs and decorative stitches.
Finally, patience and practice are key. Like all crochet techniques, mastering yokes takes time. Don’t hesitate to unravel and redo sections if needed. Each attempt sharpens your skills and brings you closer to creating the perfect handmade garment.
What is a crochet yoke?
It is the part of a garment that shapes the neckline and shoulders, often worked in the round or flat as the upper section of blouses, dresses, or sweaters.
Do I need to be advanced to make a crochet yoke?
No, beginners can start with simple yoke designs. As you gain experience, you can try more complex lace or motif-based yokes.
What yarn works best for crochet yokes?
Lightweight cotton or acrylic blends are popular for summer tops, while wool or thicker yarns are great for warm sweaters and winter garments.
How do I know if my yoke fits correctly?
Measure carefully before starting and check your gauge with a swatch. A good yoke should sit comfortably on the shoulders without pulling or sagging.
Can I make a yoke without a pattern?
Yes, experienced crocheters often design their own yokes by experimenting with increases, stitches, and motifs. However, beginners benefit from following patterns at first.
Can I add a crochet yoke to an existing garment?
Absolutely. Many people add crocheted yokes to fabric tops or dresses, creating unique mixed-material fashion pieces.
Do I have to block my crochet yoke?
Blocking is highly recommended, especially for lace or delicate stitch patterns. It ensures the yoke looks neat and professional.
Learning how to make crochet yoke opens up a world of creative possibilities for your handmade wardrobe. From simple designs for beginners to intricate lace and motif-based projects for experienced crocheters, yokes allow you to combine structure, beauty, and personalization in your garments.
By following the steps, tips, and ideas shared in this article, you can confidently start your journey into creating crochet yokes that not only fit perfectly but also highlight your skills.
Now it’s your turn—what kind of crochet yoke would you like to try first? Share your thoughts, opinions, and suggestions. Your feedback can inspire new designs and help others in the crochet community create even more stunning handmade garments.


