Crochet Pig In A Granny Square Blanket Pattern


The Lovely Crochet Birdie Decoration – A Fun and Charming Project is the perfect craft for anyone who loves crochet and home décor. This adorable little bird brings color, texture, and happiness wherever it is placed — from your living room to your workspace.
With just a bit of yarn, a hook, and some creativity, you can make a delightful flock of crochet birdies that will brighten any space or make thoughtful handmade gifts.
One of the most enjoyable things about the Lovely Crochet Birdie Decoration is how versatile it is. You can turn these little birds into ornaments, keychains, mobiles, or garlands.
Whether you’re a beginner learning basic stitches or an experienced crocheter experimenting with color and detail, this project offers room for creativity.
Each bird can be unique — from soft pastels to bold, bright shades — making it an excellent opportunity to use leftover yarn scraps from previous projects.
Crocheting these sweet birdies is not just relaxing; it’s also deeply rewarding. Watching a flat piece of yarn come to life as a cute 3D figure gives an incredible sense of satisfaction. The process encourages mindfulness and creativity, and the result — a cheerful handmade bird — becomes a lovely accent for your home or a heartfelt present. Let’s explore how to create this fun and charming project step by step.
Before starting your Lovely Crochet Birdie Decoration, gather all the essential materials. The most recommended yarn for this project is cotton or a soft acrylic blend. Cotton yarn gives your bird a neat finish and great stitch definition, while acrylic adds fluffiness and a cozy look. You’ll need a few colors — one for the body, one for the wings, and a contrasting color for the beak and eyes.
Choose a hook size that matches your yarn’s label, typically between 2.5mm and 3.5mm for smaller decorations. Using a smaller hook helps keep your stitches tight, preventing stuffing from showing through. If you plan to make a larger bird for wall or window décor, you can use thicker yarn and a larger hook for a softer texture.
Stuffing is also important — use polyester fiberfill or cotton stuffing to shape your bird. Make sure to stuff gently so it remains soft but not lumpy. You’ll also need a tapestry needle to sew parts together and weave in loose ends neatly.
For eyes, you can use small black safety eyes, beads, or simple embroidered stitches using black thread. If the bird is meant for children or pets, embroidery is safer than beads. A little pink blush on the cheeks (using yarn or fabric paint) can add a touch of cuteness and personality.
Finally, have some decorative accessories nearby. A small ribbon bow, a flower appliqué, or even a tiny crochet hat can make each Crochet Birdie Decoration special. These creative details transform a simple bird into a centerpiece of charm and joy.
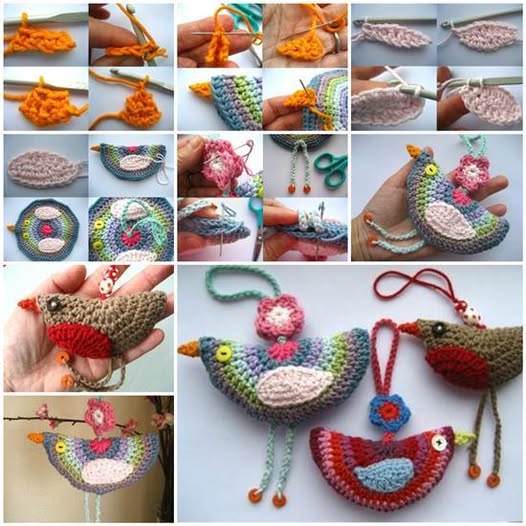
Start the Lovely Crochet Birdie Decoration – A Fun and Charming Project by making the body. Begin with a magic ring and work in continuous rounds using single crochet stitches. Increase gradually to create a rounded shape. The base forms the belly, and as you move upward, you’ll slightly decrease to close the top. Before closing completely, add stuffing to give the body a firm but soft structure.
Next, crochet the wings separately. Use a contrasting or complementary color to make them stand out. Work in small ovals or teardrop shapes, and once finished, sew or glue them symmetrically to the sides of the body. For a more dynamic look, position one wing slightly raised as if the bird is fluttering.
Now create the beak — a small triangle or cone shape worked in yellow or orange yarn. Attach it to the center front of the face. Then, add the eyes just above it, ensuring they’re evenly spaced. If you’re using safety eyes, secure them tightly before closing the head section.
The tail and feet are optional but add extra personality. The tail can be a small fan shape made with short chains and single crochets, while the feet can be embroidered or made with twisted yarn cords.
Once all parts are attached, finish by weaving in all ends securely. Fluff the stuffing evenly and gently press the shape to adjust proportions. You now have a cute handmade crochet birdie that’s ready to decorate your space.
One of the best parts of making a Lovely Crochet Birdie Decoration is deciding how to display it. These versatile creations can be used in countless ways to add a touch of handmade charm to your surroundings.
You can turn them into ornaments for Christmas trees, Easter branches, or springtime wreaths. By attaching a loop of yarn or ribbon, they can hang beautifully anywhere — from door handles to car mirrors.
Another great idea is to make a garland. Crochet several birdies in different colors and connect them with a chain or string. Hang the garland above a crib, along a wall, or across a window for a cheerful decorative accent.
For a nursery, these birdies are perfect companions. Their soft, rounded shape and cute expression make them safe and comforting décor items. You can even personalize them with embroidered initials or little heart motifs.
If you prefer practical crafts, turn your bird into a keychain or bag charm. Attach a metal clasp and carry your crochet art wherever you go. It’s also a thoughtful handmade gift for friends and family — simple yet full of love.
Lastly, use them as table decorations or photo props. During special occasions like baby showers, spring celebrations, or birthdays, these crochet birdies bring warmth and creativity to any event.
To achieve the best results with your Lovely Crochet Birdie Decoration, pay attention to details during each stage of the process. The tightness of your stitches matters — if they’re too loose, the stuffing may show; if they’re too tight, shaping becomes difficult. Practice finding the right balance before starting.
Use stitch markers to keep track of rounds, especially since amigurumi-style projects are worked in continuous spirals. This prevents uneven shapes and helps maintain symmetry.
Experiment with color combinations. Try soft pastel shades for a delicate, dreamy look, or bold tones for modern décor. Mixing variegated yarns can also create a playful pattern without changing yarns frequently.
Add personality with embroidery. Tiny eyes, a curved smile, or rosy cheeks instantly give life to your bird. You can even add little wing stitches or dots to imitate feathers.
When assembling, use invisible stitches for a seamless finish. This makes your bird look neat and professional. Take your time sewing on the wings, beak, and other parts — symmetry enhances the final result.
And most importantly, enjoy the process. Crocheting these Lovely Birdie Decorations is not only about crafting an object — it’s about creating joy, relaxing your mind, and celebrating handmade beauty.
What skill level is needed for this crochet birdie?
This project is beginner-friendly. Basic knowledge of single crochet, increases, and decreases is enough to complete it.
What type of yarn works best?
Cotton yarn is ideal for a smooth finish, while acrylic adds softness. You can also use leftover yarn scraps for colorful variations.
Can I make the bird without stuffing?
Yes! You can make a flat version for appliqués, bookmarks, or wall hangings. Simply skip the stuffing step and sew both sides together.
Is this pattern safe for babies?
Yes, if you embroider the eyes instead of using beads or safety eyes. Always ensure all parts are securely attached.
How can I make my crochet birdie unique?
Play with colors, add tiny accessories like bows or flowers, and embroider cute expressions to give each bird its own character.
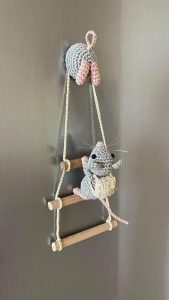
Can I turn my bird into a mobile or garland?
Absolutely. String several birdies together using yarn or fishing line and hang them for a delightful, airy decoration.
How long does it take to make one?
On average, it takes 1–2 hours depending on your experience. Smaller birds take less time, while detailed ones may take longer.
Can I sell my finished crochet birdies?
Yes, handmade items like these make great market or craft fair products. Just be sure to credit the free pattern if you use one.
The Lovely Crochet Birdie Decoration – A Fun and Charming Project is an enjoyable, relaxing, and creative craft for anyone who loves handmade décor. With simple stitches, a few supplies, and imagination, you can make adorable crochet birds that add warmth and happiness to any space.
Whether you’re crafting for yourself or creating gifts for others, each bird becomes a unique symbol of love and creativity. Try different colors, add personal touches, and experiment with new display ideas.
We hope this article inspired you to start your own crochet birdie project! Share your honest opinions, experiences, and suggestions — your creativity may inspire someone else to pick up a hook and start crocheting today.


