Crochet Pig In A Granny Square Blanket Pattern


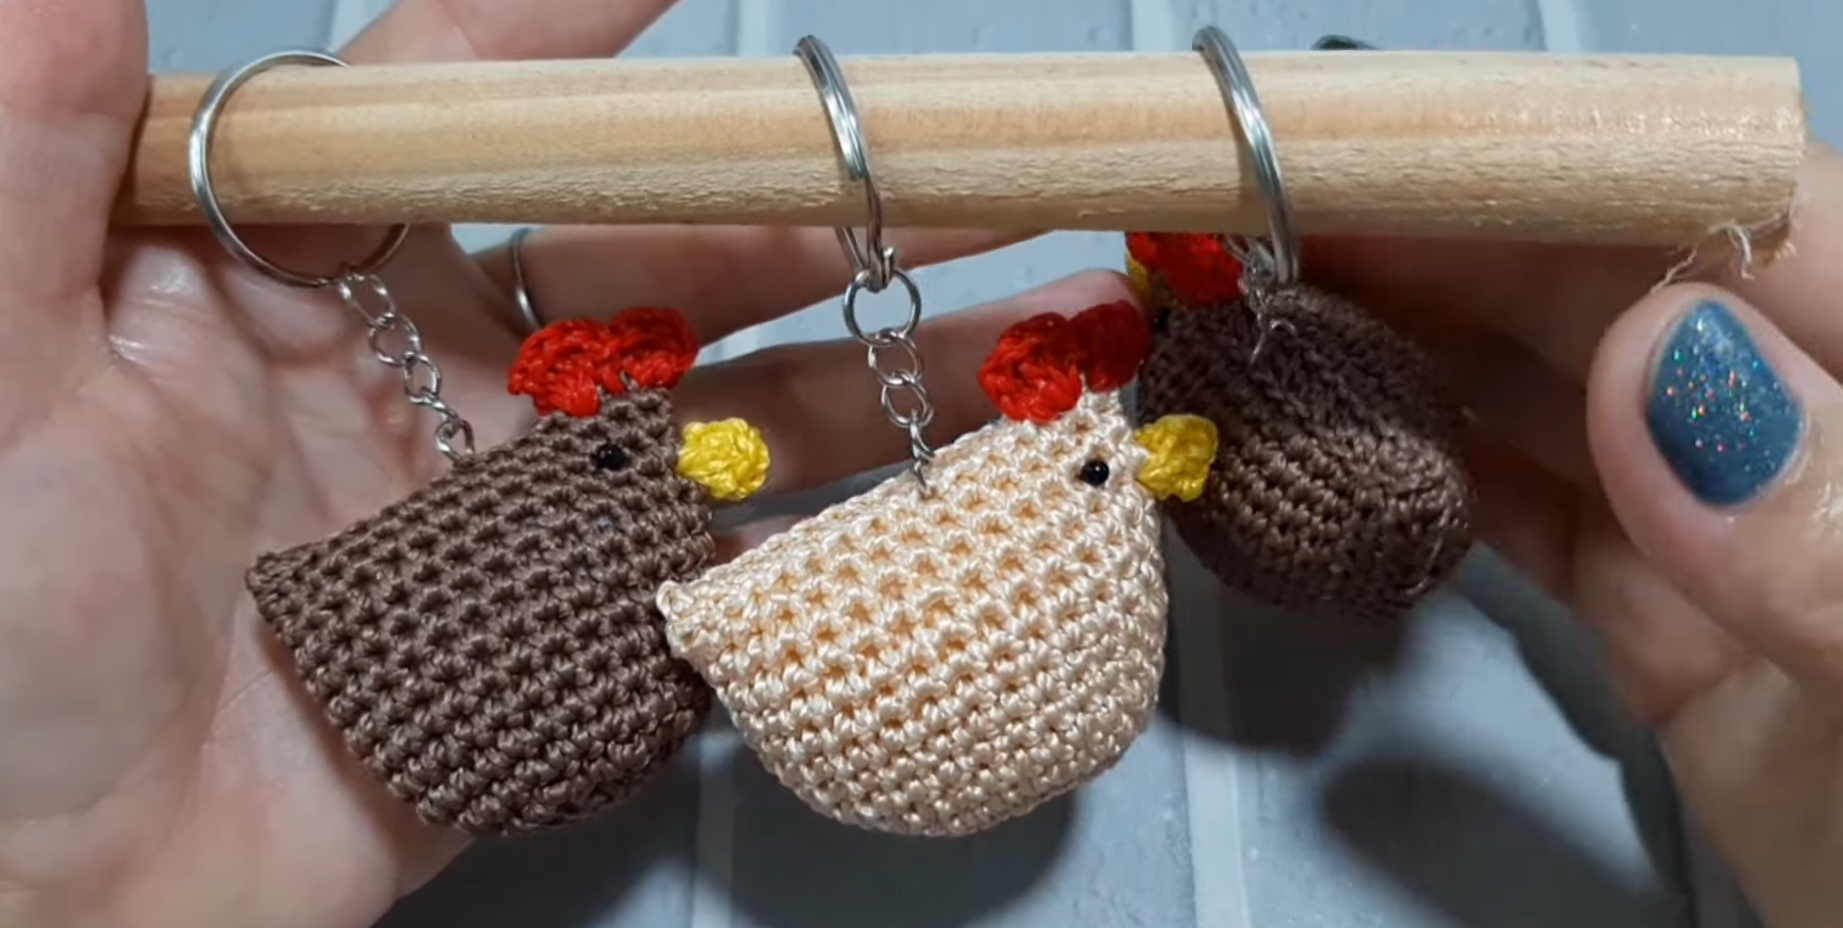
Mini Crochet Chicken Keychain – Easy and Quick to Make is one of the cutest and most enjoyable crochet projects you can try, even if you’re just starting out.
This adorable little chicken makes the perfect keychain, bag charm, or small handmade gift. With only a few simple stitches and materials, you can create something that’s both fun and practical.
These mini crochet chickens are lightweight, colorful, and can be made in just a few minutes, making them ideal for quick crochet sessions or selling at craft fairs.
One of the great things about making a Mini Crochet Chicken Keychain is that it uses very little yarn. You can use leftover scraps from other projects and turn them into something unique and charming.
Each keychain can be customized with different colors, expressions, or small accessories like bows or hats, allowing your creativity to shine. These mini chickens also make wonderful gifts for Easter, birthdays, or anyone who loves cute handmade crafts.
In this Mini Crochet Chicken Keychain – Easy and Quick to Make tutorial, you’ll learn step by step how to crochet your own tiny chicken. We’ll cover the materials, the basic stitches, and how to assemble the parts into an adorable finished keychain. Whether you’re a beginner or an experienced crocheter looking for a quick project, this guide will help you make your own flock of mini chickens in no time.
Before you start crocheting, make sure you have all the materials you need. For this Mini Crochet Chicken Keychain – Easy and Quick to Make project, you’ll only need a few basic supplies. Gather your yarn, hook, and keychain hardware to get started.
Use small amounts of soft acrylic or cotton yarn in white, yellow, orange, and red colors. White or yellow will be the main body, orange for the beak and feet, and red for the comb. Choose lightweight yarn (like DK or sport weight) for the best results, as it will help your chicken remain small and detailed.
A crochet hook size 2.5mm or 3mm works perfectly for this project. You’ll also need a yarn needle for sewing, scissors for cutting yarn, and a small amount of fiberfill or cotton stuffing to give the chicken its shape. Finally, grab a small metal keychain ring and jump ring to attach your finished chicken.
If you want to make your Mini Crochet Chicken Keychain even more unique, you can add small safety eyes or embroider the eyes with black thread. You can also glue a tiny felt heart or add a ribbon around its neck for decoration. Once you’ve prepared everything, you’re ready to start crocheting your mini chicken!
Now that you have your materials ready, it’s time to start the fun part—making your Mini Crochet Chicken Keychain – Easy and Quick to Make. This project is made up of small, simple pieces that come together to form the cute chicken shape.
Start with the chicken’s body. Using your main yarn color (white or yellow), make a magic ring and work six single crochet stitches into it. Continue crocheting in the round, increasing in each round until your piece forms a small ball shape. Once you reach the desired size, stuff it lightly with fiberfill before closing it off.
Next, crochet the wings. Make two small oval shapes using the same color as the body. You can do this by chaining four stitches and working single crochet stitches along both sides of the chain. Attach the wings to the sides of the chicken using your yarn needle.
For the beak, use orange yarn. Chain two or three stitches and slip stitch back to the start to create a tiny triangle. Sew it to the front of the chicken’s head. Then, with red yarn, make a small wavy comb on top of the head using simple loops or chains.
Finally, add the feet by making two short pieces of orange yarn tied at the bottom of the chicken. Insert the safety eyes or embroider small eyes just above the beak. Once assembled, your Mini Crochet Chicken Keychain will look adorable and full of personality!
Now that your mini chicken is crocheted and stuffed, it’s time to turn it into a keychain. This part of the Mini Crochet Chicken Keychain – Easy and Quick to Make process is simple and fast.
Using a metal jump ring, attach the keychain ring securely to the top of the chicken’s head. If you’ve made a small loop with yarn or a chain, you can use it to connect the ring easily. Ensure it’s tightly attached so it won’t come loose when used daily.
You can add extra touches like a small bell, bead, or charm to make your keychain more decorative. A drop of clear glue on the knot can help strengthen the attachment. If you prefer, crochet a small chain strap in a contrasting color for a more handmade look.
Once the keychain is assembled, gently shape your chicken with your hands and adjust the stuffing if needed. Fluff the wings and straighten the comb. Your Mini Crochet Chicken Keychain is now complete and ready to use or gift!
These little crochet chickens can also serve as ornaments, zipper pulls, or decorations for gift wrapping. The versatility of this project makes it an all-time favorite for crochet lovers who enjoy quick, adorable crafts.
There are countless ways to personalize your Mini Crochet Chicken Keychain – Easy and Quick to Make. You can change the colors to match your mood or the season, like making pastel chickens for Easter or red and green ones for Christmas.
Add accessories like small hats, scarves, or bows to give your chickens personality. If you enjoy amigurumi-style crochet, you can even make an entire set of farm animals—cows, pigs, ducks—to go along with your chicken. They make fantastic gifts or craft fair items.
Another idea is to crochet a matching chicken family set: a big one for decoration and smaller ones as keychains. You can even fill them with lavender or scented stuffing to create cute, fragrant accessories. The possibilities are endless!
This project also makes an excellent beginner’s crochet pattern because it helps practice shaping, sewing, and working with small parts. Plus, it’s fast, portable, and uses minimal yarn. You can make several in an afternoon, ready to gift or sell.
1. What type of yarn is best for a Mini Crochet Chicken Keychain?
Lightweight cotton or acrylic yarn works best since it keeps the chicken small and easy to shape.
2. Can I make this project if I’m a beginner?
Yes! The Mini Crochet Chicken Keychain – Easy and Quick to Make uses only basic stitches like single crochet and slip stitch, perfect for beginners.
3. How long does it take to make one chicken keychain?
On average, it takes 30 to 45 minutes to complete one, depending on your skill level.
4. Can I wash my crochet chicken keychain?
Yes, but hand wash gently in cold water and let it air dry to keep its shape.
5. What can I use instead of safety eyes?
You can embroider eyes with black thread or use tiny black beads for a handmade look.
6. Can I sell the finished chickens?
Absolutely! These are great for craft fairs, online shops, or as handmade gifts.
Making a Mini Crochet Chicken Keychain – Easy and Quick to Make is a fun, fast, and satisfying crochet project for all skill levels. You’ve learned how to create the chicken’s body, wings, and cute facial features, as well as how to assemble it into a durable keychain.
Each tiny chicken you make can carry its own charm and personality, making it a thoughtful handmade item. Try experimenting with different colors and accessories to create your own adorable collection.
We hope you enjoyed this step-by-step guide! Don’t forget to share your honest opinion and suggestions — your feedback helps make every project even better.


