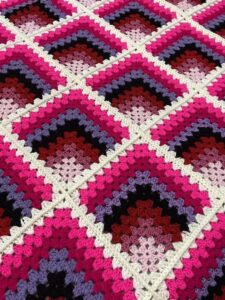
Crochet Pig In A Granny Square Blanket Pattern


Creating a Minnie Mouse Amigurumi is a delightful and rewarding experience for any crochet enthusiast. From beginners to advanced crafters, this charming handmade doll captures the essence of Minnie Mouse’s iconic design.
By following specific steps, choosing the right yarn, and using quality crochet hooks, crafters can achieve a beautiful result.
Moreover, crafting a Minnie Mouse Amigurumi encourages creativity and personalization. Crafters can adjust colors, sizes, and even accessories to reflect their unique style.
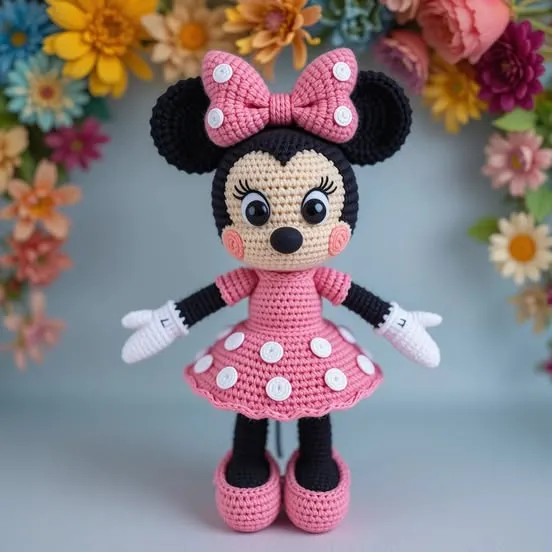
Selecting the right materials is the first step in creating a successful Minnie Mouse Amigurumi. The choice of yarn is crucial, as it determines the texture, softness, and durability of the doll. Most crafters prefer using cotton or acrylic yarns because they are easy to work with and maintain their shape over time. It’s important to pick colors that match Minnie Mouse’s iconic look, such as black for her ears, red for her dress, and white for her gloves.
Equally important are the crochet hooks. Different hook sizes produce varying tension and stitch size, impacting the final appearance of the Minnie Mouse Amigurumi. A slightly smaller hook than recommended for the yarn ensures tight stitches, preventing stuffing from showing through. This detail enhances the doll’s polished and professional appearance, giving it a more lifelike and consistent look.
Stuffing is another critical factor. Using polyester fiberfill provides a soft yet firm structure for Minnie Mouse. It allows the doll to maintain its shape while remaining cuddly. Stuffing evenly and carefully ensures the doll looks balanced, especially in areas like the head, arms, and legs. Overstuffing or uneven stuffing can distort the proportions of the Minnie Mouse Amigurumi, so attention to detail is essential.
Safety eyes and facial features also play a role in achieving an appealing look. For younger children, embroidered eyes may be safer than plastic ones. Adding small stitched details, such as eyelashes and a tiny smile, helps capture Minnie Mouse’s signature expression. Choosing high-quality materials ensures that the Minnie Mouse Amigurumi is both beautiful and durable for years of enjoyment.
Understanding basic crochet stitches and techniques is essential for making a Minnie Mouse Amigurumi. The most common stitches include the chain stitch, single crochet, increase, and decrease. These fundamental techniques allow crafters to shape the doll’s body, head, and limbs accurately. Mastering these stitches ensures even tension and consistency throughout the project.
Working in rounds is another critical technique. Amigurumi dolls are typically crocheted in a spiral, starting from the top or bottom. This method helps create a smooth, seamless surface for the Minnie Mouse Amigurumi, avoiding visible seams that could detract from its appearance. Counting stitches carefully during each round prevents errors and maintains the correct proportions.
Joining pieces together is an essential step in the assembly process. Once all parts, including the head, body, arms, legs, and ears, are completed, they must be sewn together neatly. Using a yarn needle and matching yarn ensures secure attachment and a polished finish. Correct assembly brings the Minnie Mouse Amigurumi to life, making it look cohesive and professional.
Color changes are also important for achieving Minnie Mouse’s iconic look. Techniques such as carrying yarn or switching colors between rounds allow for smooth transitions. Attention to color placement ensures that the bow, dress, and gloves are correctly highlighted. Learning these techniques enhances the overall quality of the Minnie Mouse Amigurumi, making it visually striking and accurate.
Crochet tension plays a significant role in shaping the doll. Too tight stitches may make the doll stiff, while loose stitches may create gaps. Practicing consistent tension ensures the Minnie Mouse Amigurumi is both durable and aesthetically pleasing. With patience and practice, even beginners can achieve professional-looking results.
One of the most exciting aspects of creating a Minnie Mouse Amigurumi is customization. Crafters can personalize the doll by adding unique details, such as a tiny skirt, a bow of a different color, or even themed accessories like a miniature handbag. Customization allows each doll to have its own personality while staying true to Minnie Mouse’s classic design.
Size variations are another way to customize your project. Some crafters prefer small dolls suitable for keychains or decorative purposes, while others create larger, huggable versions. Adjusting the yarn weight, hook size, and number of stitches allows for scalable creations. Regardless of size, maintaining proportionality is key to ensuring the Minnie Mouse Amigurumi looks adorable and well-crafted.
Adding textures can also enhance the doll’s appeal. For instance, using fluffy or textured yarn for the skirt or bow can give a playful and soft appearance. Small embroidery details or sewn-on embellishments further elevate the design. Thoughtful customization makes your Minnie Mouse Amigurumi truly one-of-a-kind, reflecting your personal creativity.
Color schemes offer endless possibilities for customization. While traditional red, black, and white are classic, experimenting with pastel colors or glittery yarn can create a unique aesthetic. This flexibility allows crafters to design dolls for special occasions, holidays, or themed collections. Customized color choices ensure the Minnie Mouse Amigurumi aligns perfectly with the creator’s vision.
Adding removable accessories is another creative approach. Small hats, scarves, or miniature shoes can be attached and removed for imaginative play. This interactive element makes the Minnie Mouse Amigurumi more engaging for children and collectors. Thoughtful accessory design also improves the doll’s versatility and charm.
Personalizing facial expressions can give your doll a distinctive personality. Slight variations in embroidered eyes, smiles, or eyelashes create subtle differences that make each Minnie Mouse Amigurumi unique. These small details make the doll feel alive, enhancing the emotional connection for the owner.
Proper care ensures that your Minnie Mouse Amigurumi lasts for years. Regular cleaning with a gentle hand wash helps maintain the yarn’s softness and color. Avoiding harsh chemicals and high temperatures prevents damage to delicate fibers and preserves the doll’s integrity.
Storing the doll correctly is equally important. Keeping it in a dry, cool place prevents mold and discoloration. Avoid exposing the Minnie Mouse Amigurumi to direct sunlight for long periods, as it can fade the colors and weaken the yarn fibers over time.
Repairs may occasionally be needed, especially if the doll is used frequently. Small stitching repairs or reinforcing seams help maintain the doll’s structure. With regular maintenance, your Minnie Mouse Amigurumi can remain a treasured keepsake or collectible item.
Displaying your doll can also be a form of care. Placing it on a shelf, in a display case, or as part of a themed collection keeps it safe from damage. Proper display enhances the visual appeal of the Minnie Mouse Amigurumi while protecting it from wear and tear.
Handling the doll with clean hands prevents dirt and oils from transferring to the yarn. Gentle handling ensures the doll’s features remain intact and maintains its original charm. Establishing a routine of careful use prolongs the life of your Minnie Mouse Amigurumi.
Rotating the doll in collections or play areas prevents excessive wear on specific parts. Regularly changing its position ensures even aging and reduces the risk of yarn stretching or deforming. These simple steps guarantee the Minnie Mouse Amigurumi remains beautiful for years to come.
Q1: What skill level is needed to make a Minnie Mouse Amigurumi?
A1: While beginners can attempt a Minnie Mouse Amigurumi, having basic crochet knowledge, such as single crochet and working in rounds, is recommended.
Q2: How long does it take to make a Minnie Mouse Amigurumi?
A2: Depending on size and complexity, it can take anywhere from a few hours to several days. Larger dolls with detailed accessories require more time.
Q3: Can I use different yarn types for Minnie Mouse Amigurumi?
A3: Yes. Cotton and acrylic yarns are preferred for durability and softness, but creative choices like textured or plush yarn are also possible.
Q4: How do I attach the parts of Minnie Mouse Amigurumi securely?
A4: Use a yarn needle and matching yarn to sew the head, arms, legs, ears, and accessories together. Tight and even stitches ensure durability.
Q5: Is it safe for children?
A5: Yes, but consider embroidering facial features instead of using plastic safety eyes for small children to prevent choking hazards.
Q6: Can I customize Minnie Mouse Amigurumi?
A6: Absolutely. You can change colors, add accessories, and modify facial expressions to make it unique and personal.
Q7: How do I clean a Minnie Mouse Amigurumi?
A7: Hand wash gently with mild detergent, rinse thoroughly, and air dry. Avoid high temperatures and harsh chemicals.
From choosing the right materials to mastering crochet techniques, customization, and proper care, every step contributes to a charming and durable finished product.
By following the tips and guidelines in this article, you can successfully craft a beautiful Minnie Mouse Amigurumi that reflects your personal style and creativity.
Share your results, leave an honest opinion, and provide suggestions for future projects, helping the crafting community grow and inspire others.


