Crochet Pig In A Granny Square Blanket Pattern


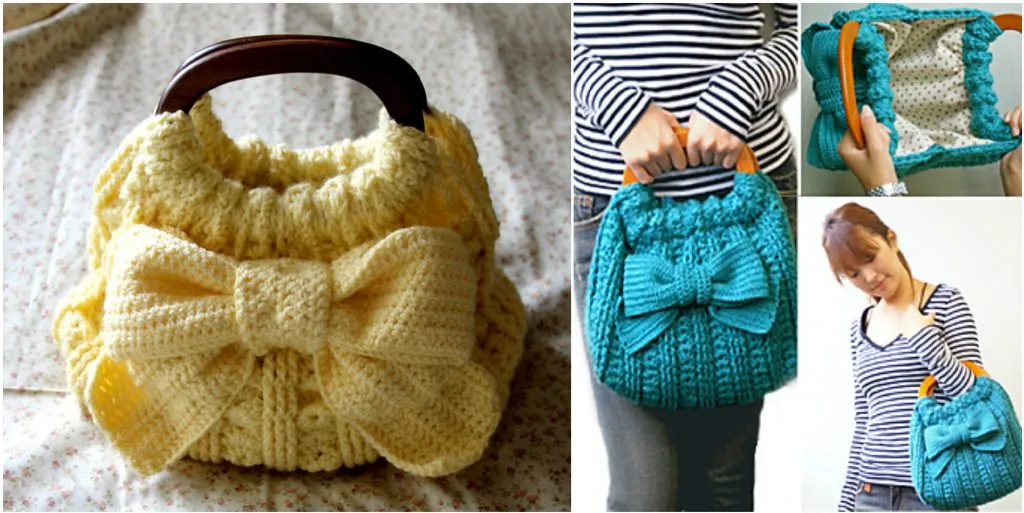
The Ribbon Accent Bag – Free Pattern is a delightful project for crocheters looking to create a stylish and functional accessory. This bag combines simplicity with charm, featuring decorative ribbons that add a unique flair to a classic design.
With this free pattern, both beginners and experienced crocheters can follow clear, step-by-step instructions to craft a beautiful bag suitable for daily use or gifting.
Crocheting a Ribbon Accent Bag allows you to explore color combinations, textures, and design elements. The ribbons provide a playful contrast to the yarn, enhancing the overall aesthetic of the bag.
This bag is versatile and can be customized in size, yarn type, and ribbon color. Whether you prefer bold, bright hues or soft, neutral tones, the Ribbon Accent Bag – Free Pattern allows for personal expression. Its compact yet roomy design makes it perfect for carrying essentials, from keys and wallets to small crafting supplies.
The first step in making your Ribbon Accent Bag – Free Pattern is selecting the right materials. Start with medium-weight cotton or canvas fabric, which provides both structure and durability. Consider using a lining fabric as well to give your bag a polished interior.
Before starting the Ribbon Accent Bag, gather all necessary materials. You’ll need medium-weight yarn, a crochet hook suitable for your yarn, a yarn needle, scissors, and coordinating ribbons for decoration. Choosing a yarn that holds shape well ensures the bag remains structured and durable.
The ribbon accents can be woven through the stitches, tied in bows, or threaded along the bag’s edge. Satin, grosgrain, or cotton ribbons work beautifully depending on the look you want to achieve. Matching the ribbon color with your yarn or selecting a contrasting shade creates visual interest.
Other optional materials include buttons, lining fabric, or magnetic snaps if you prefer a closed bag. These extras can enhance functionality and provide a polished, professional finish.
Organize your tools and materials before starting. This preparation ensures a smooth crochet experience and allows you to focus on following the Ribbon Accent Bag – Free Pattern step by step.
Apply interfacing to the wrong side of the outer fabric if you want extra stability. This step is optional but recommended, especially if your fabric is soft or thin.
With all pieces cut and prepped, start assembling the bag by attaching the ribbon. Place the ribbon on the right side of the outer fabric where desired and secure it with pins before sewing it down.
Topstitch the ribbon carefully to keep it flat and avoid puckering. You can sew multiple ribbons or create a bow detail depending on your style.
The Ribbon Accent Bag is created using simple crochet stitches, making it accessible to beginners. Begin by chaining a base foundation that corresponds to your desired bag width. Work in rows of single or half-double crochet to build the bag’s body.
Once the base is complete, continue crocheting upward to create the bag’s height. Maintain consistent tension to ensure even rows and a neat, professional appearance. The pattern may include stitch variations to add texture or decorative elements to the bag body.
Adding the ribbon accent is a key feature of this bag. Weave the ribbon through stitches along the top edge or around the middle section. Secure it with knots or bows to prevent slipping. This simple addition elevates the bag’s design, making it look sophisticated and stylish.
For handles, crochet straps directly onto the bag or attach pre-made straps. Ensure they are securely fastened to support the weight of items carried in the bag.
Finish by weaving in loose yarn ends and blocking the bag if necessary. Blocking can help smooth uneven stitches and shape the bag properly. Once complete, your Ribbon Accent Bag is ready for use or gifting.
The Ribbon Accent Bag – Free Pattern allows for numerous customizations. You can change the yarn type, using cotton for a lightweight bag or acrylic for durability. Adjust the bag size to create mini versions, tote bags, or larger storage bags.
Experiment with different ribbon types and colors. Contrasting ribbons make the accent pop, while matching colors create a subtle, elegant effect. You can also layer multiple ribbons for added texture and visual interest.
Try adding pockets or lining to increase functionality. A fabric lining prevents small items from slipping through the stitches and gives the bag a more professional finish.
Decorative elements like buttons, tassels, or charms can be attached to the ribbon or the bag itself. These details personalize your creation and make it unique.
Consider alternating stitch patterns for variety. For example, a row of shells or clusters can add texture, complementing the ribbon accent beautifully.
Finally, always measure as you go. Ensuring the bag’s width, height, and strap length match your intended design helps maintain proportion and usability.
Creating the Ribbon Accent Bag is both practical and enjoyable. It’s a functional accessory that can be used daily, while also serving as a creative outlet. The process enhances your crochet skills, including stitch consistency, pattern reading, and finishing techniques.
The ribbon accent introduces a design element that encourages creativity. Experimenting with colors, textures, and ribbon placement allows you to explore different artistic choices in a simple project.
Making this bag also promotes mindfulness. The repetitive motions of crocheting combined with the satisfaction of seeing your project take shape can reduce stress and foster relaxation.
Gifting a handmade Ribbon Accent Bag demonstrates thoughtfulness and effort, making it a cherished present for friends or family. The bag’s versatility ensures it appeals to various tastes and preferences.
The project’s simplicity means it can be completed in a relatively short amount of time, providing instant gratification and motivation for future crochet projects.
Finally, using a free pattern allows you to enjoy these benefits without the cost of purchasing instructions, making this a perfect project for hobbyists of all levels.
Q: Is the Ribbon Accent Bag suitable for beginners?
A: Yes, it uses basic stitches and includes a simple step-by-step layout, making it beginner-friendly.
Q: What types of yarn work best?
A: Medium-weight cotton or acrylic yarns are ideal, as they provide structure and durability.
Q: Can I change the ribbon color?
A: Absolutely! Choose matching or contrasting ribbons depending on your style preference.
Q: How do I make the bag larger or smaller?
A: Adjust the number of foundation chains for width and the number of rows for height.
Q: Can I add pockets or lining?
A: Yes, fabric lining or crochet pockets can enhance functionality and give a polished finish.
Q: How do I secure the ribbon?
A: Weave the ribbon through the stitches and tie knots or bows to keep it in place.
Q: Can I gift this bag?
A: Definitely. Handmade Ribbon Accent Bags make thoughtful, personalized gifts for any occasion.
By following this free pattern, you can craft a bag that reflects your personal taste, experiment with colors and textures, and enhance your crochet skills. Whether for personal use or as a thoughtful gift, this bag is a rewarding project that will bring joy to both maker and recipient.
We’d love to hear your honest feedback and suggestions! Share your experience, favorite ribbon combinations, or any tips that helped perfect your Ribbon Accent Bag. Your input can inspire others and encourage creativity in the crochet community.


