Crochet Pig In A Granny Square Blanket Pattern


Simple Relief Butterfly – Crochet Pattern is a delightful guide for crochet enthusiasts who want to create a beautiful and textured butterfly design.
The Simple Relief Butterfly – Crochet Pattern offers an easy-to-follow tutorial, allowing crafters of all skill levels to create an intricate yet accessible project.
This pattern is perfect for decorating blankets, clothing, accessories, or home décor with a touch of elegance. By following this Simple Relief Butterfly – Crochet Pattern, you will craft a butterfly that is both charming and visually striking.
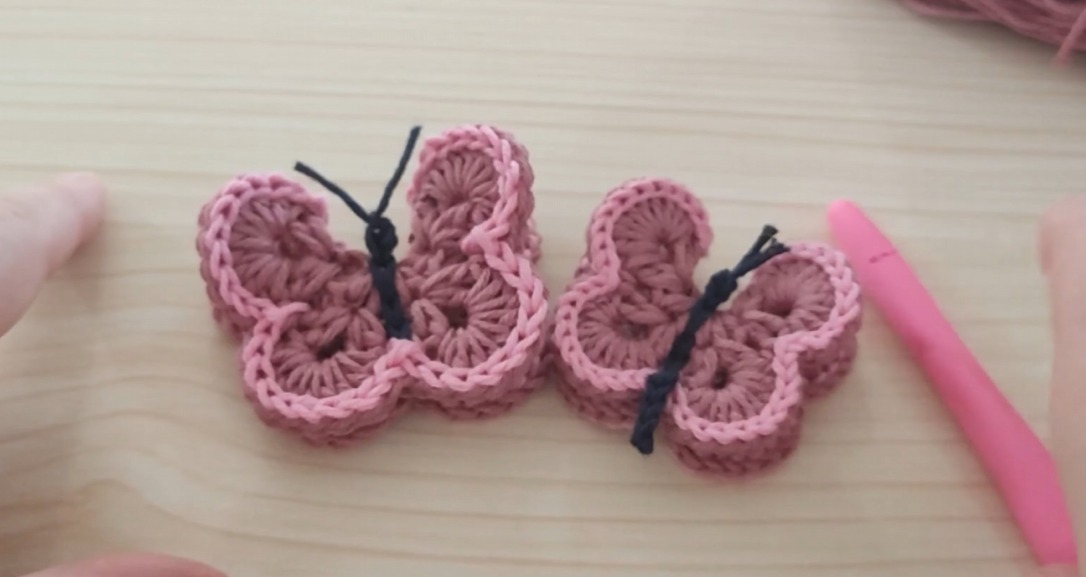
The Simple Relief Butterfly – Crochet Pattern emphasizes the use of relief stitches, which give the butterfly a 3D effect, making it stand out in any project.
Understanding basic crochet stitches, such as single crochet, half double crochet, and front or back post stitches, is essential for this pattern. The tutorial also guides you in selecting yarn and hook size, ensuring your butterfly maintains its shape while remaining soft and flexible.
Creating a butterfly using the Simple Relief Butterfly – Crochet Pattern is a rewarding creative process. The pattern encourages experimentation with colors, textures, and stitch combinations. Choosing bright, vibrant hues or subtle pastels allows each butterfly to have its own personality. This pattern ensures that whether used as a standalone motif or part of a larger design, your Simple Relief Butterfly will be elegant, detailed, and durable.
To complete the Simple Relief Butterfly – Crochet Pattern, gathering the proper materials and tools is essential. The tutorial recommends lightweight or medium-weight cotton yarn for its smooth texture and ability to maintain shape. Cotton yarn highlights the relief stitches and ensures the butterfly has crisp, well-defined edges.
The project also requires a crochet hook suitable for the chosen yarn, usually between 2.5 mm and 4 mm, depending on the yarn’s thickness. Additional tools include scissors, stitch markers, and a yarn needle for weaving in ends. The Simple Relief Butterfly – Crochet Pattern emphasizes that having the right tools improves efficiency and produces a professional finish.
Color selection is important for this pattern. Using contrasting colors for the wings or a gradient of tones can enhance the visual appeal. The tutorial provides guidance on combining colors to create depth and dimension in your butterfly design.
Optional materials include beads, embroidery thread, or small sequins for decorative accents. These can add sparkle and interest to the butterfly, making your Simple Relief Butterfly – Crochet Pattern unique and eye-catching.
Finally, a comfortable workspace with good lighting ensures precision while working with intricate stitches. Preparation and organization make the process smoother, allowing you to focus on creating detailed and accurate motifs.
The Simple Relief Butterfly – Crochet Pattern begins with the body. Create a small chain and work in single crochet stitches to form a firm and narrow body for the butterfly. The body acts as the foundation for attaching the wings.
Next, the wings are crocheted separately or directly onto the body, depending on your preferred method. The tutorial explains how to use front and back post stitches to create relief and texture, giving the wings a realistic, 3D appearance.
Shaping the wings is crucial in the Simple Relief Butterfly – Crochet Pattern. Increases and decreases in stitch count create curves and angles that mimic the natural flow of butterfly wings. This ensures the final motif looks balanced and elegant.
Adding details such as wing patterns, borders, or small decorative stitches enhances the butterfly’s realism. The tutorial provides guidance for spacing and stitch placement to achieve a professional finish.
Once the wings and body are complete, finishing touches like antennae can be added using embroidery thread or yarn. Properly securing these elements ensures durability while adding charm to the butterfly.
Finally, weave in all loose ends carefully and gently block the butterfly if needed. This final step ensures that the Simple Relief Butterfly – Crochet Pattern lays flat and retains its intended shape, ready for use in various projects.
The Simple Relief Butterfly – Crochet Pattern is versatile and can be used in numerous projects. Individual butterflies can be attached to blankets, pillowcases, or table runners, adding elegance and a handmade touch.
Crochet butterflies are also perfect for clothing and accessories. Add them to hats, scarves, bags, or headbands for a whimsical and colorful accent. The tutorial provides tips for securely attaching butterflies to ensure they remain in place.
Home décor benefits greatly from this pattern. Butterflies can be used in wall hangings, garlands, or framed art pieces, bringing a touch of nature indoors.
Using multiple butterflies in a series allows for creative experimentation with color gradients, wing patterns, and arrangements. The Simple Relief Butterfly – Crochet Pattern encourages exploring these creative possibilities.
This pattern is also ideal for gifting. Handmade butterflies are thoughtful and charming presents, reflecting the creator’s care and attention to detail.
Finally, seasonal themes can be incorporated. Spring colors evoke freshness and renewal, while autumn shades create warmth and elegance. The Simple Relief Butterfly – Crochet Pattern adapts beautifully to any occasion or décor style.
The Simple Relief Butterfly – Crochet Pattern provides tips for maintaining consistency in size and shape. Measuring wings and checking symmetry ensures balanced and visually appealing motifs.
Blocking finished butterflies is recommended to help wings lie flat and enhance relief. Gently shaping and pressing the wings preserves structure and improves appearance.
Experimenting with stitch variations adds texture and depth to your butterfly. The tutorial encourages trying different relief stitches for unique effects.
Choose a soft, high-quality yarn that highlights the texture of the butterfly. Cotton yarn is a popular choice for its stitch definition, but you can also use acrylic or blended yarns based on your project’s needs.
Maintaining even tension throughout the project ensures that wings and body remain proportional and neat. This is particularly important when working with detailed relief stitches.
Keeping multiple butterflies organized while working on larger projects prevents confusion and simplifies assembly. Sorting motifs by color or size is recommended.
Finally, patience and practice are key. The Simple Relief Butterfly – Crochet Pattern may require multiple attempts to perfect, but each practice piece contributes to skill development and a polished final result.
Q1: Is this pattern suitable for beginners?
Yes, the tutorial provides clear, step-by-step instructions and tips for both beginners and experienced crocheters.
Q2: What yarn is recommended for this pattern?
Lightweight or medium-weight cotton yarn is ideal for smooth texture and maintaining shape.
Q3: Can I customize the colors?
Absolutely! Use bright, vibrant colors or soft pastels for unique butterflies.
Q4: Can the butterflies be attached to clothing or accessories?
Yes, the tutorial provides tips for securely attaching butterflies to hats, bags, scarves, and other items.
Q5: Should I block the butterfly?
Blocking is recommended to ensure wings lie flat and maintain their intended shape.
Q6: Are decorative elements like beads optional?
Yes, beads, embroidery, or sequins can be added for personalization but are not required.
The Simple Relief Butterfly – Crochet Pattern provides a complete guide for creating charming and textured crochet butterflies. From selecting materials and colors to shaping wings and adding finishing touches, this pattern ensures a polished and visually striking result.
By following the instructions, crafters of all skill levels can produce durable, elegant butterflies suitable for a variety of projects. Share your creations, leave feedback, and offer suggestions to inspire a vibrant and creative crochet community.


