Crochet Pig In A Granny Square Blanket Pattern


The Solid Granny Square Crochet Free Pattern is one of the most versatile and timeless crochet projects you can make. Whether you’re a beginner or an experienced crocheter, this simple yet elegant square is a must-have in your pattern collection.
The solid granny square differs from the traditional open granny because it features a denser, more compact texture, making it perfect for creating blankets, bags, cushions, and clothing.
In this article, we’ll guide you step by step through this free pattern, explore creative ideas for using it, and share tips to make your project smooth and professional-looking.
Crocheting a solid granny square is also a great way to use up yarn scraps while learning how to maintain consistent tension and stitch count.
Many crafters love this pattern because of how easily it can be customized — you can play with color combinations, yarn weights, and hook sizes to achieve the exact look and texture you want. Plus, the repetitive rhythm of this pattern makes it relaxing and almost meditative to work on.
Before diving into the details, it’s essential to know that this Solid Granny Square Crochet Free Pattern is ideal for anyone who enjoys modular projects. You can crochet multiple squares and join them together to make larger creations. Whether you’re aiming for a cozy throw blanket or a decorative pillow, these squares offer endless possibilities. In the sections below, you’ll find detailed guidance on how to crochet them, color tips, joining techniques, and creative project ideas that can inspire your next masterpiece.
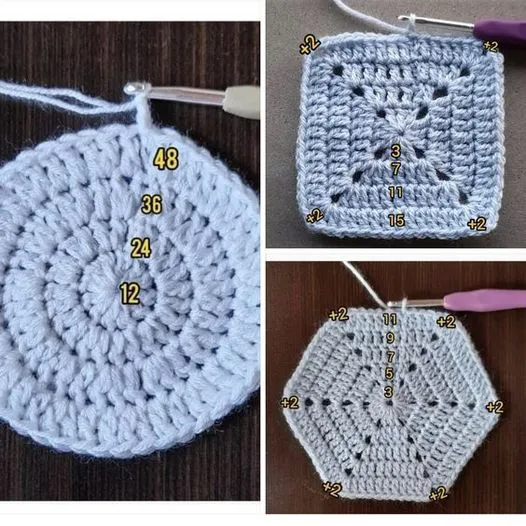
To begin your Solid Granny Square Crochet Free Pattern, you’ll need a medium-weight yarn and a hook suitable for that yarn. Start by making a slip knot and chaining four stitches, then join the chain to form a ring. Inside this ring, work a series of double crochets that will form your first round. Typically, you’ll create three double crochets, two chains, and repeat that around to form four corners. This forms the foundation of your square.
In the second round, you’ll work into the spaces and stitches from the previous round, maintaining the square shape by adding two chains in each corner. The magic of the solid granny square lies in how the corners build up neatly while the sides stay dense without open gaps. You can continue this process until your square reaches the desired size.
Be sure to count your stitches regularly, as keeping a consistent number in each side ensures your square remains even and flat. Crocheters often use stitch markers to keep track of corners, especially in larger squares. It’s also helpful to block your finished squares to achieve perfect alignment when joining them together.
Another tip for beginners is to practice tension control. If your stitches are too tight, the square may curl up; if too loose, it can become floppy. Finding that perfect balance will help your solid granny square look professional and neat. Practice a few samples before starting your final project to build confidence.
As you gain experience, you’ll notice how easy it becomes to memorize the pattern. The repetition makes it a wonderful take-anywhere project — perfect for crocheting while watching TV or relaxing at a café. Once you’ve mastered the basics, the next step is to explore different color patterns and combinations to bring your solid squares to life.
Lastly, remember that finishing your work properly is just as important as crocheting it. Weaving in the yarn tails neatly and blocking the squares ensures that your final piece has a clean, polished appearance. Take your time with this step to make your Solid Granny Square Crochet Free Pattern project truly shine.
One of the most enjoyable aspects of working on a Solid Granny Square Crochet Free Pattern is experimenting with colors. Because the square is solid, it offers a perfect background to showcase your favorite yarn shades. You can use a single color for a minimalist look or multiple hues for a more vibrant, eye-catching effect.
For a classic appearance, try using neutral tones like cream, gray, or beige. These create timeless pieces that fit into almost any home décor. If you prefer something cheerful, combine bright shades like turquoise, coral, and lemon yellow for a playful design. The solid granny square provides a clean canvas, so bold colors always stand out beautifully.
Another creative idea is to use gradient yarn or ombré effects. These yarns transition smoothly from one color to another, making your squares look intricate without extra effort. You can also alternate light and dark shades to add depth and contrast.
If you want your project to have a cohesive yet interesting look, consider using one color for the center of each square and a consistent border color to tie them all together. This technique is perfect for blankets, giving them a balanced and professional appearance.
Don’t be afraid to mix fibers, too. Combining cotton with acrylic or wool with blended yarns can create unique textures. Just be sure that all yarns have similar weights to maintain evenness in your solid granny squares.
When planning your color palette, lay out a few completed squares side by side. This helps you visualize the final result and make adjustments before joining them. Taking this extra step ensures your final project looks coordinated and visually appealing.
Once you’ve made several solid granny squares, it’s time to assemble them. The joining method you choose will influence the overall look of your finished piece. One of the most popular techniques is the slip stitch join, which creates a flat, nearly invisible seam. Another common method is the whip stitch, a sewing approach that joins squares neatly with a bit of texture.
For those who enjoy decorative finishes, the join-as-you-go method is a great option. It allows you to connect squares as you crochet the final round of each one, saving time and giving your project a seamless appearance. This is especially useful when working on large blankets.
When joining, always ensure the squares are blocked to the same size. This will help them align properly, avoiding lumps or stretching. Blocking involves gently wetting or steaming your squares and pinning them to shape until dry.
After joining, consider adding a border around your entire project. A border not only frames your work beautifully but also reinforces the edges, making them more durable. Simple single crochet or shell stitch borders work well for most solid granny square projects.
Once the joining and border are complete, weave in any remaining ends securely. Loose yarn tails can unravel over time, so it’s best to tuck them in firmly with a yarn needle.
Finally, take a moment to admire your work. The process of creating a Solid Granny Square Crochet Free Pattern project is both satisfying and creative, showcasing your patience and skill in every stitch.
The Solid Granny Square Crochet Free Pattern can be transformed into countless creative projects. A classic use is making blankets — perfect for cozy nights or thoughtful handmade gifts. You can also make throw pillows by sewing together four or more squares for a decorative touch in your living room or bedroom.
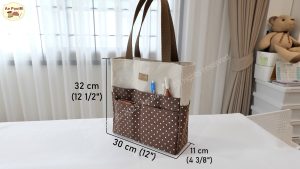
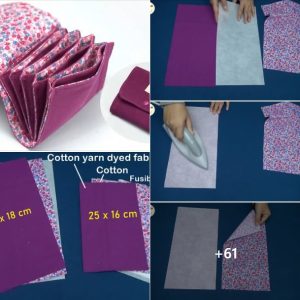
If you enjoy fashion accessories, consider turning your solid squares into tote bags. With a sturdy lining and handles, these bags are stylish, eco-friendly, and functional. The solid texture makes them durable enough to hold books, groceries, or everyday essentials.
Another popular idea is to create scarves or shawls. By connecting several small squares, you can design a patchwork accessory full of color and warmth. The solid structure ensures the piece retains its shape even after washing.
Home décor projects like table runners, coasters, and placemats are also excellent options. These small items are quick to make and add a handmade charm to your home. You can match the colors to your existing décor for a cohesive style.
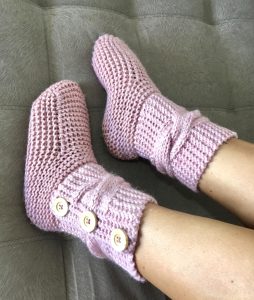
For something truly unique, experiment with clothing pieces such as vests, cardigans, or skirts. The solid granny square offers a dense enough texture to create wearable, comfortable garments. Combine different square sizes for a modern, geometric look.
Lastly, these squares are perfect for gifts. Whether you make a single coaster, a colorful pillow, or a large blanket, your handmade project will always carry a personal and heartfelt touch.
1. What materials do I need to make a solid granny square?
You’ll need yarn (preferably medium-weight), a crochet hook suited for that yarn, scissors, and a yarn needle for weaving in ends.
2. Can beginners make this pattern easily?
Yes! The Solid Granny Square Crochet Free Pattern is beginner-friendly. With a bit of practice, anyone can master it quickly.
3. How can I prevent my square from curling?
Maintain even tension and block your finished squares. If they still curl, try using a slightly larger hook.
4. What’s the best way to join solid granny squares?
The slip stitch or join-as-you-go methods are popular choices for a smooth, polished finish.
5. Can I use different yarn types together?
Yes, but make sure the yarns are similar in weight and texture to maintain consistency across your project.
6. How do I make my project look more professional?
Take your time weaving in ends neatly, block each square evenly, and choose a cohesive color palette.
The Solid Granny Square Crochet Free Pattern is a timeless project that every crocheter should try. From blankets to bags, scarves, and home décor, its versatility makes it an essential pattern in the crochet world. By following the steps, tips, and techniques shared in this guide, you can create stunning, durable, and unique pieces.
We hope this article has inspired you to start your own solid granny square journey. Don’t forget to share your thoughts, suggestions, or experiences — your feedback helps inspire other crochet lovers and keeps the creativity growing!


