Crochet Pig In A Granny Square Blanket Pattern


Willow Granny Square Pattern Free Tutorial is one of the most beloved crochet designs for both beginners and advanced makers.
Known for its vintage charm and versatility, the Willow Granny Square offers endless creative opportunities, whether you’re making a blanket, pillow cover, tote bag, or even garments.
This free tutorial provides a clear step-by-step approach to help you master this beautiful motif while understanding the basics of crochet.
By the end of this article, you will not only know how to crochet this stunning square but also how to use it effectively in larger projects.
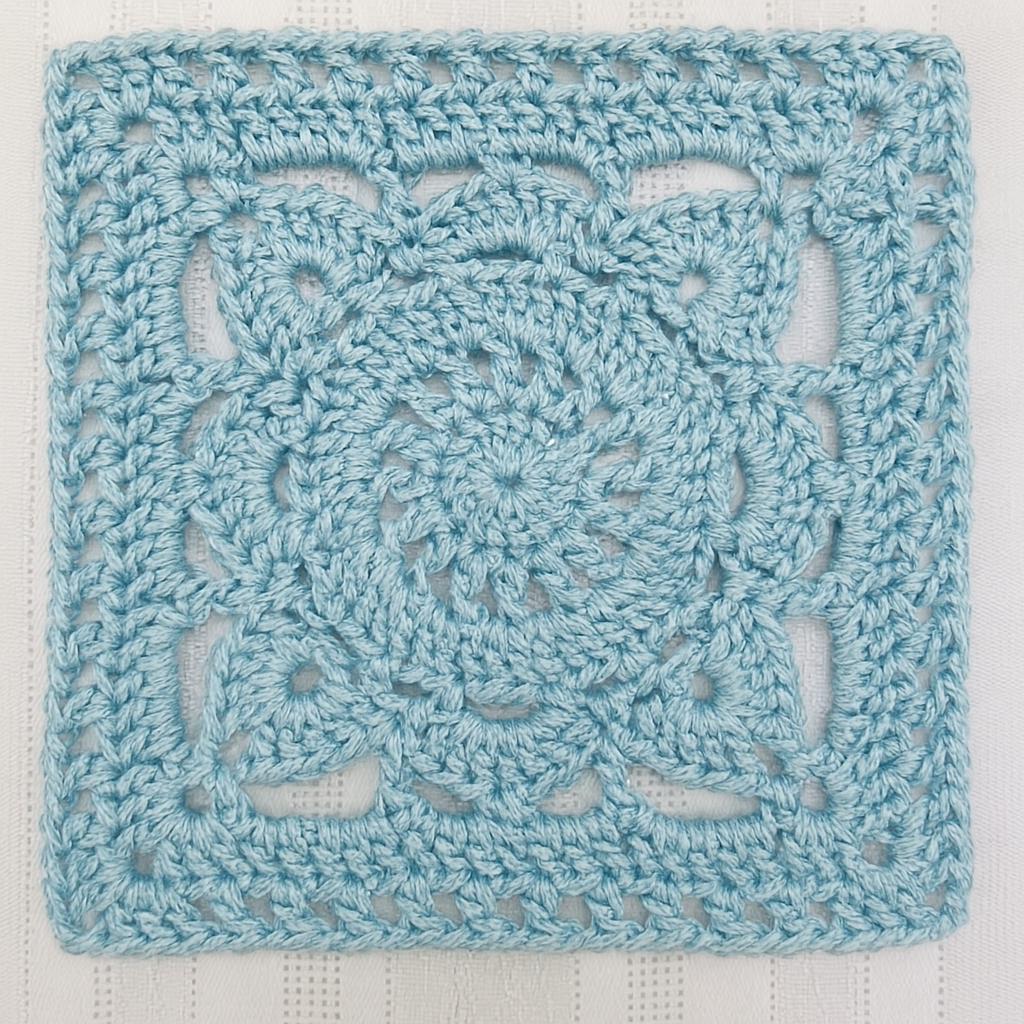
The popularity of the Willow Granny Square Pattern Free Tutorial comes from its elegant floral-like center and the traditional granny square edges that allow easy joining with other motifs. Unlike a basic granny square, the willow design features intricate stitch variations that create a textured and eye-catching result. The good news is that with patience and the right guidance, even beginners can follow this free tutorial and succeed. Each stitch builds upon the last, allowing you to practice while creating something beautiful and functional.
Before diving into the tutorial, it is important to understand why this pattern remains timeless. The Willow Granny Square Pattern Free Tutorial combines the comfort of repetition with the excitement of variation. Once you’ve learned the first few rounds, you’ll notice how meditative the process becomes. It’s also highly customizable—you can experiment with color changes in each round to achieve striking contrasts or stick with a monochrome palette for a classic look. The beauty of this design is that it suits all preferences, making it a must-know for anyone who loves crochet.
The Willow Granny Square Pattern Free Tutorial begins with a classic center ring, which is typically created using a magic ring or chain loop. This foundation is crucial because it determines the stability of the entire motif. Starting tightly ensures the design holds its shape as you add more rounds. Beginners often underestimate the importance of tension, but in this pattern, consistent tension creates uniform stitches that highlight the floral design at the center.
As you progress to the first round, you will work double crochets and chain spaces. These simple stitches create the foundation for the petal-like shapes that make the willow design unique. The elegance of the square lies in its combination of simplicity and detail. Each round introduces a subtle change that enhances the overall look without being too overwhelming for those new to crochet.
Another key point is color choice. The Willow Granny Square Pattern Free Tutorial allows you to play with endless color combinations. You can alternate shades with each round or keep the design unified with a single color. Either approach works beautifully, but multicolor versions often highlight the intricate layers better. Many crafters recommend planning your color scheme before starting to avoid interruptions during the crocheting process.
After you’ve completed the first two or three rounds, the motif begins to take shape. The central flower-like design becomes visible, which motivates beginners to keep going. This early reward is part of why the willow granny square is so popular. It keeps the maker engaged and excited to see the final outcome.
When expanding the square, additional stitches like chains and trebles may be introduced. These create the frame that allows the square to grow while maintaining its balance. Don’t be intimidated by new stitches—the Willow Granny Square Pattern Free Tutorial is designed to guide you step by step, making even the more complex rounds approachable.
Finally, once your square is complete, blocking becomes an important step. Blocking ensures your motif lays flat and has crisp edges. This process is especially useful if you plan to join multiple squares for a larger project. Taking the time to block each square elevates the professionalism of your work, giving it a polished finish.
The first step in the Willow Granny Square Pattern Free Tutorial is to gather your supplies. You will need yarn in your chosen colors, a crochet hook suited for the yarn weight, scissors, and a yarn needle for weaving in ends. Choosing the right hook size is crucial, as it affects the tightness of your stitches. Beginners often start with medium-weight yarn and a 5mm or 5.5mm hook, which provides balance between control and visibility of stitches.
Next, create the magic ring or chain loop. This is where all the initial stitches will be anchored. Beginners may find the magic ring tricky at first, but it provides a neat and adjustable center that doesn’t leave a hole. If the magic ring feels overwhelming, a chain loop is a great alternative. The Willow Granny Square Pattern Free Tutorial accommodates both methods, allowing you to pick whichever feels most comfortable.
Once the center ring is secure, begin with your first round of double crochets. These stitches form the petals that are characteristic of the willow square. Working into the ring might feel crowded initially, but as the stitches build, you’ll see the pattern start to bloom. Counting carefully ensures accuracy at this stage.
Moving on to the next round, chain spaces are introduced. These spaces create breathing room for the design and prepare the foundation for the outer edges. Each stitch should be deliberate, keeping the overall symmetry in mind. Remember, the beauty of the Willow Granny Square Pattern Free Tutorial lies in its repeating shapes, which give the illusion of petals framed by clean lines.
By the third and fourth rounds, trebles and additional chains may come into play. These rounds expand the square outward and balance the floral design with the structure of a granny square. The combination of stitches creates a unique look that stands apart from traditional granny squares.
Finally, finish the motif with a border. The border often consists of chains and double crochets that give the square its final shape. At this point, you can decide whether to stop or continue making more squares. Each finished square can be joined to create blankets, shawls, or other creative projects.
One of the most exciting aspects of the Willow Granny Square Pattern Free Tutorial is the versatility it offers. Unlike some crochet motifs that are limited in application, the willow granny square can be transformed into countless projects. Its floral appearance makes it ideal for decorative items and fashion pieces alike.
A popular use is making blankets. By joining dozens of squares, you can create a stunning afghan that combines tradition with artistry. The repeating pattern of willow squares creates a tapestry-like effect that is both cozy and visually impressive. Changing colors between squares adds depth and makes the design even more engaging.
Pillows and cushion covers are another great way to use the willow square. These projects require fewer squares, making them achievable in less time while still showcasing the beauty of the design. Adding a zipper or button closure to the back makes the pillow covers practical and easy to maintain.
Fashion enthusiasts often use the willow granny square for bags or tops. A tote bag made of these squares is not only functional but also stylish. Meanwhile, crochet tops or vests with willow motifs give a vintage-inspired, bohemian look that is currently very trendy. The Willow Granny Square Pattern Free Tutorial provides the flexibility to adapt the square for these creative applications.
Another interesting use is in wall hangings or table runners. By arranging the squares in creative patterns, you can design unique home décor items. These projects are perfect for showcasing your crochet skills and bringing handmade charm into your living space.
Finally, willow granny squares can be used for small accessories like coasters or bookmarks. Even a single square can become a thoughtful handmade gift. The versatility of the design makes it ideal for both large and small projects, depending on your time and creativity.
While following the Willow Granny Square Pattern Free Tutorial, it helps to keep a few tips in mind to ensure success. First, consistency is key. Keeping your tension even will give the motif a professional and polished look. Uneven stitches can disrupt the symmetry and affect the final outcome.
Another important tip is practicing your color changes. Switching yarns at the right moment keeps the design neat and prevents loose ends from showing. Many crafters recommend weaving in ends immediately rather than leaving them for later, as it keeps the project tidy.
Blocking, as mentioned earlier, cannot be overstated. Blocking helps highlight the design and makes it easier to join squares evenly. It also prevents curling edges, which is a common challenge for beginners.
Personalization is where creativity truly shines. The Willow Granny Square Pattern Free Tutorial is flexible enough to accommodate your own flair. You might choose bold, contrasting colors for a vibrant look or stick with soft pastels for something more subtle. Adding a border in a complementary color is another way to make your design stand out.
For larger projects, planning ahead is essential. Deciding how many squares you’ll need and preparing your yarn supply ensures you won’t run out in the middle of your work. Careful planning saves time and keeps your project stress-free.
Finally, don’t be afraid to experiment. Crochet is about creativity and expression, and the willow granny square is an ideal canvas for trying new ideas. Whether you add beads, mix yarn textures, or modify the border, the result will always be uniquely yours.
1. Is the Willow Granny Square good for beginners?
Yes, the pattern is beginner-friendly. While it includes slightly more detail than a basic granny square, the tutorial is designed to guide you step by step, making it accessible to new crocheters.
2. What yarn works best for the Willow Granny Square?
Medium-weight yarn is most commonly used, but you can adapt the design to lighter or heavier yarns depending on your project. Always match your hook size to the yarn weight.
3. Can I make the Willow Granny Square in one color?
Absolutely. A single-color square highlights the texture of the stitches, while multicolor designs emphasize the floral and layered look. Both options are beautiful.
4. How do I join multiple Willow Granny Squares?
You can join them using slip stitches, whip stitch, or more decorative joining methods like the flat braid join. Blocking squares before joining makes the process easier.
5. Do I need to block every square?
Blocking is highly recommended, especially for larger projects. It ensures uniformity and prevents warping, giving your work a professional finish.
6. Can I adapt the Willow Granny Square for clothing?
Yes, many crafters use willow squares in tops, vests, and bags. The design’s flexibility makes it perfect for both functional and decorative fashion pieces.
The Willow Granny Square Pattern Free Tutorial is a timeless crochet design that blends elegance, versatility, and creativity. From blankets to accessories, its floral-inspired motif adapts beautifully to countless projects.
With patience and practice, even beginners can master this pattern and enjoy the satisfaction of creating something handmade and meaningful.
We hope this guide has helped you understand the process and inspired you to explore your own color choices and applications. If you found this tutorial useful, please share your honest opinion and leave suggestions for future patterns you’d like to see.


