
Ballerina pencil case with zipper Pattern


The Amelia Quilt Pattern is a beautifully designed quilt that combines elegance, simplicity, and creativity. Perfect for both beginners and experienced quilters, this pattern offers a structured approach to creating a stunning quilt while allowing room for personal customization. With the Amelia Quilt Pattern, you can craft a cozy and visually appealing quilt suitable for your bed, living room, or as a heartfelt gift.
Creating an Amelia Quilt is a rewarding experience that brings together colors, textures, and fabric pieces in harmony. The design emphasizes symmetry and balance, ensuring that each block complements the overall layout. By following this pattern, quilters can organize their fabric and stitch sequences to create a professional-looking quilt with minimal stress.
The versatility of the Amelia Quilt Pattern allows quilters to experiment with different fabrics, color schemes, and layouts. Whether you prefer soft pastels for a calming effect or bold, vibrant shades for a statement piece, this pattern adapts to your creative vision. The PDF or printed instructions make the process simple, guiding you step by step from fabric selection to the finished quilt.
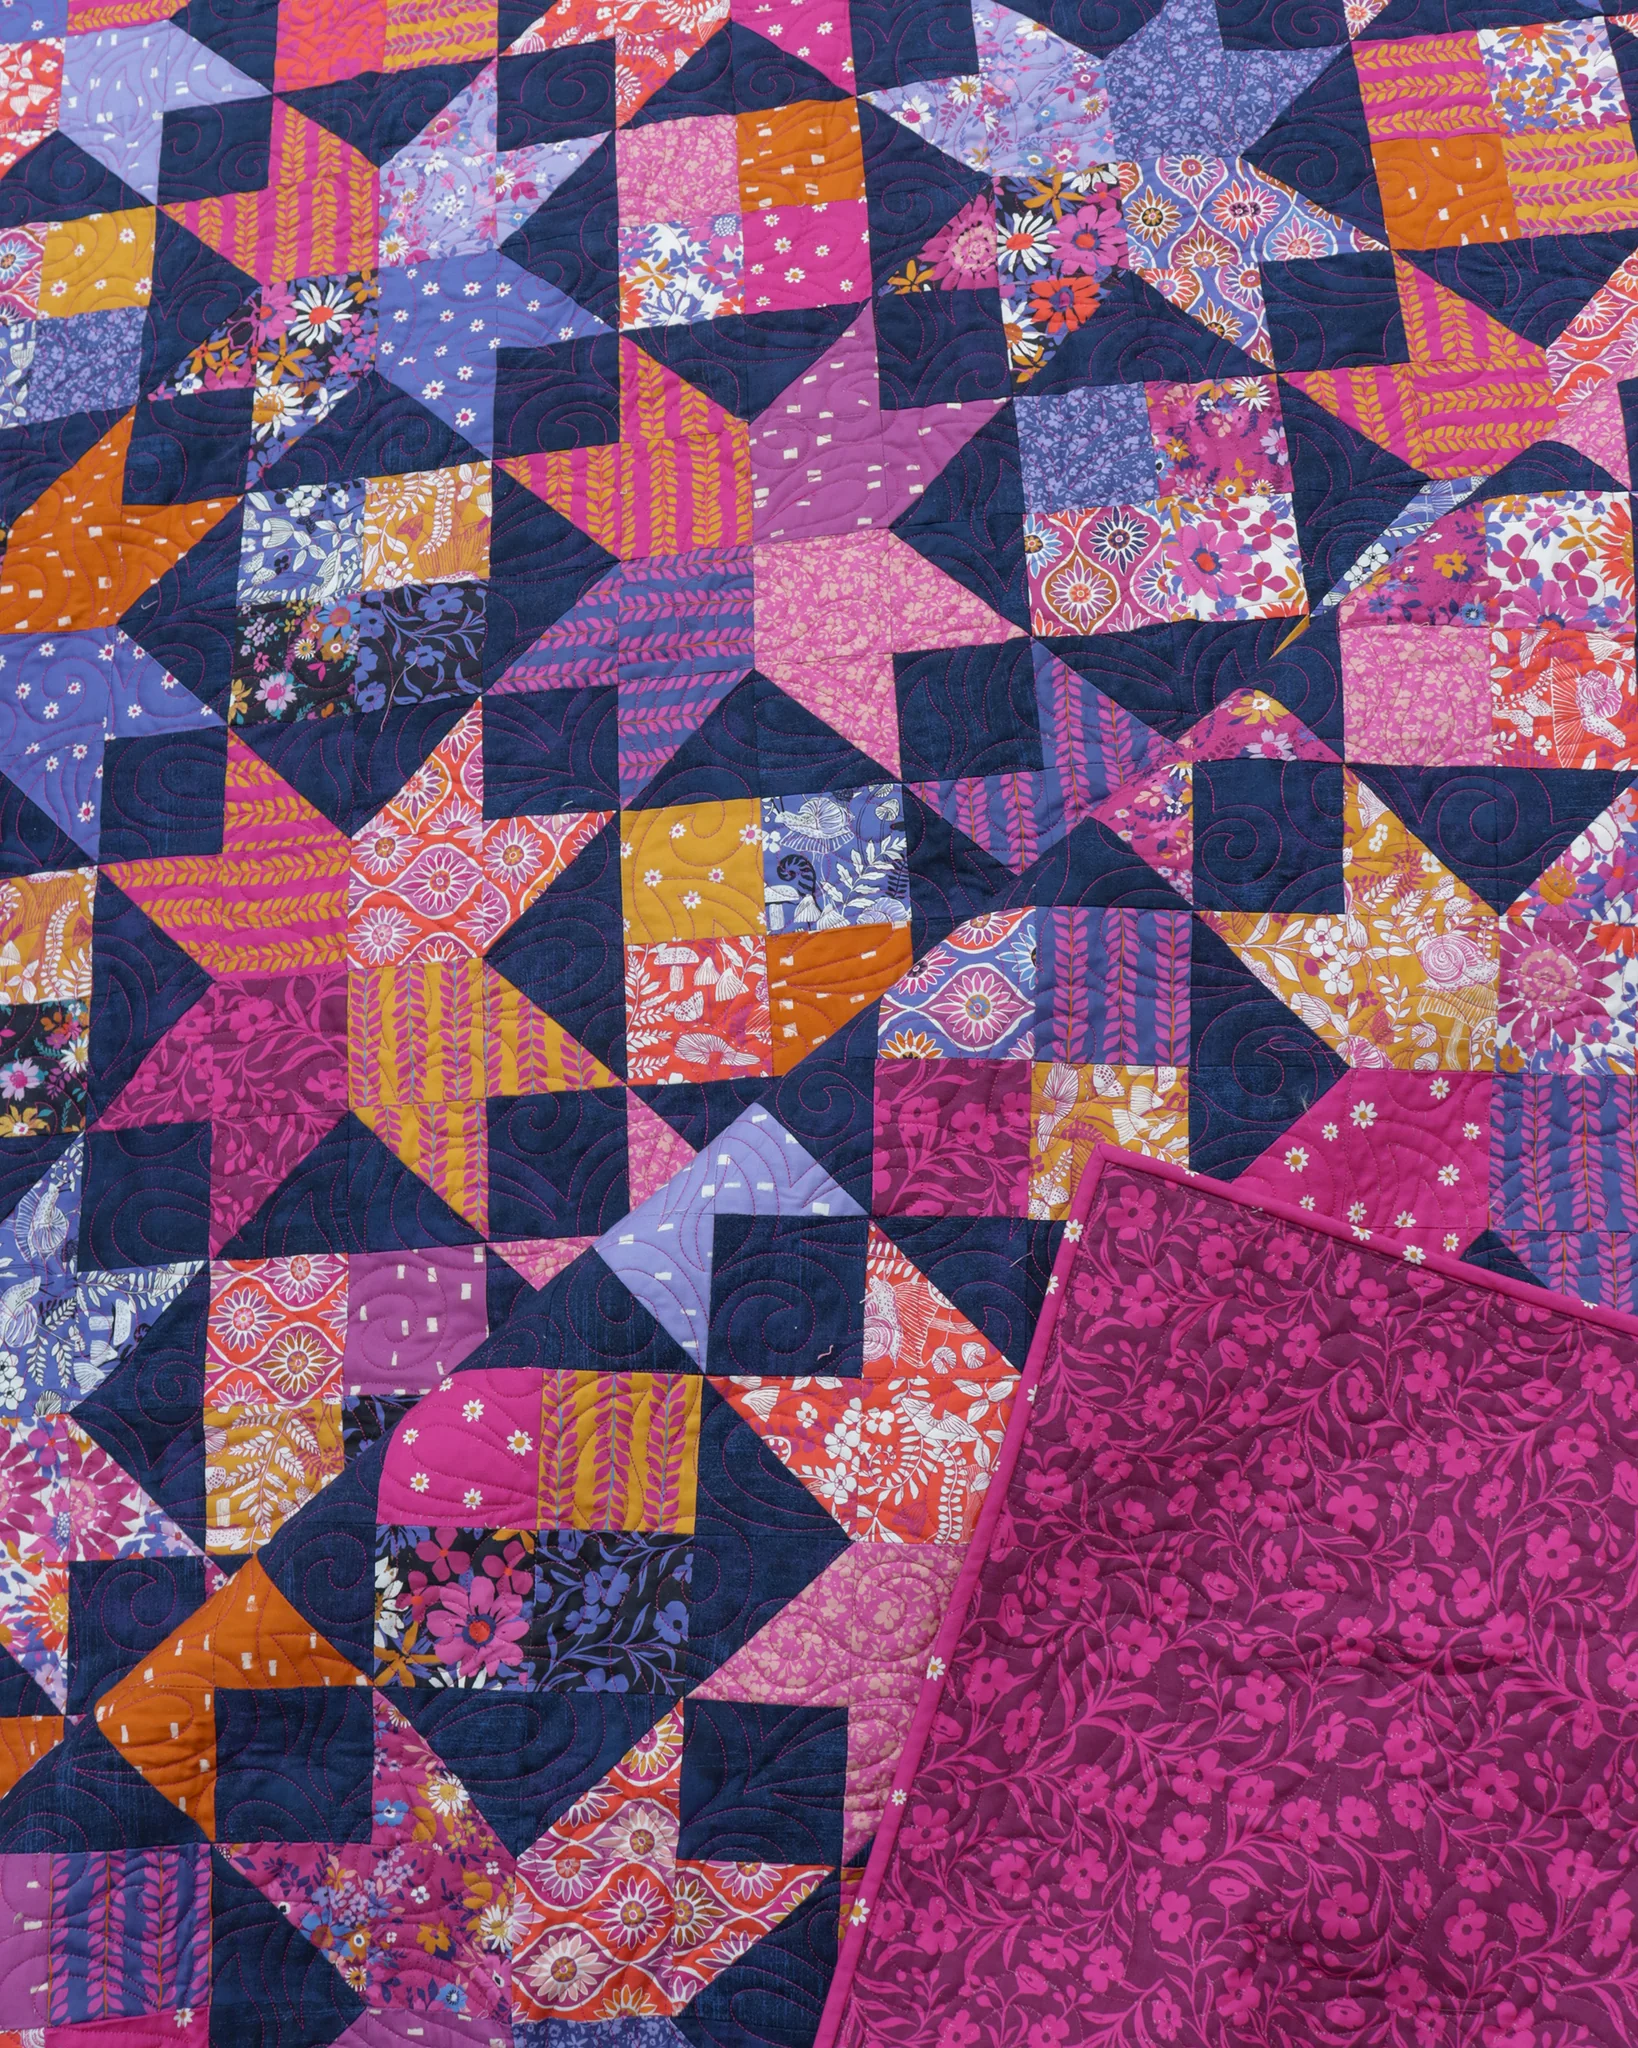
The Amelia Quilt Pattern is based on a combination of traditional block techniques and modern quilting methods. Each block is constructed with precision, typically using patchwork or pieced designs that create a geometric and visually appealing effect. Understanding how the blocks are assembled is key to achieving a flawless quilt.
The pattern encourages quilters to organize fabrics by tone or pattern. Grouping light, medium, and dark fabrics ensures that each block stands out while maintaining balance within the overall quilt. The Amelia Quilt Pattern provides diagrams and layout suggestions to help quilters visualize the final arrangement.
The stitch and seam techniques in this pattern are beginner-friendly but produce sophisticated results. By carefully following seam allowances and pressing each block, you ensure that the quilt pieces fit together perfectly, minimizing distortion and bulk.
The design’s adaptability allows for various quilt sizes. By adding or reducing blocks, you can create a lap quilt, throw, twin, or queen-sized quilt. This makes the Amelia Quilt Pattern a flexible choice for different projects and occasions.
Finally, the pattern’s aesthetic appeal lies in its ability to highlight fabric textures and patterns. By mixing solids with prints, you can add depth and visual interest, transforming simple fabrics into a stunning work of art.
Creating an Amelia Quilt begins with careful planning and preparation. Start by selecting fabrics that complement one another in tone, color, and texture. Organize your fabrics into piles based on their use in the pattern.
Step 1: Cut your fabric pieces according to the block measurements specified in the pattern. Accuracy is essential for achieving neat and consistent blocks.
Step 2: Assemble the first quilt block. Follow the pattern instructions, piecing together smaller fabric sections into a larger block. Press each seam flat for precision and a polished appearance.
Step 3: Continue constructing additional blocks, maintaining consistent stitch techniques and seam allowances. Ensure each block matches in size and shape for smooth assembly.
Step 4: Arrange the blocks on a large surface to plan the final layout. Experiment with rotation and placement to create the desired visual effect.
Step 5: Sew the blocks together, row by row, checking alignment frequently. Accurate stitching ensures the quilt top remains even and professional in appearance.
Step 6: Add borders to frame the quilt top. Borders enhance the overall design, add structure, and provide extra width if needed.
Step 7: Layer the quilt top with batting and backing fabric. Baste the layers together using pins or temporary stitching to hold them securely in place.
Step 8: Quilt the layers together. You can use straight-line stitching, free-motion quilting, or hand quilting to enhance the design and secure the layers.
Step 9: Finish the quilt by adding binding along the edges. This provides durability, a clean look, and completes the quilt professionally.
Maintaining consistent seam allowances is critical when working with the Amelia Quilt Pattern. Even minor deviations can affect block alignment and overall appearance.
Press each seam carefully as you assemble blocks. This reduces bulk, ensures smooth edges, and keeps blocks flat.
Organize fabric pieces before sewing. Proper organization helps maintain consistency in color and pattern placement, ensuring a balanced quilt.
Check block dimensions frequently. Minor inconsistencies in block size can accumulate, making assembly more challenging if not addressed early.
Use high-quality thread that complements your fabrics. Durable thread ensures strong seams and reduces the likelihood of fraying or breaking.
Consider customizing the quilt by adjusting block size, fabric combinations, or adding additional decorative borders to suit personal preference.
Finally, enjoy the process. Crafting the Amelia Quilt allows for creative expression while producing a functional, beautiful piece you’ll cherish for years.
The Amelia Quilt Pattern is highly versatile. By changing fabric combinations, you can create multiple quilt designs, each with a unique personality.
Use a monochromatic color scheme for a modern, minimalist quilt that emphasizes texture and shape.
Experiment with contrasting colors to create bold, eye-catching patterns that make a statement in any room.
Mix fabrics with different patterns, such as florals, stripes, and solids, to create a dynamic, eclectic design that highlights each block.
Adjust the size of individual blocks to create visual interest or to fit different quilt dimensions.
Incorporate decorative stitching or applique elements to personalize the quilt further, adding a signature touch to your finished piece.
Q: Is the Amelia Quilt Pattern suitable for beginners?
A: Yes. The pattern provides step-by-step instructions, diagrams, and tips, making it accessible for beginners while offering flexibility for experienced quilters.
Q: Can I adjust the quilt size?
A: Absolutely. By adding or reducing the number of blocks, you can create lap quilts, throws, or bed-sized quilts.
Q: What fabrics work best for this pattern?
A: Cotton quilting fabrics are ideal due to their durability, ease of handling, and wide range of colors and prints.
Q: How do I ensure blocks are uniform?
A: Measure and cut fabric pieces carefully, maintain consistent seam allowances, and press seams after stitching each section.
Q: Can I mix patterns and solids?
A: Yes. Combining patterned and solid fabrics adds depth and visual interest to the quilt.
Q: How should I quilt the layers together?
A: You can use machine quilting, hand quilting, or free-motion techniques depending on your preference and skill level.
Q: How do I finish the quilt edges?
A: Add binding along the edges for a clean, durable finish. Use matching or contrasting fabrics for a decorative effect.
The Amelia Quilt Pattern is a timeless design that combines elegance, creativity, and functionality. By following this step-by-step guide, you can create a quilt that is both visually stunning and practical for everyday use.
From fabric selection and block assembly to quilting and finishing, every stage of the process offers opportunities for creativity and personalization.
Creating the Amelia Quilt is a rewarding experience, whether you are making it for yourself, as a gift, or as a cherished family heirloom.
Share your results, variations, and personal touches with fellow quilters. Your feedback, tips, and suggestions can inspire others to explore this beautiful pattern and create their own unique quilt masterpieces.


