
Ballerina pencil case with zipper Pattern


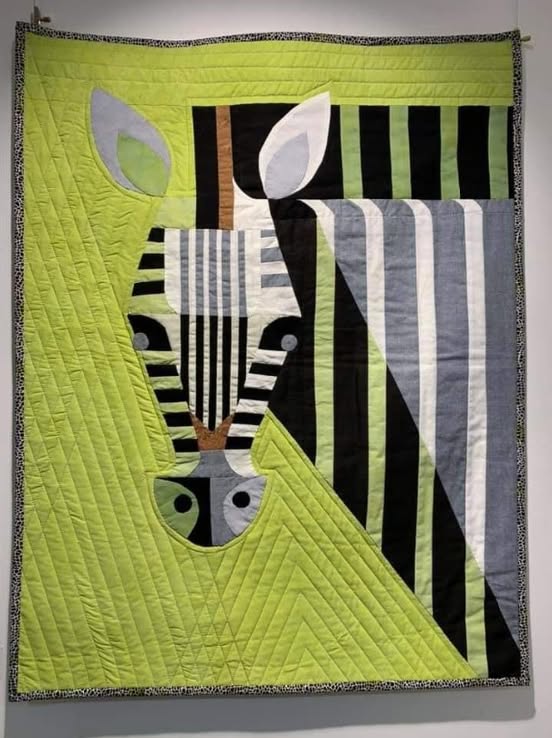
Beautiful Zebra Quilt – Tutorial is a comprehensive guide for quilters who want to create a striking and stylish quilt inspired by the elegance of zebra patterns.
The Beautiful Zebra Quilt – Tutorial combines artistry with precision, providing step-by-step instructions suitable for both beginners and experienced quilters.
This tutorial emphasizes design balance, technical accuracy, and creative expression, making it an ideal project for anyone looking to craft a quilt that stands out.
With the right materials, tools, and patience, you can bring the Beautiful Zebra Quilt to life, creating a piece that is both functional and visually captivating.
When following the Beautiful Zebra Quilt – Tutorial, selecting high-quality fabrics is crucial. Choosing fabrics with contrasting tones, such as black and white or subtle shades of gray, enhances the zebra pattern and creates a bold visual effect. Quilting is not only about sewing; it is an art form. By adhering to the Beautiful Zebra Quilt – Tutorial, quilters can ensure precise alignment of blocks, maintaining the symmetry and elegance that define this design.
The Beautiful Zebra Quilt – Tutorial also encourages creativity and personal expression. Experimenting with different textures, fabrics, or subtle accent colors can make your quilt unique. Understanding the fundamentals of cutting, block assembly, and stitching techniques is essential to achieving a professional-looking quilt. This tutorial ensures that your Beautiful Zebra Quilt becomes a treasured item, whether it’s for home décor, gifting, or display.
The Beautiful Zebra Quilt – Tutorial introduces a distinctive pattern that mimics the flowing lines of a zebra’s stripes. The design uses rectangular and diagonal blocks to create movement and rhythm, capturing the natural elegance of zebra markings. Precise measurements and accurate cuts are essential to maintain balance throughout the quilt.
Fabric selection is critical. High-contrast fabrics enhance the zebra effect, while subtle patterns in gray or muted tones can add depth. The Beautiful Zebra Quilt – Tutorial guides quilters on how to combine these fabrics effectively to create a harmonious design.
Block arrangement is another key aspect. Laying out the blocks before sewing allows quilters to visualize the final design and make adjustments to ensure the stripes flow naturally. This step is emphasized in the Beautiful Zebra Quilt – Tutorial to prevent mistakes and maintain symmetry.
Essential tools include rotary cutters, rulers, scissors, pins, and cutting mats. Using precise tools ensures accurate cuts, which are crucial for achieving the smooth lines and sharp contrasts characteristic of the zebra pattern.
Consistent seam allowances are vital. The tutorial emphasizes maintaining uniform seams, as even small discrepancies can disrupt the flow of the zebra design. This attention to detail is a hallmark of the Beautiful Zebra Quilt – Tutorial.
Optional embellishments such as decorative stitching or appliqué can be added to enhance the quilt. While not required, these details allow quilters to personalize their work and add extra charm to the Beautiful Zebra Quilt.
A rotary cutter is indispensable for cutting precise strips and shapes. Pair it with a self-healing cutting mat to protect your work surface and keep your cuts accurate.
A quilting ruler is another must-have. It ensures your stripes are straight and uniform, which is crucial for the Beautiful Zebra Quilt – Tutorial to look polished and professional.
For the batting, choose a lightweight or medium-weight batting depending on the warmth you desire. Cotton or cotton-blend batting works well for a soft yet breathable finish.
Starting with the Beautiful Zebra Quilt – Tutorial, begin by arranging your cut fabric pieces according to the pattern. Ensuring proper alignment before sewing helps maintain symmetry and overall aesthetic.
Sew blocks in small sections for better control and precision. This approach minimizes errors and ensures that the flowing zebra lines remain continuous across the quilt.
Pinning fabric pieces before stitching prevents shifting. The tutorial explains the best pinning techniques, which are crucial for achieving sharp lines and consistent seams.
Pressing seams is another important step. Properly pressed seams help blocks lie flat and improve the overall appearance of the quilt. Using a pressing cloth and the correct iron temperature preserves fabric integrity.
The tutorial also explains quilting methods. Whether hand quilting or machine quilting, uniform stitches contribute to durability and enhance the visual impact of the Beautiful Zebra Quilt – Tutorial.
Finally, adding binding completes the quilt. The tutorial guides quilters through creating a clean, professional edge that frames the zebra design beautifully and ensures longevity.
Selecting the right materials is central to the Beautiful Zebra Quilt – Tutorial. Fabrics should be durable, colorfast, and easy to work with. Cotton and cotton blends are ideal choices.
Thread selection is also crucial. Strong, high-quality threads matching the quilt colors prevent fraying and ensure a long-lasting finish.
Batting choice affects warmth and texture. The Beautiful Zebra Quilt – Tutorial recommends cotton, polyester, or blended batting depending on the desired feel and quilt thickness.
Color balance is essential. High contrast is the key to achieving the signature zebra look, but subtle gray tones or complementary neutrals can enhance depth and sophistication.
Proper tools, such as rotary cutters, rulers, and pins, improve accuracy and efficiency during cutting and sewing. Maintaining sharp blades and organized materials ensures smooth progress.
Finally, the quilt backing should complement the front design. A simple, solid color or a muted pattern works well, supporting the structure while enhancing the aesthetic of the Beautiful Zebra Quilt – Tutorial.
The Beautiful Zebra Quilt – Tutorial encourages adding personal touches. Decorative stitching, appliqué, or subtle embroidery can add character without overwhelming the zebra design.
Adding labels or signatures can personalize the quilt further, making it a meaningful gift or keepsake.
Borders or unique edging styles, such as scallops or piping, enhance the finished look and showcase craftsmanship.
Experimenting with accent colors in stripes or small motifs can highlight areas of the quilt, giving it a more dynamic appearance.
Finishing techniques such as careful blocking and pressing ensure the quilt lays flat and maintains its shape over time.
Sharing your completed Beautiful Zebra Quilt – Tutorial with friends, family, or quilting communities allows you to receive feedback, inspire others, and celebrate your work.
Q1: Is the Beautiful Zebra Quilt suitable for beginners?
Yes, the tutorial provides detailed instructions and visual guidance to support beginners.
Q2: What fabrics work best for this quilt?
High-quality cotton or cotton blends are recommended for durability and ease of use.
Q3: Can I customize the colors?
Absolutely. While black and white are classic, you can experiment with gray tones, muted colors, or accent fabrics.
Q4: How do I maintain the quilt?
Machine wash on a gentle cycle or hand wash with mild detergent. Air drying or low-heat drying is recommended.
Q5: Are embellishments required?
No, embellishments are optional for personalization but not necessary for completing the quilt.
Q6: Can I adjust the size?
Yes, by adding or removing blocks, you can customize the quilt’s dimensions.
The Beautiful Zebra Quilt – Tutorial is a complete guide for quilters of all skill levels. From fabric selection and block assembly to finishing touches and personalization, this tutorial ensures a polished, professional result.
By following these steps, quilters can create a striking zebra-inspired quilt that is both functional and visually captivating. Share your completed quilt, leave honest feedback, and offer suggestions to inspire creativity within the quilting community.


