
Ballerina pencil case with zipper Pattern


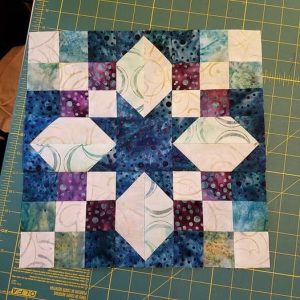
The BETTY’S BLOOM QUILT BLOCK – TUTORIAL is a beautiful and creative project that has captured the attention of quilters who love timeless designs. Quilt blocks are the foundation of most quilting projects, and this particular pattern stands out because of its floral-inspired structure.
Its design is both elegant and versatile, making it suitable for quilts, table runners, pillow covers, or even framed as decorative wall art. For quilters of all levels, this tutorial offers a chance to combine precision with artistry in a way that is rewarding and enjoyable.
One of the most appealing aspects of the BETTY’S BLOOM QUILT BLOCK – TUTORIAL is its balance between simplicity and sophistication. The block looks intricate at first glance, but with careful step-by-step instructions, even beginners can achieve excellent results.

Quilters appreciate this type of design because it gives them the satisfaction of creating something visually striking without feeling overwhelmed by complexity. With each step, you’ll see how small pieces of fabric come together to form a blooming flower-like pattern that radiates charm and warmth.
Another reason this block is so beloved is its adaptability. You can make the BETTY’S BLOOM QUILT BLOCK – TUTORIAL using solid colors for a modern, minimalist look or choose a mix of patterned fabrics for a more traditional style.
The block can be enlarged or kept small depending on the type of project you want to complete. Whether you’re crafting a baby quilt, a seasonal wall hanging, or an heirloom-quality bedspread, this block adapts beautifully to your vision and creativity.
Before beginning the BETTY’S BLOOM QUILT BLOCK – TUTORIAL, gathering the right materials is essential. Having everything prepared will make the sewing process smoother and help you stay focused on the joy of quilting. Fortunately, this block doesn’t require rare tools or materials; most of what you need is already part of a quilter’s basic toolkit.
The first material you’ll need is fabric. Choosing high-quality cotton fabrics ensures crisp seams and durability in your final quilt. For this pattern, it’s common to select at least three to four coordinating fabrics: one for the background, one for the center bloom, and others for accent petals or surrounding pieces. The contrast between light and dark fabrics is especially important to highlight the floral shape of the block.
A rotary cutter and cutting mat are also essential tools. Accuracy is key in quilting, and using these tools ensures your fabric pieces are cut precisely. Pair them with a clear acrylic quilting ruler to measure and cut straight lines with confidence. Accurate cutting reduces frustration and ensures your block comes together cleanly.
Of course, you’ll need a reliable sewing machine. While some quilters enjoy piecing blocks by hand, a sewing machine speeds up the process and helps maintain consistency. Make sure to use a quarter-inch presser foot if available, since quilting relies heavily on precise quarter-inch seams.
Additional supplies include thread, pins or clips, and an iron with an ironing board. Pressing your seams as you go is a crucial step in quilting, as it helps the pieces fit together more accurately and keeps your block flat. For the BETTY’S BLOOM QUILT BLOCK – TUTORIAL, pressing will highlight the sharp lines and floral design of the finished block.
Lastly, keep a seam ripper nearby. Even experienced quilters occasionally need to redo a seam. A seam ripper allows you to correct mistakes quickly without damaging your fabric, ensuring your finished block looks polished.
The process of completing the BETTY’S BLOOM QUILT BLOCK – TUTORIAL is straightforward when broken down into manageable steps. Each part of the block contributes to the overall floral effect, so accuracy and patience are important.
You’ll start by cutting your fabric pieces according to the measurements provided in the pattern. Precise cutting lays the foundation for success, and it’s worth taking your time to double-check each piece. Using contrasting fabrics for petals and background helps create the illusion of blooming flowers.
Next, you’ll begin assembling smaller units such as half-square triangles or flying geese, depending on the variation of the design. These smaller sections form the petals of the bloom and give the block its signature style. Be sure to press your seams after each step to keep the pieces sharp and neat.
Once the smaller units are ready, you’ll start joining them into rows. Aligning seams carefully is important at this stage to ensure the floral design comes together cleanly. Using pins or clips at each seam intersection helps keep everything aligned during sewing.
After sewing the rows, you’ll join them together to complete the central portion of the block. The flower shape should become more visible at this point, and the satisfaction of seeing the bloom come alive is one of the highlights of this tutorial.
The final step is to add the border pieces, which frame the bloom and give the block structure. Once all pieces are sewn together, give the block a final press to flatten seams and highlight the design. At this stage, your BETTY’S BLOOM QUILT BLOCK – TUTORIAL is complete and ready to be used in a quilt or any other project.
Quilters often make multiple blocks to create a full quilt, and repeating the process builds skill and efficiency. With each block, your confidence will grow, and the results will look even more professional.
The BETTY’S BLOOM QUILT BLOCK – TUTORIAL offers endless possibilities for creativity. While the traditional block design is stunning on its own, experimenting with different variations allows you to make it uniquely yours.
One way to personalize the block is by changing the fabric color palette. For a fresh springtime look, you might use pastel colors for the petals and a crisp white background. For autumn, warm tones like gold, burgundy, and brown can give the block a seasonal feel. Adjusting fabric colors transforms the mood of the entire quilt.
You can also play with scale. Enlarging the block makes it a striking centerpiece for a wall hanging or quilt, while making smaller versions allows you to create intricate patchwork designs. Adjusting the block size expands your project options significantly.
Another variation involves experimenting with fabric prints. Solid fabrics highlight the geometry of the design, while floral or abstract prints add texture and depth. Mixing solids and prints creates a balance between structure and creativity.
Adding embellishments is another way to customize. Some quilters stitch embroidery details onto the petals or use decorative quilting stitches to enhance the floral design. Small additions like beads or appliqué can turn the block into a true piece of textile art.
Finally, consider using the BETTY’S BLOOM QUILT BLOCK – TUTORIAL in nontraditional ways. Instead of joining multiple blocks into a quilt, you could create a single block and frame it as wall art. You could also use it as a centerpiece for a pillow cover, tote bag, or table runner. Its versatility makes it a valuable addition to any quilter’s repertoire.
Quilters of all levels can benefit from a few helpful tips when working on the BETTY’S BLOOM QUILT BLOCK – TUTORIAL. These insights ensure your experience is smooth and your final results are beautiful.
First, take your time during the cutting stage. Accurate measurements are crucial for quilting, and even small errors can affect the overall look of the block. Double-check your measurements before making each cut.
Second, always press your seams as you go. Pressing may seem like an extra step, but it greatly improves accuracy and ensures that the block lays flat. This simple habit can make the difference between a block that looks homemade and one that looks professional.
Third, use a consistent quarter-inch seam allowance. Quilting relies on this standard seam size, and being consistent ensures your block fits together properly with others. A quarter-inch presser foot is a helpful tool for maintaining precision.
Fourth, don’t be discouraged by mistakes. Quilting is a learning process, and every block you make teaches you something new. Use a seam ripper when necessary and view mistakes as opportunities to improve.
Fifth, experiment with fabric combinations on a design wall or flat surface before sewing. Laying out the pieces helps you visualize the final block and make adjustments to color placement if needed.
Finally, enjoy the process. The BETTY’S BLOOM QUILT BLOCK – TUTORIAL is not only about the finished product but also about the joy of creating something with your hands. Savor each step, and don’t rush through the project.
1. Is the BETTY’S BLOOM QUILT BLOCK – TUTORIAL suitable for beginners?
Yes, the block looks intricate but is beginner-friendly with careful following of instructions.
2. How long does it take to complete one block?
On average, it can take one to two hours depending on your sewing speed and experience.
3. Can I make the block using scraps of fabric?
Absolutely. Scraps are perfect for this pattern and add charm through varied colors and textures.
4. What size should my finished block be?
The size depends on the specific measurements in your chosen tutorial, but most blocks finish between 10 and 12 inches square.
5. Do I need special tools to make this block?
No, just basic quilting tools like fabric, rotary cutter, ruler, sewing machine, and iron.
6. Can I use the block for projects other than quilts?
Yes, it’s perfect for pillows, wall art, tote bags, and many other fabric crafts.
The BETTY’S BLOOM QUILT BLOCK – TUTORIAL is a wonderful project that combines tradition with creativity. From gathering materials to completing the final stitch, each step teaches valuable quilting skills while producing a visually stunning result. Its floral-inspired design offers flexibility, allowing quilters to experiment with colors, prints, and embellishments.
Whether you’re a beginner eager to learn or an experienced quilter looking for a fresh project, this block is a rewarding choice. It’s versatile, practical, and beautiful, making it a valuable addition to any quilter’s collection.
We hope this article has guided and inspired you to try the BETTY’S BLOOM QUILT BLOCK – TUTORIAL for yourself. If you do, please share your sincere opinion and suggestions—we’d love to hear how your creative journey unfolds!


