
Ballerina pencil case with zipper Pattern


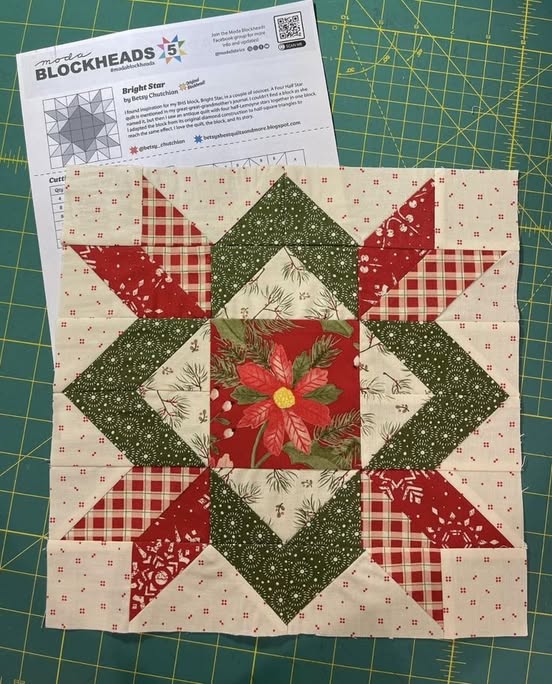
Bright Star Block Pattern is one of the most iconic and versatile quilt block designs that both beginners and experienced quilters love to create.
This pattern is celebrated for its geometric symmetry and star-shaped design, making it a stunning focal point in any quilt. Using this guide, you will learn everything about the Bright Star Block Pattern, including how to select fabrics, cut pieces accurately, and assemble the block to achieve a polished look.
The Bright Star Block Pattern is more than just a visual centerpiece; it embodies a rich tradition in quilting. Historically, star patterns have been used in quilts to symbolize guidance, hope, and craftsmanship.
This tutorial will show you how to replicate this classic block while adding your personal flair through fabric choices and color combinations. By mastering this pattern, you can create quilts that are both timeless and modern.
Creating a Bright Star Block is a rewarding project because it combines precision and creativity. You will learn to carefully measure and cut triangles and squares, understand the importance of accurate seam allowances, and explore layout techniques that make your star pop. This step-by-step approach ensures that even if you are a beginner, you can successfully craft a Bright Star Block Pattern that looks professional and visually appealing.
Selecting the right fabrics is a crucial step in achieving a bright and striking star design. Quilters often use contrasting colors to make the star shape stand out. Light and dark fabrics work well together, creating a three-dimensional effect that enhances the visual appeal of the block. Consider using fabrics with different textures or subtle patterns to add depth to your Bright Star Block Pattern.
Another tip is to choose fabrics that complement the rest of your quilt. If your quilt has a calm, neutral background, a bright and bold star fabric will become the centerpiece. On the other hand, using more muted colors can create a harmonious and soothing overall design. Selecting high-quality cotton fabrics ensures durability and ease of sewing, which is essential when crafting the Bright Star Block Pattern.
When selecting fabrics, consider pre-washing to prevent color bleeding and shrinkage. This step ensures that your Bright Star Block Pattern maintains its color and shape over time. Pre-washing also softens the fabric, making it easier to handle during piecing. A well-chosen fabric palette can make your star block both visually stunning and long-lasting.
Mixing prints and solids can also enhance the block’s aesthetic. Solids can highlight the star shape, while small prints can add subtle texture and interest. For a traditional look, use classic star colors like navy, red, and cream. For a modern twist, try bright or pastel tones that create a fresh and unique Bright Star Block Pattern.
Keep in mind the scale of your prints. Large prints may overwhelm small star blocks, while tiny prints can become lost. Choosing fabrics that balance pattern scale with block size ensures that your Bright Star Block Pattern is readable and visually appealing from a distance.
Finally, organizing your fabrics before starting piecing can save time. Lay out all pieces according to your star layout to visualize the final block. This planning stage helps prevent mistakes and ensures that your Bright Star Block Pattern comes together beautifully.
Accurate cutting is essential for a Bright Star Block Pattern to fit together seamlessly. Use a rotary cutter, ruler, and cutting mat to achieve precise shapes. Triangles and squares are the primary components of this block, so careful measurement is key. Cutting slightly outside the lines and then trimming after piecing can help achieve perfect points in your star.
Piecing the block requires patience and attention to detail. Sew triangles and squares together using consistent seam allowances, usually ¼ inch. Press seams carefully to reduce bulk and help the star lay flat. Following these steps ensures that your Bright Star Block Pattern has crisp lines and sharp points, making the design stand out.
When joining multiple units, check alignment constantly. A misaligned seam can distort the star shape. Pinning pieces before sewing can help maintain accuracy. Accurate piecing is the foundation of a professional-looking Bright Star Block Pattern.
Consider chain piecing to save time. Sewing multiple pieces in a sequence without cutting the thread between each one speeds up the process while maintaining consistency. This technique is especially helpful when creating several Bright Star Block Patterns for a full quilt.
Pressing techniques also impact the block’s final look. Press seams open or to one side based on personal preference and fabric thickness. Proper pressing ensures that your Bright Star Block Pattern lays flat and creates sharp, defined points.
Finally, double-check all measurements before assembling the block. Accurate cutting and careful piecing are the keys to creating a Bright Star Block Pattern that is both beautiful and precise. Taking the time to master these skills will make your quilting projects easier and more enjoyable.
Once all pieces are cut and sewn, it’s time to assemble the Bright Star Block Pattern. Lay out your pieces in the star formation to ensure correct orientation. Start by joining smaller units and gradually combine them into the full block. This step-by-step assembly ensures that your star maintains symmetry.
Pin pieces together before sewing to prevent shifting. Accurate pinning is crucial for keeping points aligned. This helps achieve a clean and professional Bright Star Block Pattern. Sewing slowly and carefully ensures that seams match perfectly and the star shape is maintained.
After sewing, press the block again to flatten seams and prepare it for quilting. Pressing enhances the crisp lines and ensures that the block sits flat within the quilt top. A well-pressed Bright Star Block Pattern is easier to handle and gives a polished appearance.
Trimming edges before combining with other blocks is important for consistency. Use a square ruler to trim the block to the exact dimensions needed. This step prevents misalignment when piecing multiple blocks into a quilt.
Consider adding sashing or borders to enhance the star. Borders can frame the Bright Star Block Pattern, making it stand out more prominently in the quilt design. Choose colors that complement or contrast with the star to achieve the desired effect.
Finally, enjoy the satisfaction of completing a classic and beautiful quilt block. The Bright Star Block Pattern is a timeless design that works in a variety of quilts, from traditional to modern, and showcases your skills as a quilter.
Personalizing the Bright Star Block Pattern allows you to create a unique quilt. Experiment with different color schemes, using gradients or complementary colors to add depth. Each block can have a slightly different palette to create a dynamic quilt layout.
Try using specialty fabrics like metallic or textured cotton to make the star pop. These fabrics add a tactile element to your quilt and make your Bright Star Block Pattern more visually interesting.
Changing the size of the block can adapt it for different projects. Smaller stars are perfect for throw quilts, while larger stars work well as focal points in bed quilts. Adjusting the size also impacts fabric requirements and project planning.
Mixing traditional and modern techniques can enhance the block’s appeal. Combine pieced triangles with appliqué elements for added creativity. This approach gives your Bright Star Block Pattern a unique and contemporary twist.
Experiment with layout patterns. Stars can be arranged in diagonal, horizontal, or scattered layouts for different visual effects. Choosing the right layout ensures that your quilt design is balanced and harmonious.
Finally, practice makes perfect. The more you create the Bright Star Block Pattern, the more precise and confident you will become. Each block adds experience and skill, making future quilting projects easier and more enjoyable.
Q: Is the Bright Star Block Pattern suitable for beginners?
A: Yes, beginners can create this block with patience and careful attention to measurements. Following a step-by-step tutorial ensures accuracy.
Q: What fabrics work best for this pattern?
A: High-quality cotton fabrics in contrasting colors work best. Solids and small prints enhance the star’s visual effect.
Q: How can I make the points of the star sharp?
A: Accurate cutting, consistent seam allowances, careful piecing, and proper pressing are key to sharp star points.
Q: Can I change the size of the block?
A: Absolutely. Adjusting the size of the squares and triangles allows you to create smaller or larger blocks depending on your quilt project.
Q: How do I prevent the fabric from shifting while sewing?
A: Pin pieces carefully before sewing, chain piece when possible, and press seams as you go to maintain alignment.
Q: Can I mix prints and solids in one block?
A: Yes, solids help highlight the star shape, while small prints add texture. Balancing the two enhances the block’s aesthetic.
The Bright Star Block Pattern is a timeless and versatile quilt design that offers both beauty and craftsmanship. By carefully selecting fabrics, accurately cutting and piecing, and thoughtfully assembling your blocks, you can create a quilt that showcases your skills and personal style.
This guide provided a complete overview of techniques, tips, and customization ideas to help you master this classic block.
Share your results, leave your honest opinions, and suggest any improvements or variations you would like to see. Your feedback helps the quilting community grow and inspires creativity in every project.


