
Ballerina pencil case with zipper Pattern


The holiday season is the perfect time to explore creative quilting, and the Christmas Tree Block – Tutorial is a wonderful way to bring festive spirit into your sewing projects. Whether you’re making a holiday quilt, a table runner, or simply adding decorative blocks to your collection, this tutorial helps you create a timeless design.
The Christmas tree is a symbol of warmth, joy, and tradition, and turning it into a quilt block allows you to capture that magic with fabric and thread.
Working on the Christmas Tree Block – Tutorial gives quilters the opportunity to practice important techniques while making something cheerful and fun. From cutting precise pieces to assembling them into a tree shape, every step is rewarding.
Beginners can follow the steps with ease, while experienced quilters can add more creative touches to personalize their work. This project strikes a balance between simplicity and creativity, making it a favorite among quilting enthusiasts.
The beauty of the Christmas Tree Block – Tutorial is its versatility. You can use classic green fabrics for the tree, playful prints for a modern twist, or even metallic fabrics to add sparkle. The block can be as simple or as elaborate as you like, depending on your fabric choices and finishing touches. Once complete, the block becomes a piece of art that captures the holiday season, ready to be displayed in your home or gifted to someone special.
To begin the Christmas Tree Block – Tutorial, you will need some basic quilting supplies. Start with fabric in colors that reflect your style. Traditional green for the tree, white or cream for the background, and brown for the trunk are common choices, but you can use any combination that suits your holiday vision.
A rotary cutter and cutting mat are essential for cutting fabric pieces accurately. Precision is key in quilting, and having sharp tools ensures your shapes line up perfectly when sewn together. Pair this with a clear quilting ruler to measure and cut straight edges consistently.
Thread plays an important role in both construction and appearance. A neutral thread color works well for piecing, while decorative threads can be used if you plan to add quilting details later. Choosing quality thread prevents tangling and breakage, making the process smoother.
A reliable sewing machine is also crucial for completing your block efficiently. While hand sewing is possible, using a machine saves time and ensures even stitching. A quarter-inch foot can help maintain accurate seam allowances, which is especially important in quilting projects.
You will also need an iron and ironing board. Pressing seams as you go keeps the block flat and professional-looking. It helps the pieces fit together neatly, preventing bulky intersections.
Lastly, keep pins or fabric clips handy to hold pieces in place as you sew. This small step makes a big difference in accuracy, helping you achieve a clean and polished Christmas Tree Block – Tutorial.
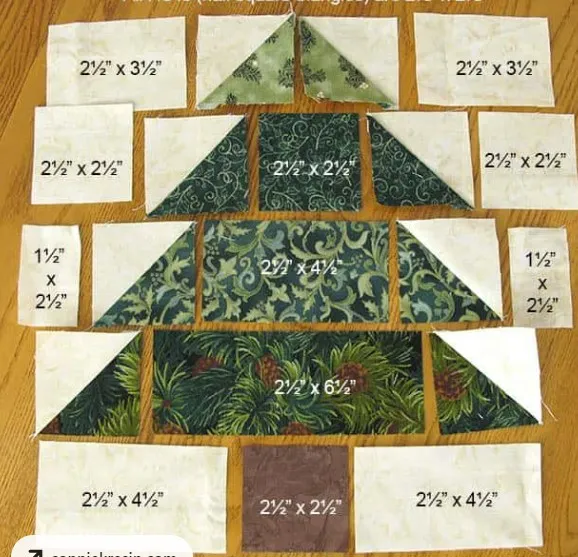
The first step in the Christmas Tree Block – Tutorial is cutting your fabric. You will need triangles and rectangles that come together to form the tree shape. Precision in this stage ensures that the pieces align correctly when assembled.
After cutting, begin piecing the triangles together to create the tree sections. Typically, the block is built in layers, starting with the widest base and working up to the tip of the tree. Each layer should be carefully aligned to keep the tree symmetrical.
Next, sew the layers together. Take your time and press seams open or to the side as you work. This step not only keeps the block flat but also helps match points more easily, giving the tree a clean and crisp appearance.
The trunk is usually created from a small rectangle of brown fabric. Position it beneath the tree base and attach it with even seams. Though small, the trunk is an important detail that gives the block its signature Christmas tree look.
Once the tree and trunk are complete, add background pieces around the design. This frames the tree and gives you a consistent block size. Careful measuring ensures your finished block aligns with others if you plan to make a larger quilt.
Finally, give the block a good press to smooth everything out. At this stage, your Christmas Tree Block – Tutorial comes to life, ready to be admired or used in a bigger project.
One of the best parts of the Christmas Tree Block – Tutorial is experimenting with variations. You don’t need to stick to traditional colors or styles—you can let your imagination run wild.
For a modern twist, use bright or patterned fabrics instead of solid greens. Stripes, polka dots, or festive prints can give your tree a playful personality. Mixing different fabrics in one tree can also create a scrappy look that feels cozy and handmade.
Adding embellishments is another way to make your block unique. Small buttons or embroidered details can act as ornaments on the tree. A touch of gold thread can serve as tinsel, and a star-shaped applique can top your quilted tree beautifully.
You can also play with block sizes. Make smaller blocks for a mini quilt or larger ones for a statement wall hanging. Changing the scale gives you flexibility to adapt the design for different projects.
Seasonal fabrics are another creative option. Metallic prints or fabrics with snowflakes and holly leaves can enhance the holiday theme. Even fabrics with a bit of sparkle can bring your block to life.
If you’re making multiple blocks, consider arranging them in rows to create a quilt that looks like a whole forest of Christmas trees. This design is both festive and visually striking, making the Christmas Tree Block – Tutorial even more rewarding.
The Christmas Tree Block – Tutorial isn’t just a quilting project—it’s a way to celebrate the holiday season through creativity. Handmade projects carry meaning, and creating a quilt block shaped like a Christmas tree connects you with tradition while expressing your personal style.
This block is also beginner-friendly, making it accessible to new quilters while still enjoyable for experienced ones. It teaches valuable skills like cutting, piecing, and pressing, all of which are useful in larger projects.
Completing the block brings a sense of accomplishment. Seeing the tree take shape from simple pieces of fabric is rewarding and encourages you to keep exploring more quilting techniques.
It’s also versatile. The block can stand alone as a decoration, be part of a quilt, or even be used in smaller projects like cushions, bags, or table runners. This flexibility makes it a valuable pattern to learn.
Additionally, quilting has emotional benefits. It’s a relaxing hobby that allows you to focus on something creative while producing a tangible result. Working on a festive block adds joy and excitement to the process.
Most importantly, the Christmas Tree Block – Tutorial allows you to create something that can be treasured for years. Handmade decorations become part of holiday traditions, passed down from one generation to the next.
Q1: Is the Christmas Tree Block – Tutorial suitable for beginners?
Yes, the design is simple enough for beginners but still enjoyable for experienced quilters.
Q2: What size should the block be?
The size depends on the pattern you follow, but you can easily adjust it by changing fabric measurements.
Q3: Can I use scraps for this block?
Absolutely. Scraps are perfect for creating a scrappy tree design that feels cozy and unique.
Q4: How do I keep my points aligned?
Careful cutting, accurate seam allowances, and pressing after each step will help keep points sharp.
Q5: Can I hand sew the block?
Yes, although machine sewing is faster, hand sewing works if you prefer a slower, more traditional method.
Q6: What projects can I make with this block?
You can use it in quilts, table runners, wall hangings, or even turn it into a cushion cover.
The Christmas Tree Block – Tutorial is a delightful quilting project that combines tradition, creativity, and festive joy. From gathering materials to adding your own decorative touches, every step brings you closer to creating something special for the holiday season. This block is versatile, beginner-friendly, and a meaningful way to celebrate Christmas through handmade art.
If you’ve tried this tutorial, share your thoughts and experiences. Your feedback and suggestions are always welcome and can inspire others to begin their quilting journey. Let’s keep the tradition of crafting heartfelt holiday projects alive, one quilt block at a time.


