
Ballerina pencil case with zipper Pattern


The Christmas Wreath Quilt Block – Tutorial is the perfect holiday project for quilters who love combining traditional charm with festive creativity.
As the holiday season approaches, handmade decorations bring a warm, personal touch to any home — and this project does exactly that.
Whether you’re a beginner learning to piece together your first quilt block or an experienced crafter looking for a joyful new idea, this Christmas Wreath Quilt Block will add beauty and spirit to your festive décor.
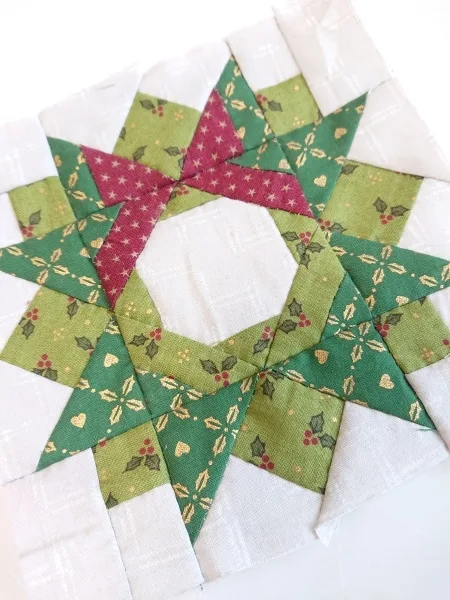
This tutorial focuses on crafting a Christmas Wreath Quilt Block that captures the essence of Christmas in every stitch. You’ll learn how to select the right fabrics, piece together the block, and use simple quilting techniques that make a big visual impact.
With its circular pattern symbolizing unity and celebration, this wreath block can be used for quilts, pillows, wall hangings, or table runners — adding that perfect handmade charm to your home.
Creating a Christmas Wreath Quilt Block is not only about sewing fabric pieces together; it’s also a way to embrace the joy of creativity and tradition. Many quilters find that working on holiday-themed projects helps them unwind and express their festive spirit. As you follow this tutorial, you’ll discover step-by-step how to make your own fabric wreath, from cutting and assembling to adding those final decorative touches that make your creation truly shine.
Selecting the perfect fabric is the foundation of any successful quilt block, and that’s especially true for the Christmas Wreath Quilt Block. To make your wreath come alive, opt for rich seasonal colors like deep greens, vibrant reds, snowy whites, and subtle golds. These hues instantly evoke the warmth and cheer of Christmas while maintaining that timeless quilt aesthetic.
When choosing fabric textures, consider a mix of cottons and small-print fabrics that add depth to the design. Using different shades of green for the wreath leaves can create a dynamic, layered look that mimics the natural variation of real evergreens. If you prefer a more modern touch, try pairing classic holiday tones with metallic fabrics or patterns featuring stars and holly.
Another great tip for your Christmas Wreath Quilt Block – Tutorial is to include a neutral background. A crisp white, cream, or even a soft gray backdrop can help the wreath pattern stand out beautifully. This contrast enhances the overall design and ensures your block looks polished and professional.
Before cutting any fabric, always prewash and press it. This step prevents shrinking and helps your seams align perfectly when assembling the pieces. Accurate fabric preparation may seem simple, but it’s a crucial part of achieving that clean, crisp wreath shape.
If you want your project to have a more vintage look, consider using fabric scraps from previous quilts. This not only adds sentimental value but also creates a charming patchwork appearance. Each piece will tell its own little story, making your quilt block even more special.
Finally, don’t forget to coordinate your thread color. Matching the thread to the dominant hues in your wreath ensures seamless stitching and a cohesive finish — one of the hallmarks of a well-made Christmas Wreath Quilt Block.
Now that your fabrics are ready, it’s time to bring your Christmas Wreath Quilt Block to life. Precision is key here, but with a bit of patience, even beginners can achieve impressive results.
Start by cutting your fabric into the required pieces. Typically, you’ll need squares and triangles to form the circular wreath pattern. The exact measurements can vary depending on the finished block size you want, but most quilters find that 12-inch blocks are a comfortable starting point for this design.
Lay out your cut pieces on a flat surface before sewing. This arrangement helps you visualize the final layout and make adjustments if needed. Arrange the green pieces in a circular formation, leaving an open center to represent the wreath’s hollow core. Add red accent squares or triangles where you’d like the berries or ribbons to appear.
Once the layout looks good, begin piecing the sections together in rows. Sew each seam carefully, pressing as you go to keep everything flat. Consistent seam allowances — usually ¼ inch — will ensure your block aligns correctly when finished.
After assembling the main wreath shape, add the background pieces around it to complete the square. This step frames the wreath beautifully, giving your block a clean and symmetrical look. Double-check that all seams are pressed neatly and that the edges are straight.
Finally, admire your finished Christmas Wreath Quilt Block before moving on to quilting or adding embellishments. This stage is a great time to make any small corrections and ensure your wreath looks perfectly balanced.
One of the most enjoyable parts of this Christmas Wreath Quilt Block – Tutorial is personalizing your design with creative embellishments. Small details can transform a simple quilt block into a festive masterpiece.
Start by adding fabric appliqués or embroidered accents. You can stitch tiny bows, holly leaves, or even miniature ornaments around the wreath. These extra touches make your quilt block truly unique and festive.
Buttons and beads also work beautifully as decorations. A few strategically placed red buttons can represent holly berries, while gold beads can serve as sparkling ornaments. Just remember to secure them tightly so they remain safe and durable, especially if the quilt will be handled frequently.
If you enjoy hand-stitching, consider outlining the wreath with decorative embroidery stitches. Blanket stitches, backstitches, or chain stitches in metallic thread can add texture and shimmer to your block. This technique highlights the wreath’s circular shape and adds dimension to your design.
For a softer, cozy look, you might add felt appliqués. Felt provides a nice contrast to cotton fabrics and gives your quilt block a more tactile quality. It’s an easy way to incorporate both color and texture without overwhelming the design.
Finally, consider quilting motifs that complement the wreath’s theme. Swirls, stars, or snowflakes quilted into the background can tie the whole piece together, creating a cohesive and festive composition.
The Christmas Wreath Quilt Block is incredibly versatile and can be used in a variety of holiday projects. Once you’ve made a few blocks, you’ll find endless ways to incorporate them into your seasonal décor.
One classic idea is to use multiple blocks to create a Christmas quilt or wall hanging. A full quilt made entirely of wreath blocks can make a stunning statement piece during the holidays. You can alternate the wreath blocks with plain squares or star patterns for visual balance.
If you prefer smaller projects, turn a single Christmas Wreath Quilt Block into a festive pillow cover. This is a great way to showcase your handiwork and instantly add holiday cheer to your living room or bedroom.
Another creative idea is to use the block as part of a holiday table runner. A series of wreath blocks arranged in a line will create a beautiful centerpiece for Christmas dinners. Add a few candles or pinecones, and you’ll have a table setup that feels warm and inviting.
Quilt blocks also make thoughtful gifts. You can turn them into potholders, mini wall hangings, or even tote bags for loved ones who appreciate handmade crafts. Adding a personal note or a small embroidered tag makes your gift even more meaningful.
Finally, keep in mind that your Christmas Wreath Quilt Block can be customized for different styles — from traditional to modern. By changing color schemes, adding unique embellishments, or experimenting with shapes, you can adapt this timeless pattern to fit any aesthetic.
1. What size should my Christmas Wreath Quilt Block be?
Most quilters prefer a 12-inch block, but you can adjust the dimensions to suit your project. Smaller blocks are perfect for pillows or table runners, while larger ones work well for quilts and wall hangings.
2. Can beginners make the Christmas Wreath Quilt Block?
Yes! This tutorial is beginner-friendly. As long as you follow each step carefully and maintain accurate seam allowances, you’ll get a beautiful result even if you’re new to quilting.
3. What fabrics work best for this project?
Cotton fabrics with small prints or solid colors are ideal. They’re easy to work with, hold their shape, and showcase the wreath design beautifully.
4. How can I make my wreath more decorative?
Try adding buttons, embroidery, appliqués, or beads for texture and color. You can even quilt festive motifs like stars or snowflakes around the wreath for a detailed finish.
5. Is it necessary to prewash the fabric?
Yes, prewashing is recommended to prevent shrinkage and color bleeding later. It ensures your finished quilt block remains neat and long-lasting.
6. Can I use scraps for this project?
Absolutely! Using fabric scraps adds personality and helps reduce waste. It’s also a wonderful way to make your Christmas Wreath Quilt Block more unique and meaningful.
Creating your own Christmas Wreath Quilt Block is a joyful way to celebrate the season and express your creativity through fabric and color.
From choosing the right materials to adding personalized embellishments, each step allows you to craft something truly special. This tutorial provides everything you need to make a beautiful wreath block that can brighten your home or become a heartfelt gift for someone you love.
If you enjoyed this project, share your thoughts in the comments! Let us know what techniques worked best for you and what creative touches you added to make your wreath stand out. Your feedback and suggestions help inspire other quilters — and keep the spirit of handmade Christmas traditions alive.


