
Ballerina pencil case with zipper Pattern


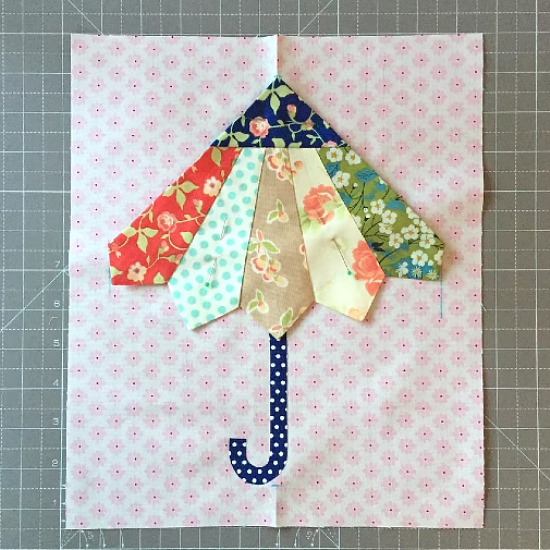
Create a Charming Umbrella Block: A Quilting Tutorial is the perfect guide for quilters of all levels who want to add a playful, rainy-day-inspired design to their projects.
This tutorial focuses on creating a visually appealing umbrella quilt block that can be incorporated into larger quilts, wall hangings, or even table runners.
With detailed steps, helpful tips, and creative ideas, you’ll be able to craft an umbrella block that adds charm and personality to your quilting collection.
Quilting is not only a creative outlet but also a relaxing hobby that allows you to express your personal style through fabric, color, and design.
By learning how to create a charming umbrella block, you can experiment with different fabrics and color combinations to achieve a unique look. This tutorial is designed to make the process straightforward and enjoyable, even for beginners, while providing advanced techniques for more experienced quilters.
Adding themed blocks like an umbrella can make a quilt more interesting and meaningful. Whether you’re making a gift for a loved one or crafting a personal project, this umbrella quilt block tutorial helps you achieve a professional and polished appearance. By following each step carefully, you can ensure your blocks are precise, visually balanced, and ready to be joined with other blocks to create a cohesive quilt design.
Selecting the right fabrics is crucial for the overall impact of your umbrella quilt block. Consider using contrasting colors for the umbrella and background to make the design pop. For example, a bright, patterned fabric for the umbrella canopy paired with a neutral background fabric can create a striking visual effect.
Cotton fabrics are highly recommended because they are easy to work with and maintain shape well. They are also durable and washable, making your quilt functional as well as decorative. Additionally, you can mix solids and prints to add texture and depth to your umbrella block.
When choosing fabrics, consider the size of your block. Smaller prints can add intricate details, while larger prints work well for bigger blocks. Balance is key: too many patterns can make the block look busy, while carefully selected prints can enhance the charm of your umbrella design.
Don’t forget to pre-wash your fabrics to prevent shrinkage and color bleeding. This simple step ensures your finished umbrella block maintains its original size and color integrity after washing. It also helps your fabric feel softer and more pliable for cutting and sewing.
Consider the thread color as part of your fabric selection. Using a thread that complements your fabrics can enhance the look of your seams and quilting stitches. Contrasting threads can be used for decorative stitching to highlight the umbrella design.
Finally, gather all your materials before you start cutting and piecing. Having everything ready, including scissors, rotary cutter, rulers, and pins, will make the sewing process smoother and more enjoyable.
Start by cutting your fabric pieces according to the dimensions of your chosen umbrella quilt block pattern. Accurate cutting is essential to ensure that your block pieces fit together neatly. Use a rotary cutter and ruler for precision.
The umbrella canopy is usually made from a triangle or fan-shaped piece, while the handle can be a simple rectangle or a curved shape. Carefully cut each piece and arrange them on your workspace to visualize the final block.
Pinning your pieces before sewing helps maintain alignment and prevents shifting. Place the right sides together when sewing, and remember to use a consistent seam allowance for accuracy.
Sew the umbrella canopy pieces first, then attach the handle. Press your seams after each step to ensure a crisp and professional finish. Pressing is especially important when working with small pieces to avoid bulk.
Check your block size after piecing. If necessary, trim edges to achieve perfect squares or rectangles, which will make joining multiple blocks easier. Accurate blocks lead to a cleaner, more polished quilt overall.
Consider adding small embellishments or decorative stitching to enhance the umbrella design. For example, quilting along the canopy ribs can add texture and dimension, making your umbrella block even more charming.
Once your umbrella block is complete, it’s time to incorporate it into your larger quilt project. Arrange your blocks in a pleasing layout, balancing colors and patterns for visual harmony.
Sew blocks together carefully, maintaining seam allowances to ensure your quilt top remains even. Press seams open or to one side, depending on your preference and quilt thickness.
Add borders if desired. Borders can frame your umbrella block beautifully and give your quilt a finished look. Choose colors that complement your block fabrics for a cohesive design.
Layer your quilt top with batting and backing fabric. Pin or baste layers to prevent shifting during quilting. Consider using safety pins or basting spray for stability.
Quilt around the umbrella block design or use an overall quilting pattern that enhances the block. Stitching along canopy lines or adding raindrop motifs can make your umbrella block come alive.
Finish your quilt with binding. Binding completes the edges and adds a professional touch. Match or contrast binding with your umbrella block colors to highlight your design.
Take your time with cutting and piecing to avoid mistakes. Accurate measurements and careful sewing are the foundation of a beautiful umbrella quilt block.
Use a design wall or a large surface to arrange your fabrics before sewing. Visualizing the final layout helps you make color adjustments and ensures balance.
Press seams consistently to prevent bulk and ensure flat blocks. Use a pressing cloth if necessary to avoid scorching delicate fabrics.
Experiment with different fabric textures for added interest. Cotton blends, quilting cotton, and even lightweight flannels can bring unique character to your umbrella block.
Consider hand applique techniques if you want to add intricate umbrella details that are difficult to piece. Applique allows for creative freedom and adds dimension to your quilt.
Keep a notebook of measurements, fabrics used, and sewing notes. This record helps you replicate your umbrella block design for future projects and makes improvements easier.
Q: Can beginners make an umbrella quilt block?
A: Yes! This tutorial is designed for quilters of all skill levels. Start with simple shapes and fabrics, and gradually try more complex designs.
Q: What fabric types work best for quilt blocks?
A: Quilting cotton is ideal because it is easy to sew, durable, and washable. Pre-wash fabrics to prevent shrinkage.
Q: How do I ensure my blocks are the same size?
A: Measure and cut each piece precisely, use consistent seam allowances, and trim blocks after piecing if necessary.
Q: Can I combine umbrella blocks with other designs?
A: Absolutely! Umbrella blocks can be mixed with squares, triangles, or other themed blocks for a unique quilt layout.
Q: How can I add dimension to my umbrella block?
A: Use applique, decorative stitching, or textured fabrics to give the block depth and visual interest.
Q: What is the recommended size for an umbrella block?
A: Sizes vary based on your quilt design, but a common block size is 6 to 12 inches square, which is versatile for most projects.
Creating a charming umbrella block is a rewarding quilting project that adds personality and charm to any quilt. By carefully selecting fabrics, accurately cutting and piecing, and using creative quilting techniques, you can craft a block that is both beautiful and functional.
Following this quilting tutorial, you now have the tools and tips to make your own umbrella blocks and incorporate them into quilts, wall hangings, or table runners.
We encourage you to leave your honest opinions and suggestions about your experience with this tutorial and share any creative ideas you used while crafting your umbrella blocks.


