
Ballerina pencil case with zipper Pattern


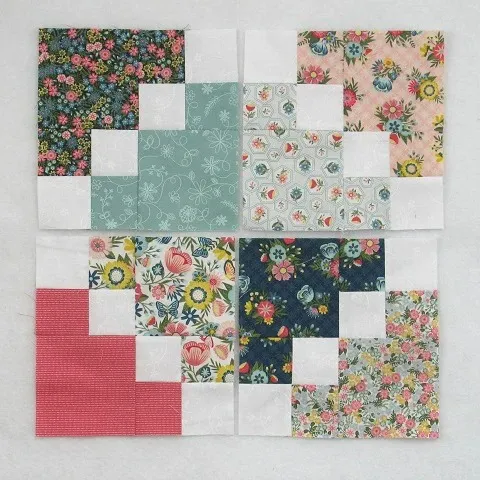
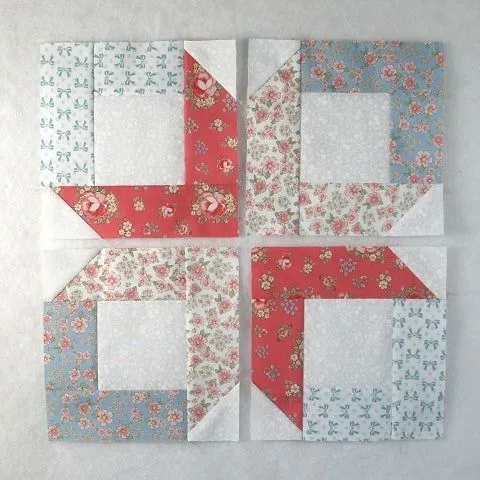
The Double Four Patch Quilt Block Tutorial is an excellent guide for quilters who want to explore traditional block patterns while adding their personal touch.
The double four patch block combines simplicity and elegance, creating a visually striking design that works beautifully in any quilt.
Whether you are a beginner looking for a manageable project or an experienced quilter seeking a quick yet classic block, this tutorial provides all the steps you need to complete your quilt successfully.
Making a Double Four Patch Quilt Block is not just about sewing pieces together; it’s about crafting something meaningful and timeless.
Each block represents precision, patience, and creativity. With this tutorial, you can learn how to construct blocks efficiently, assemble them, and customize colors and layouts for a unique finished quilt. The block’s versatility makes it suitable for blankets, table runners, pillows, and more.
The Double Four Patch Quilt Block Tutorial emphasizes the importance of accuracy and design balance. Each block consists of a combination of squares sewn into two layers of four-patch units, which are then joined to form the final block. By mastering this technique, you can create quilts that are visually balanced, symmetrical, and perfectly aligned, achieving professional-looking results even as a beginner.
The Double Four Patch Quilt Block is built from smaller four-patch units. Each four-patch unit consists of four squares arranged in a 2×2 configuration. Two of these units are then combined to form the larger double four patch block, which results in a total of sixteen small squares arranged symmetrically.
The charm of the block lies in the contrast of light and dark fabrics. Proper color placement creates the illusion of diagonal lines or checkerboard patterns, making the block dynamic and eye-catching. By alternating fabrics, you can achieve a variety of visual effects from subtle textures to bold designs.
Traditionally, quilters use a combination of solid and printed fabrics to enhance the block’s structure. Solid fabrics help define the patch lines, while prints add interest and movement. However, modern quilters often experiment with gradients, ombre effects, or coordinated color schemes to create unique variations.
Accuracy is key in constructing the Double Four Patch Quilt Block. Consistent seam allowances and precise square sizes ensure that the blocks align perfectly during assembly. A small misalignment in one unit can throw off the overall layout, so taking time during cutting and piecing is crucial.
The block can be scaled to fit any quilt size. By adjusting the size of the squares in each four-patch unit, you can create small baby quilts or large bedspreads. The flexibility of the double four patch design makes it a popular choice for quilters of all levels.
Before you begin, it’s helpful to layout your fabric squares and plan color placement. This preparation allows you to visualize the final pattern and prevents mistakes during sewing.
Creating a Double Four Patch Quilt Block is straightforward when broken into clear steps. Follow this tutorial to achieve precise and beautiful blocks.
Step 1: Cut Fabric Squares
Select your fabrics, and cut sixteen small squares of equal size for each block. Typically, 2.5-inch squares work well, but you can adjust the size depending on your desired block dimensions. Separate your squares into light and dark tones for contrast.
Step 2: Assemble Four-Patch Units
Take four squares (two light and two dark) and arrange them in a 2×2 pattern. Sew the squares together row by row, then join the rows to complete one four-patch unit. Repeat this process for a second four-patch unit.
Step 3: Join the Four-Patch Units
Place the two four-patch units side by side, matching seams carefully. Sew them together to form the double four patch block. Press the seams open or to one side to maintain a flat surface.
Step 4: Square Up the Block
Trim the edges of your block to ensure it is a perfect square. Accuracy is important to ensure that all blocks align neatly when assembling the full quilt.
Step 5: Assemble the Quilt Top
Lay out your double four patch blocks on a large surface. Experiment with different layouts to achieve the desired visual effect. Once satisfied, sew the blocks together in rows, then join the rows to complete the quilt top.
Step 6: Add Borders and Finish
Attach borders to frame your quilt, then layer it with batting and backing fabric. Quilt using your preferred method, then finish with a binding to secure the edges.
The Double Four Patch Quilt Block Tutorial ensures that even beginners can achieve precise, visually appealing results while learning essential quilting techniques.
To create flawless Double Four Patch Quilt Blocks, keep a few key tips in mind.
First, maintain a consistent quarter-inch seam allowance. Uniform seams are essential for accurate block alignment.
Second, press seams after each step. Proper pressing prevents bulk and ensures your blocks lie flat.
Third, plan your color placement before sewing. Alternating light and dark squares carefully produces dynamic visual effects.
Fourth, use pins when joining four-patch units. This helps prevent seam shifting and keeps your block symmetrical.
Fifth, trim blocks after completing each unit to maintain even edges. This makes assembling the quilt top much easier.
Finally, don’t rush. Take time to check alignment and consistency at every step. Patience ensures professional-looking results.
The Double Four Patch Quilt Block is highly versatile, allowing quilters to create a wide range of designs.
Use color gradients to create a subtle ombre effect across your quilt. This adds depth and visual interest to a traditional block.
Experiment with fabric prints, combining florals, geometrics, and solids for a scrappy, eclectic look. Each quilt becomes a unique work of art.
The layout of blocks can dramatically change the overall design. Try diagonal alignments, checkerboard patterns, or concentric arrangements for creative variations.
Borders and sashing can further enhance the quilt. Narrow sashing between blocks highlights individual patterns, while wide borders frame the quilt and give it a finished look.
The block can also be scaled for smaller projects, like pillows, table runners, or placemats, making it a versatile design beyond full-sized quilts.
Finally, consider mixing double four patch blocks with other quilt blocks for an original sampler quilt. Combining blocks introduces variety while showcasing your quilting skills.
Q: Is the Double Four Patch Quilt Block suitable for beginners?
A: Yes. The block’s repetitive structure makes it easy to follow, and it’s perfect for learning piecing and color placement.
Q: What size squares should I use?
A: Two to 2.5-inch squares are ideal for each small square, but you can adjust based on your preferred block size.
Q: Can I use pre-cut fabrics?
A: Absolutely! Jelly rolls, charm packs, or scrap fabrics work well for this pattern.
Q: How many blocks do I need for a full quilt?
A: This depends on quilt size. For a twin quilt, around 30–36 double four patch blocks are sufficient.
Q: How do I maintain accurate seams?
A: Use a consistent quarter-inch seam allowance, press seams carefully, and pin units before sewing.
Q: Can this block be combined with other blocks?
A: Yes. The double four patch works beautifully in sampler quilts when mixed with other traditional or modern blocks.
Q: How should I care for my finished quilt?
A: Machine wash on gentle with mild detergent and lay flat to dry. Avoid harsh detergents and high heat to preserve the fabrics and seams.
The Double Four Patch Quilt Block Tutorial offers a perfect combination of simplicity, elegance, and versatility. By mastering the construction of this classic block, you can create quilts that are visually striking, balanced, and personalized.
Now that you’ve learned every step in this tutorial, gather your favorite fabrics and start creating your own Double Four Patch Quilt. Share your experience, suggestions, and favorite layouts — your insights may inspire fellow quilters and help build a vibrant quilting community.


