
Ballerina pencil case with zipper Pattern


Double Windmill Quilt Block: A Step-by-Step Guide Pattern is a timeless design loved by quilters for its dynamic movement, symmetry, and creative possibilities. In this article, you will learn how to make a beautiful version of this classic block while mastering essential quilting skills. The Double Windmill Quilt Block: A Step-by-Step Guide Pattern offers a perfect combination of tradition and modern style, making it ideal for beginners and experienced crafters alike. Throughout this guide, we will explore techniques, tips, and quilting insights to help you achieve professional results.
Working with the Double Windmill Quilt Block: A Step-by-Step Guide Pattern teaches you how to handle contrasting colors, match seams correctly, and build a block that feels alive with motion. Whether your goal is to create a full quilt, a cushion cover, or a decorative panel, understanding the rules behind windmill-style piecing is essential. This pattern’s structure also allows quilters to experiment with color combinations and fabric types, ensuring each project becomes truly unique.
Before diving into the technical parts of the process, it is important to understand why the Double Windmill Quilt Block: A Step-by-Step Guide Pattern stands out. Its geometric twists create a captivating visual rhythm, and the doubled blades make the block appear more intricate than it actually is. With patience, attention to detail, and the instructions below, you will quickly notice how simple lines transform into artistic movement. Now let’s explore every step of this pattern with clarity and confidence.
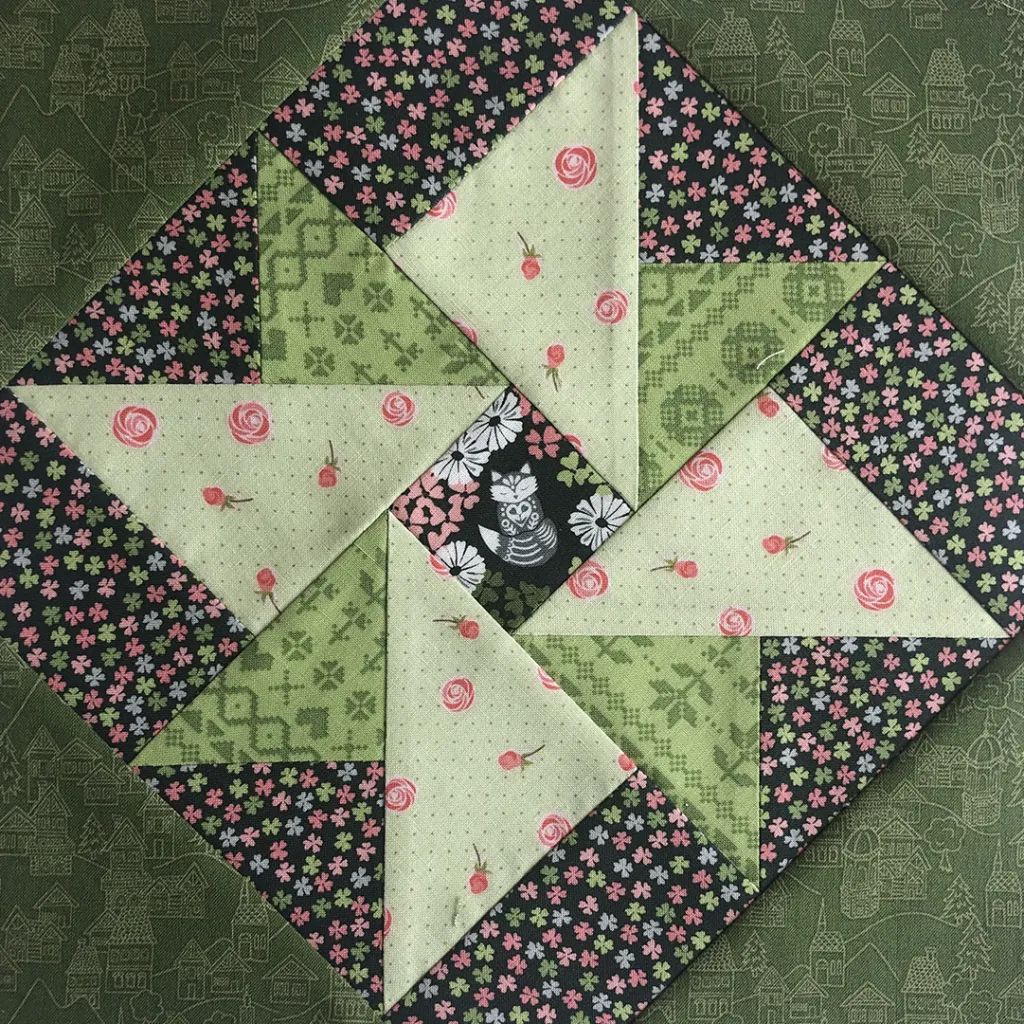
The beauty of the Double Windmill Quilt Block: A Step-by-Step Guide Pattern is found in its simple yet clever arrangement of triangles and squares. Each blade of the windmill is formed by precise angles that meet neatly at the center. This structure helps crafters improve accuracy and learn how to handle multiple seams converging in a single point. Because of this, it becomes a great training block for anyone looking to refine their quilting precision.
Another important aspect of this block is the balance between light and dark fabrics. The Double Windmill Quilt Block: A Step-by-Step Guide Pattern relies heavily on contrast, so choosing fabrics that stand out from each other is essential. You can use solids for a bold, modern look or mix prints for a more traditional feel. Either way, the visual effect is created through the careful arrangement of tones.
Symmetry also plays a major role in the block’s appeal. Each blade mirrors the others, creating a rotating effect that feels almost three-dimensional. This symmetry is what makes the Double Windmill Quilt Block: A Step-by-Step Guide Pattern ideal for large quilt layouts because the blocks align beautifully in rows or alternating arrangements. When repeated across an entire quilt, the effect becomes mesmerizing.
You will also appreciate how this pattern works well with charm packs, scraps, or yardage. Its versatile shape allows you to repurpose smaller fabric cuts while still producing a polished final result. This flexibility encourages sustainability in quilting and makes it easier to complete a project without needing large amounts of yardage.
Another advantage is that this block is highly customizable. Whether you want crisp points or softer, scrappier lines, the Double Windmill Quilt Block: A Step-by-Step Guide Pattern adapts to your style. You can experiment with muted palettes, bold neons, or holiday themes to suit any project. The result remains visually dynamic regardless of the direction you take.
Finally, this pattern serves as an excellent foundation for learning more advanced quilting techniques. By mastering the windmill structure, you build confidence in cutting accuracy, seam alignment, and pressing strategies. These skills carry over into many other quilt block designs, making this pattern an important step in a quilter’s learning journey.
Begin by selecting the fabrics for your Double Windmill Quilt Block: A Step-by-Step Guide Pattern. You will need at least two contrasting colors, though many quilters choose four fabrics for added complexity. The goal is to create strong visual separation between the blades of the windmill, allowing the design to stand out clearly.
Next, cut the necessary squares and triangles according to the block size you want. Precision is key, so use a sharp rotary cutter and ensure your ruler does not slip. For this pattern, consistent cutting ensures that all pieces fit together smoothly during assembly. Even minor size differences can affect your final block alignment.
Once your pieces are cut, start pairing the fabrics that will form each windmill blade. Sew the triangles together carefully, aligning edges and maintaining an even seam allowance. Pressing each seam after sewing is essential, as it keeps the block flat and helps all points meet neatly in the finished design.
After assembling the small components, begin building the larger sections. The Double Windmill Quilt Block: A Step-by-Step Guide Pattern is typically pieced in quadrants, which makes alignment easier. Join each pair of blades together and ensure the center point matches correctly. If necessary, trim minimal fabric to square the sections.
With the quadrants complete, connect them to form the final block. The center can be the most challenging part, as multiple seams meet at one point. Press seams open or to the side depending on your preference, but aim for a smooth result that allows the windmill to appear crisp and sharp.
Finally, square your completed block using a ruler to ensure the edges are even. A squared block is essential if you plan to create a full quilt, as consistent sizing ensures clean assembly. Once squared, your Double Windmill Quilt Block: A Step-by-Step Guide Pattern is ready to be incorporated into a quilt top or displayed on its own.
Choosing fabrics for the Double Windmill Quilt Block: A Step-by-Step Guide Pattern can dramatically influence the final appearance. A block made with soft pastels will have a gentle, elegant look, while bold colors can create a lively, modern effect. Think about the atmosphere you want your quilt to convey and pick fabrics accordingly.
When selecting prints, consider scale. Large prints may become lost when cut into small pieces, while small prints maintain their detail. Pairing solids with prints can also be effective, as the solids help frame the windmill blades clearly. This combination ensures your design remains visually balanced.
Color contrast is essential. Without it, the windmill shape may blend together and lose its definition. For best results, choose fabrics that differ in both color and value. Light-versus-dark combinations work particularly well and make the Double Windmill Quilt Block: A Step-by-Step Guide Pattern more eye-catching.
If you prefer a scrappy style, gather different fabrics within the same color family. This creates depth without overwhelming the design. A scrappy approach can also highlight the rotating movement of the block, giving it a charming handmade appearance.
Seasonal palettes are another fun direction you can explore. Winter blues, autumn browns, or holiday reds and greens can transform the windmill into a themed project. The Double Windmill Quilt Block: A Step-by-Step Guide Pattern adapts beautifully to these creative themes.
Experimentation is key. Lay out your fabric choices before cutting anything, and rotate pieces to test how they interact visually. This helps you finalize the combination that best enhances the windmill structure.
Once you complete your first Double Windmill Quilt Block: A Step-by-Step Guide Pattern, you can begin exploring different project ideas. This block works beautifully in full quilts, table runners, wall hangings, bags, and decorative pillow covers. Its dynamic shape adds a sense of movement to any project.
Creating a whole quilt with repeating windmill blocks results in a stunning effect. The rotation of the blades creates a continuous flow across the quilt top, making it visually engaging from every angle. You can arrange the blocks in straight rows or offset them for variation.
This block also pairs well with sashing. Adding thin strips between each block helps highlight the windmill design and prevents the pattern from feeling too busy. Sashing can also help unify different color combinations if you choose a scrappy or diverse palette.
You can create a single-block project as well. A standalone Double Windmill Quilt Block: A Step-by-Step Guide Pattern makes a beautiful cushion cover or framed fabric art. These smaller creations allow you to test new color schemes and practice your precision cutting and piecing.
Another creative idea is to combine the windmill block with other geometric blocks in a sampler quilt. The bold lines of the windmill contrast nicely with softer or more intricate blocks, bringing balance to the overall layout.
Finally, this block is perfect for gifting. Handmade quilts or quilted décor featuring the windmill design make heartfelt presents for birthdays, housewarmings, and holidays.
What size should my Double Windmill Quilt Block be?
Most quilters create blocks ranging from 8 to 12 inches, but you can scale the pattern to any size by adjusting the measurements.
Is this block suitable for beginners?
Yes, the Double Windmill Quilt Block: A Step-by-Step Guide Pattern is beginner-friendly, though it requires careful cutting and seam matching.
What fabrics work best for this block?
High-contrast fabrics, either solids or small prints, provide the clearest windmill shape.
How do I keep the center point neat?
Pressing seams carefully and using accurate seam allowances will help all points meet cleanly at the center.
Can I make this block using scraps?
Absolutely. Scrappy versions of the block look charming and add depth to the design.
Do I need special tools?
A rotary cutter, ruler, and quilting mat are highly recommended for accuracy.
The Double Windmill Quilt Block: A Step-by-Step Guide Pattern is a beautiful and rewarding project that helps you grow as a quilter. By learning how to structure the block, choose the best fabrics, and assemble each section with care, you can create stunning pieces full of movement and personality. This guide has provided the essential steps, tips, and insights you need to complete your own windmill block with confidence. I hope this article was helpful—please leave your sincere opinion and share any suggestions you may have for future quilting guides.


