
Ballerina pencil case with zipper Pattern


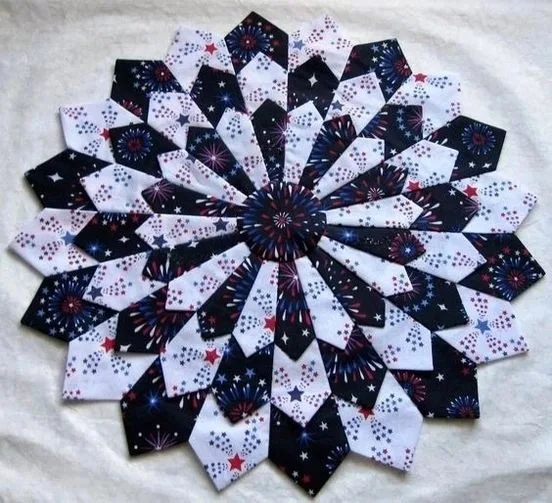
The Dresden Plate – Quilt Tutorial is one of the most beloved patterns in the quilting world, admired for its beauty, history, and endless creative possibilities. This quilt block features petal-like wedges arranged in a circular shape, resembling the blades of a fan or a blooming flower.
Its unique design has made it a timeless favorite among quilters for generations. Whether you are new to quilting or already an experienced maker, learning how to master this block can open up exciting opportunities for creating quilts that are both traditional and modern.
What makes the Dresden Plate – Quilt Tutorial especially fascinating is the fact that it combines precision with artistry. Each wedge must be carefully cut and pieced together, yet there is room for creativity in the fabric choices and color arrangements.
Some quilters prefer soft pastel palettes for a vintage look, while others experiment with bold and bright fabrics to give the Dresden Plate a fresh and contemporary twist. No matter your preference, the pattern adapts beautifully to your style.
The versatility of the Dresden Plate block is another reason for its enduring popularity. You can use a single block as the centerpiece of a pillow or wall hanging, or join multiple blocks together to create a full-sized quilt. With this Dresden Plate – Quilt Tutorial, you will discover not only the technical steps for making the block but also the inspiration to personalize it and make it your own.
Before beginning the Dresden Plate – Quilt Tutorial, it is important to prepare the right materials. Fabric is the star of this block, and you will need a selection of prints or solids that complement each other. Cotton quilting fabric is the best choice because it is easy to cut, press, and sew, while also offering durability and a polished finish.
A rotary cutter, cutting mat, and quilting ruler are essential tools for cutting precise wedges. Accuracy is crucial when working with the Dresden Plate design because even a slight difference in size can affect how the wedges fit together in a circle. Many quilters also use Dresden Plate templates to help achieve consistency in each wedge.
Thread selection is another consideration. Using a high-quality cotton thread ensures strong seams that will hold up over time. Choosing a thread color that blends with your fabric can help your stitches look neat and professional. Some quilters prefer a neutral shade like gray or beige for versatility across different fabrics.
Pins or fabric clips are also important for holding wedges in place before stitching. These small tools make it easier to manage multiple fabric pieces and prevent shifting while you sew. A seam ripper is another must-have, as even experienced quilters sometimes need to correct mistakes.
For finishing the block, you will need a background fabric, batting, and backing if you plan to assemble the Dresden Plate into a quilt. Adding a circle to the center of the plate is traditional, and you can choose a coordinating or contrasting fabric to highlight the design.
Lastly, a reliable sewing machine makes the process smoother, but you can also sew the Dresden Plate by hand if you enjoy slow stitching. Hand-sewn versions often carry a charming, vintage look that adds to the overall beauty of the quilt.
The Dresden Plate – Quilt Tutorial begins with cutting the wedges. Using your template or ruler, cut the fabric pieces carefully so they are all the same size. The number of wedges needed depends on the template used, but most Dresden Plates are made up of 12, 16, or 20 wedges.
Once the wedges are cut, you’ll need to prepare the pointed or rounded ends. This step gives the block its signature look. To create pointed ends, fold the top of the wedge right sides together and sew across the edge, then turn it right side out and press. For rounded ends, sew a curved seam along the top and clip small notches to help it lie flat after turning.
Next, sew the wedges together one by one, aligning edges and stitching them into pairs. Continue adding wedges until the entire circle is formed. Press seams open or to one side to reduce bulk. At this stage, you will begin to see the beautiful flower-like shape take form.
After the circle is completed, it’s time to attach it to the background fabric. You can center the Dresden Plate on a square of fabric and secure it with pins or fabric glue. Then, applique the edges by hand or machine, depending on your preference. Hand applique gives a delicate finish, while machine applique is quicker and durable.
The center circle is the finishing touch. Cut a fabric circle, fold under the edges, and place it in the middle of the Dresden Plate to cover raw seams. Sew it in place with an applique stitch or blanket stitch. The center circle not only completes the look but also strengthens the block.
Finally, square up the background fabric around your Dresden Plate. If you are making multiple blocks for a quilt, ensure they are all the same size for easy assembly later. With the block complete, you are ready to add borders, sashing, or additional quilting elements as desired.
The beauty of the Dresden Plate – Quilt Tutorial lies in its flexibility. Traditional versions often use scrap fabrics, giving each block a colorful and lively appearance. This is an excellent way to use up leftover fabric from other projects while creating something visually striking.
For a more modern approach, consider using solid fabrics or a limited color palette. Monochromatic designs or high-contrast combinations create a bold statement while keeping the pattern clean and simple.
Another creative idea is to vary the size of the Dresden Plates. Large blocks make dramatic quilt centers, while smaller plates work beautifully as accents or borders. Mixing different sizes in one quilt can also add a dynamic and playful effect.
You can also experiment with placement. Instead of centering each plate on a square, try setting them off-center or overlapping slightly for a more artistic look. Quilts do not have to follow strict symmetry, and the Dresden Plate adapts well to unique layouts.
Adding embellishments is another way to personalize your project. Embroidering around the wedges, adding buttons to the center, or quilting intricate patterns on the background can elevate the design further. These small touches make your quilt truly one of a kind.
Finally, think beyond quilts. Dresden Plate blocks can be used in pillows, tote bags, table runners, or even framed as wall art. Their flower-like appearance makes them versatile and decorative for many types of projects.
When working on the Dresden Plate – Quilt Tutorial, accuracy is key. Always double-check your cutting measurements to ensure the wedges fit together properly. Using templates helps maintain consistency and reduces frustration.
Pressing at each stage makes a significant difference. Carefully pressing seams flat as you go helps the wedges align neatly and keeps the circle smooth. Skipping this step can lead to bulky seams and uneven edges.
If you are new to applique, practice on a scrap fabric first. This allows you to test your stitches and build confidence before working on your main block. Smooth, even stitches will give your Dresden Plate a professional finish.
Choosing fabrics with varying values and prints adds depth to your design. Mixing small prints, solids, and bold patterns helps each wedge stand out while still working together as a whole.
Consider stabilizing your background fabric if you are working with delicate materials. This prevents puckering and ensures the Dresden Plate lies flat. A lightweight fusible interfacing can provide extra support.
Above all, take your time and enjoy the process. The Dresden Plate is a pattern that rewards patience, and the finished result is always worth the effort.
Q1: Is the Dresden Plate pattern beginner-friendly?
Yes, beginners can make this pattern, but it does require patience and precision. Starting with a small project like a pillow is a great way to practice.
Q2: How many wedges are needed for a Dresden Plate?
The number varies depending on the template, but most blocks use between 12 and 20 wedges.
Q3: Can I make Dresden Plates without a template?
Yes, but templates are recommended for accuracy. Without them, it can be challenging to ensure all wedges are uniform.
Q4: What is the best method to applique the plate onto the background?
Both hand and machine applique work well. Hand applique gives a softer, traditional finish, while machine applique is faster and durable.
Q5: Can Dresden Plates be used in modern quilting?
Absolutely. With bold fabrics and creative layouts, Dresden Plates can look very modern and fresh.
Q6: How do I prevent puckering when sewing wedges together?
Make sure to cut accurately, maintain consistent seam allowances, and press carefully after each step.
The Dresden Plate – Quilt Tutorial is a classic quilting pattern that combines precision with creativity. From cutting wedges to arranging them into a beautiful circle, each step allows quilters to explore their skills while expressing personal style. With endless fabric choices and layout possibilities, the Dresden Plate can be adapted to traditional or modern designs, making it one of the most versatile quilt blocks.
I hope this tutorial has given you both the knowledge and inspiration to try the Dresden Plate yourself. Please share your honest opinions and suggestions—I’d love to hear your experiences and ideas for making this timeless quilt block even more special.


