
Ballerina pencil case with zipper Pattern


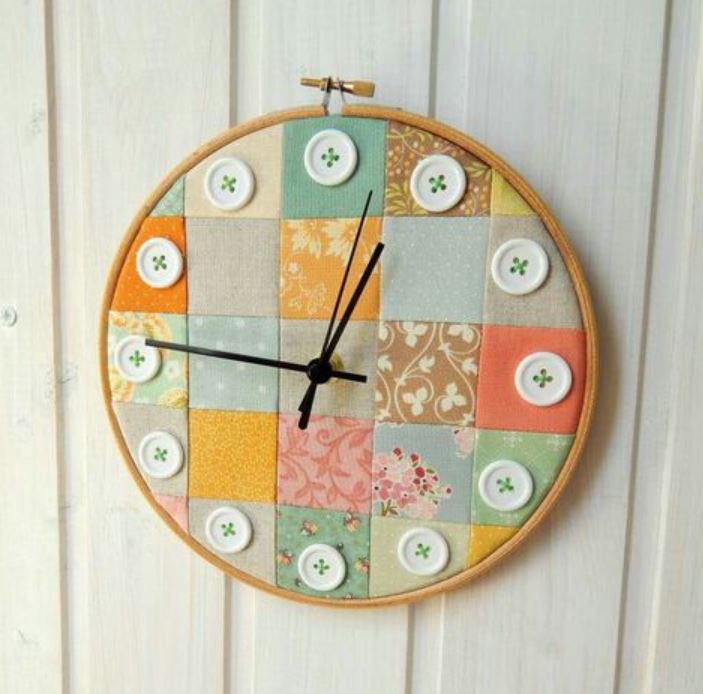
Creating a handmade Embroidery Hoop Clock – Step by Step is a delightful way to combine functionality with artistic expression. This project not only gives you a unique, customized timepiece for your home but also allows you to showcase your embroidery skills.
Unlike standard clocks, an embroidery hoop clock becomes a piece of decor that is both personal and visually appealing. It’s perfect for crafters who love DIY projects, home decorating, or gifts with a handmade touch.
Following this step-by-step guide, you’ll learn how to make your own embroidery hoop clock from scratch, using basic supplies and simple techniques, resulting in a stylish and functional piece.
The Embroidery Hoop Clock – Step by Step is highly versatile. You can choose from different embroidery designs, thread colors, and hoop sizes to match your interior style.
For example, floral designs create a soft and romantic look, geometric patterns offer a modern aesthetic, and themed motifs can reflect seasonal decor. This project is also an excellent way to recycle embroidery hoops you may already have, transforming them into functional clocks that brighten your home while keeping the environment in mind.
Another great feature of the Embroidery Hoop Clock – Step by Step is its accessibility. You don’t need advanced embroidery skills to complete this project. Beginners can start with simple patterns like a monogram, flower outlines, or abstract shapes. More experienced crafters can incorporate detailed stitching, shading, and layered textures for a more intricate result. The process of creating the clock is rewarding, allowing you to combine creativity with practicality while producing a piece that’s truly one-of-a-kind.
Before starting your Embroidery Hoop Clock – Step by Step, gather all necessary materials to ensure a smooth workflow. These include:
Having all your materials prepared in advance ensures you can focus on the creative process without interruption.
Stretch your fabric tightly over the embroidery hoop, ensuring it is smooth and taut. The fabric should sit evenly in the hoop to prevent wrinkles, which could affect both embroidery and the placement of the clock hands. Trim any excess fabric at the back, leaving enough for securing the hoop.
Use a fabric pencil or marker to lightly sketch your design directly onto the fabric. If you’re making a floral clock, draw flowers around the central point where the clock mechanism will be inserted. For geometric or abstract designs, lightly outline shapes to maintain symmetry. Sketching first ensures your embroidery stays neat and balanced.
Start stitching along the lines of your design using your chosen embroidery stitches. Common stitches for this project include:
Once your embroidery is complete, find the center point of your hoop and carefully cut a small hole in the fabric. Insert the clock mechanism according to manufacturer instructions. Ensure the hands have enough clearance and move freely without catching on your embroidery threads.
Secure the clock mechanism to the back of the embroidery hoop. Most battery-operated mechanisms have a washer and nut to hold the movement in place. Adjust the hands to the correct time, insert batteries, and check that the clock functions smoothly.
Trim any remaining excess fabric and secure it neatly at the back with glue, tape, or fabric stitches. Add any embellishments such as beads, sequins, or decorative stitching to enhance the design. Your Embroidery Hoop Clock is now ready to hang or display.
The Embroidery Hoop Clock – Step by Step offers endless creative possibilities:
Customizing your embroidery hoop clock ensures it complements your home decor while reflecting your personality and creativity.
Creating a handmade Embroidery Hoop Clock – Step by Step offers multiple benefits:
This project blends creativity with functionality, offering satisfaction for both beginners and advanced crafters.
1. Do I need embroidery experience?
No, beginners can follow simple stitch patterns, while advanced crafters can experiment with more intricate designs.
2. Can I make different sizes?
Yes, choose different hoop sizes or scale your design for mini clocks or large statement pieces.
3. What kind of fabric works best?
Cotton, linen, or any tightly woven fabric is ideal to support stitching and the clock mechanism.
4. How do I ensure the hands don’t catch?
Keep embroidery away from the center hole, and make sure threads do not overlap the clock hands.
5. Can I sell these clocks?
Yes, handmade embroidery hoop clocks are popular for crafts and gift shops.
6. Can I make themed clocks?
Absolutely! Seasonal designs, personalized monograms, or abstract patterns all work beautifully.
7. Are batteries included?
Typically, the clock mechanism uses standard batteries (AA), but these are usually not included and must be purchased separately.
8. How long does it take to complete?
Depending on the complexity of the embroidery, a project can take anywhere from a few hours to several days.
9. Can I hang the clock on the wall?
Yes, most embroidery hoops have a small hook or loop for wall mounting.
10. How do I maintain the clock?
Dust the surface lightly and replace batteries as needed. Avoid washing embroidered fabric with the mechanism attached.
The Embroidery Hoop Clock – Step by Step is a perfect combination of art and practicality. By following the steps outlined above, you can create a personalized timepiece that enhances your home decor while showcasing your creativity.
From selecting materials to sketching your design, stitching, and assembling the clock mechanism, each stage allows for customization and artistic expression.
Handmade clocks make excellent gifts, decorative accents, or even statement pieces for your living room, bedroom, or office. Start your embroidery hoop clock today, and enjoy the satisfaction of creating something functional, beautiful, and completely unique. Share your creations and ideas to inspire others, and don’t forget to leave feedback or suggestions for new designs.


