
Ballerina pencil case with zipper Pattern


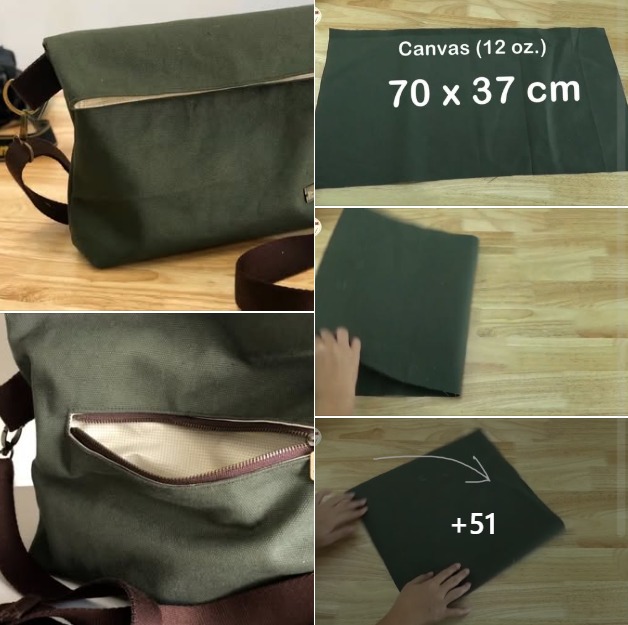
How to Make a Crossbody Bag – Pattern is a practical and stylish project for anyone looking to create a handmade accessory that combines functionality and personal style.
This How to Make a Crossbody Bag – Pattern guides you through every step, from choosing materials to finishing touches, allowing you to craft a bag that suits your needs perfectly.
Whether you are an experienced crafter or a beginner eager to try sewing or crochet, this project provides a sense of accomplishment and a unique, one-of-a-kind accessory.
Creating a crossbody bag is both functional and fashionable. With this How to Make a Crossbody Bag – Pattern, you can customize the size, colors, and materials to match your wardrobe. Handmade bags are not only practical for carrying essentials but also allow you to express creativity. Choosing fabrics or yarns that reflect your personal style adds a special touch that store-bought bags often lack.
The process of making a crossbody bag enhances your skills and understanding of construction, whether you sew or crochet. From stitching seams to adding pockets and straps, each step provides an opportunity to learn and refine your technique. Additionally, completing this How to Make a Crossbody Bag – Pattern project results in a durable, functional, and stylish accessory you can be proud of.
To begin your How to Make a Crossbody Bag – Pattern, gather all necessary materials. For a sewn bag, you’ll need fabric for the exterior and lining, interfacing for structure, a zipper or magnetic closure, and coordinating thread. For a crocheted bag, select sturdy yarn, a suitable hook, and any additional embellishments like buttons or appliques.
A sewing machine is ideal for sewn bags, ensuring straight seams and strong construction. Hand-sewing needles are useful for finishing details. For crochet, a yarn needle and stitch markers will help manage stitches and join pieces neatly.
Straps are a key component. You can use pre-made straps, leather handles, or create your own with fabric or crochet. Adjustable straps are convenient and make the bag more versatile.
Optional tools include scissors, rotary cutters, rulers, measuring tape, and pins or clips to hold fabric in place during assembly. These tools help improve accuracy and efficiency.
Choosing fabrics or yarns that are durable ensures your bag will hold up over time. Canvas, denim, or thick cotton fabrics work well for sewn bags, while worsted or bulky yarn is suitable for crochet.
Finally, consider adding accessories like pockets, inner compartments, or decorative elements. These add both functionality and personal flair, making your crossbody bag unique.
Start your How to Make a Crossbody Bag – Pattern by cutting the fabric or crocheting the base of the bag according to the desired size. For sewn bags, use a pattern to ensure accuracy. For crochet, follow a consistent stitch pattern to achieve even texture and structure.
Assemble the main body of the bag. For sewn bags, sew the front, back, and side panels together, attaching the lining and interfacing as needed. For crochet, create the front and back panels separately and join them securely.
Add the closure. Sew in a zipper, attach buttons, or use magnetic snaps depending on your design. Ensuring a secure closure keeps your belongings safe and gives the bag a professional finish.
Attach the strap. Measure and secure the strap to the sides of the bag. For adjustable straps, add buckles or loops as needed. Crocheted straps should be tightly stitched and reinforced to support weight.
Include pockets or compartments if desired. Internal pockets help organize items like phones, keys, and cards, while external pockets can provide quick access to essentials. These small details enhance functionality and usability.
Finish the bag by reinforcing seams, trimming excess threads, and pressing sewn fabric if applicable. Ensure all edges are clean and durable. Your How to Make a Crossbody Bag – Pattern is now complete and ready to use or gift.
Personalize your How to Make a Crossbody Bag – Pattern by selecting colors, patterns, and textures that reflect your style. Fabric prints, yarn shades, and decorative elements make each bag unique.
Adjust the size to meet your needs. Smaller bags are perfect for essentials like phone and wallet, while larger bags can accommodate notebooks, tablets, or other daily items.
Experiment with strap styles. Crocheted straps can be braided, sewn straps can be reinforced, and adjustable straps offer versatility. Choose the style that best suits your comfort and fashion preferences.
Add embellishments such as tassels, appliques, or embroidery for a personal touch. These details make your bag stand out and reflect your creativity.
Incorporate functional features like multiple pockets, key holders, or zippered compartments. These upgrades increase usability while maintaining a stylish appearance.
Finally, mix and match materials for a unique look. Combine fabric textures, colors, or yarn types to create a visually appealing and personalized crossbody bag.
Creating a crossbody bag with this How to Make a Crossbody Bag – Pattern is rewarding, as it combines creativity, functionality, and personal expression. Handmade bags are durable, practical, and customizable to individual preferences.
The project enhances sewing or crochet skills, from measuring and cutting to stitching and finishing. These skills can be applied to future accessories or garments.
Making your own bag ensures you have a unique, one-of-a-kind item that reflects your personality and style. This adds value and satisfaction compared to store-bought options.
Handmade crossbody bags also make thoughtful gifts. Friends and family appreciate the time, care, and personalization that goes into creating an accessory tailored for them.
Finally, completing this project provides a sense of accomplishment. From start to finish, you transform raw materials into a functional, beautiful accessory, giving pride in your handiwork.
What materials are needed for a crossbody bag?
Fabric, lining, interfacing, thread, and a zipper or closure for sewn bags. Yarn, hook, and optional embellishments for crocheted versions.
Is this pattern suitable for beginners?
Yes, the instructions are clear, and beginners can follow step-by-step with some patience.
Can I adjust the size of the bag?
Absolutely. Modify the pattern dimensions to create small, medium, or large bags.
What type of strap works best?
Adjustable straps are versatile, but you can also use fixed-length straps made from fabric, leather, or crochet.
Can I add pockets or compartments?
Yes, both sewn and crocheted bags can include internal or external pockets for added functionality.
Is this bag suitable for daily use?
Yes, with sturdy materials and reinforced construction, your handmade crossbody bag is practical for everyday activities.
The How to Make a Crossbody Bag – Pattern is a versatile and rewarding project that combines creativity, practicality, and personal style.
Whether making it for yourself or as a gift, this project provides a sense of accomplishment and produces a durable, stylish accessory. Share your experiences, suggestions, and customizations to inspire others and enhance your crafting journey.


