
Ballerina pencil case with zipper Pattern


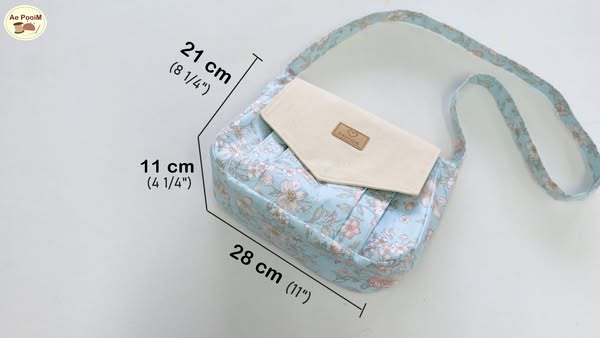
How to Make a Cute Sling Bag with Front Pockets – Free Pattern is an ideal project for beginners and experienced crafters alike. This tutorial will guide you step by step to create a stylish and practical sling bag that can be used daily or gifted to someone special.
With easy-to-follow instructions, you will learn how to sew a bag with functional front pockets, perfect for keeping your essentials organized while adding a personalized touch to your accessory collection.
Creating your own cute sling bag allows you to experiment with different fabrics, colors, and patterns. Unlike store-bought options, a handmade bag is fully customizable, ensuring it matches your style perfectly.
The free pattern provided in this tutorial is designed for simplicity without compromising on functionality or aesthetic appeal, making it a great choice for any sewing enthusiast.
A sling bag with front pockets is not only stylish but also practical. The pockets provide easy access to frequently used items like keys, phones, or wallets. By following this step-by-step pattern, you will learn how to construct a durable bag that maintains its shape and withstands daily use. This tutorial emphasizes both design and functionality, ensuring your final product is as attractive as it is useful.
Selecting the right materials is crucial when making a cute sling bag with front pockets. Start with durable fabric such as cotton canvas, denim, or a sturdy quilting material. These fabrics provide structure to your bag and make it long-lasting. For beginners, cotton canvas is highly recommended because it is easy to sew and works well with most sewing machines.
You will also need matching thread, sewing needles, a pair of scissors, pins, and a ruler for accurate measurements. Using a coordinated color scheme can enhance the bag’s aesthetic and make your front pockets stand out. Additionally, consider using interfacing to reinforce areas like the front pockets and bottom of the bag for extra durability.
Choosing the right zipper or closure is also important. A standard zipper, magnetic snap, or button closure can be used depending on your preference. For the front pockets, Velcro or small snaps are ideal for easy access while keeping items secure. By carefully selecting these materials, you ensure that your bag is both practical and stylish.
The type of strap you choose can also affect the bag’s usability. Adjustable straps allow you to customize the length for comfortable wear. Webbing straps or matching fabric straps work well for a cohesive look. By considering these material choices upfront, you set yourself up for a successful sewing project that is both functional and visually appealing.
Remember, the quality of your materials can significantly impact the final result. Investing in good fabric and sturdy hardware will make your cute sling bag with front pockets more durable and enjoyable to use. Choosing materials that are easy to work with also ensures a smooth sewing experience, especially for beginners.
Using coordinating accessories like buttons, patches, or embroidery can add a personal touch to your bag. This not only enhances the bag’s appearance but also allows you to showcase your creativity. Customization is one of the greatest advantages of creating your own sling bag using this free pattern.
Once you have gathered your materials, the next step is cutting and preparing your fabric. Accurate measurements are key to ensuring your cute sling bag with front pockets comes together seamlessly. Start by cutting out the main body pieces, front pocket panels, and strap according to the dimensions provided in the free pattern.
After cutting, mark any placement lines for pockets, zippers, and seams using a fabric pencil or chalk. Pinning pieces together before sewing can help prevent misalignment and ensure clean edges. This preparation step is crucial for beginners and experienced sewers alike.
If you are using interfacing, now is the time to fuse it to the wrong side of the fabric pieces. Interfacing adds structure and stability, especially for the front pockets and the bottom panel of your bag. This step ensures that your bag maintains its shape over time.
Check all fabric pieces for consistency and symmetry. Uneven or misaligned pieces can affect the bag’s overall appearance and functionality. Taking the time to carefully prepare and align each piece before sewing will save you frustration later.
Remember to prewash your fabric if needed, particularly if you are using cotton or canvas, to prevent shrinking after the bag is complete. Prewashing also removes any chemical residues from manufacturing, making your bag safer and softer to touch.
Lastly, organize your pieces for easy access during the sewing process. Grouping the main body, pocket pieces, and straps together allows for efficient workflow and reduces mistakes. Proper preparation ensures a smooth sewing experience when constructing your cute sling bag with front pockets.
Sewing the front pockets is a critical step in making your cute sling bag with front pockets. Begin by folding the top edge of each pocket panel and stitching it down to create a clean finish. This prevents fraying and gives the pockets a professional appearance.
Next, position the pockets on the front bag panel according to the placement marks made earlier. Pin the pockets securely before stitching along the sides and bottom. Ensure that your stitches are straight and even for a neat finish.
For added security, reinforce the corners of the pockets by stitching a small triangle at each corner. This prevents the fabric from tearing when the pockets are in use. Reinforcing corners is particularly important if you plan to carry heavier items in your bag.
If desired, add closures such as snaps or Velcro to keep pocket contents secure. These small details enhance functionality without compromising style. The free pattern provides options for adding closures, but you can also customize based on your personal preference.
Check the alignment and attachment of the pockets before moving to the next step. Misaligned pockets can affect the bag’s symmetry and overall aesthetic. Take your time to ensure the front pockets are perfectly positioned.
Finally, press the pockets with an iron for a crisp, professional look. Pressing helps set the stitches and smooths any wrinkles, giving your cute sling bag with front pockets a polished finish.
With the front pockets complete, it’s time to assemble the main body of your cute sling bag with front pockets. Begin by pinning the front and back panels together, right sides facing each other. Stitch along the sides and bottom, leaving the top open.
Add the bottom panel by pinning it to the sides and front/back pieces. Ensure the edges align precisely before stitching. This creates a sturdy base that allows your bag to hold its shape.
Attach the strap by folding and sewing the ends to the top edges of the bag. If using adjustable straps, follow the instructions to insert hardware and ensure proper length. A well-secured strap ensures comfortable wear.
Check all seams for consistency and strength. Backstitching at the beginning and end of each seam adds durability and prevents unraveling. This step is crucial for a functional and long-lasting bag.
Turn the bag right side out and press the seams to achieve a neat finish. Pressing enhances the bag’s appearance and makes the fabric more pliable for everyday use.
Finally, add any additional embellishments or finishing touches, such as topstitching, decorative buttons, or embroidery. These small details personalize your cute sling bag with front pockets and showcase your creativity.
Finishing touches bring your cute sling bag with front pockets to life. Topstitching along seams not only reinforces the bag but also adds a professional appearance. Use a contrasting thread color for a stylish effect.
Adding decorative elements like appliques, embroidery, or patches enhances the bag’s visual appeal. Personalization allows you to create a unique accessory that reflects your style.
Ensure all closures are functioning properly. Test zippers, snaps, or Velcro to confirm they operate smoothly. Properly functioning closures enhance the bag’s practicality and user experience.
Check for any loose threads and trim them carefully. Clean edges and tidy stitches contribute to a polished, professional look. Attention to detail makes a noticeable difference in the final product.
If gifting your bag, consider adding a small lining or an inner pocket for added utility. Linings improve durability and protect the contents of the bag.
Finally, try on your bag to ensure comfort and proper strap length. Adjust as necessary, and enjoy your handmade cute sling bag with front pockets that combines style and functionality.
Q: Can beginners make this sling bag?
A: Yes, this pattern is designed for beginners. Clear step-by-step instructions and simple sewing techniques make it accessible to all skill levels.
Q: What type of fabric works best?
A: Durable fabrics like cotton canvas, denim, or quilting material are recommended. These provide structure and longevity to your bag.
Q: How do I adjust the strap length?
A: Use adjustable hardware or measure the desired length and sew accordingly. Make sure it is comfortable for shoulder or crossbody wear.
Q: Can I add more pockets?
A: Absolutely! Customize your bag by adding side or internal pockets. Just ensure proper placement and reinforcement for durability.
Q: Is interfacing necessary?
A: Interfacing is optional but recommended for extra structure, especially for the bottom panel and front pockets. It enhances durability and helps the bag maintain its shape.
Q: Can I use a sewing machine?
A: Yes, a standard sewing machine works well. Hand sewing is also possible but may take longer.
By following this How to Make a Cute Sling Bag with Front Pockets – Free Pattern, you have learned how to select materials, cut and prepare fabric, sew front pockets, assemble the bag, and add finishing touches.
This project allows for creativity, personalization, and practical use. Handmade bags like this provide both style and functionality while giving you a rewarding crafting experience. Share your thoughts, leave honest feedback, and suggest improvements to help others enjoy making their own beautiful sling bags.


