
Ballerina pencil case with zipper Pattern


How to make a house quilt block is a delightful and rewarding project for quilting enthusiasts of all levels. Whether you are a beginner eager to learn a new pattern or an experienced quilter looking to expand your skills, creating a house quilt block can bring charm and personality to your quilt.
From choosing the right fabrics to mastering precise stitching techniques, this guide will walk you through every step of the process, ensuring your quilt block turns out beautifully.
The appeal of a house quilt block lies not only in its visual charm but also in its versatility. You can incorporate it into a larger quilt project, use it as a wall hanging, or even create individual blocks to give as thoughtful handmade gifts.
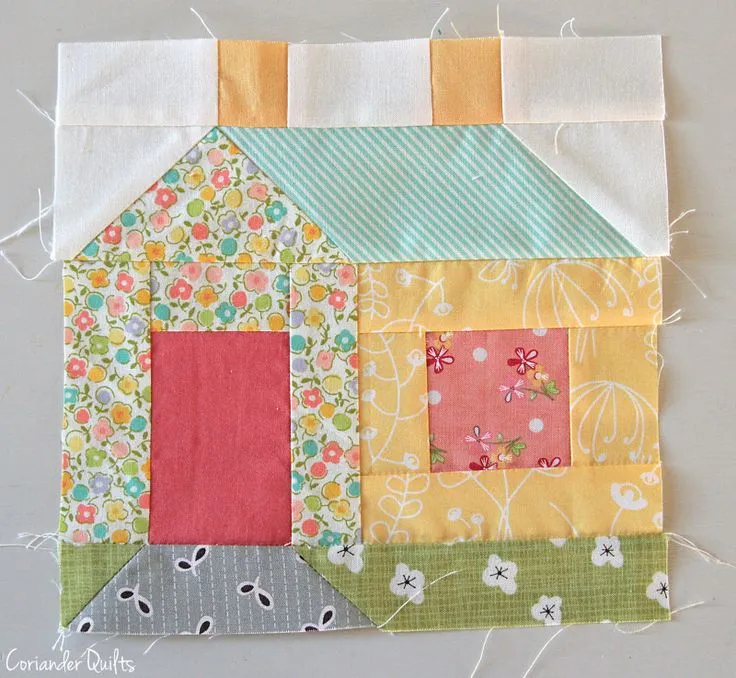
The key to a successful block is understanding the basic components—walls, roof, door, and windows—and learning how to piece them together accurately. With careful planning, you can create a cohesive and eye-catching design.
In addition to its decorative potential, learning how to make a house quilt block offers an opportunity to enhance your quilting skills. Techniques such as precise cutting, accurate piecing, and seam alignment are essential for achieving professional-looking results. This article will provide step-by-step instructions, helpful tips, and troubleshooting advice to make your quilting experience enjoyable and stress-free.
Selecting the right fabrics is the first crucial step in creating a beautiful house quilt block. Consider colors that complement each other and convey the feeling you want your block to evoke. For example, bright, cheerful colors can give your quilt a whimsical feel, while muted tones can create a cozy, classic look.
Next, pay attention to fabric textures and patterns. Using a mix of solids, florals, and subtle prints can add depth and interest to your house quilt block. However, avoid overly busy patterns, as they may overwhelm the block’s design and make it harder to see the individual elements of the house.
Quality is another important consideration. High-quality cotton fabrics tend to be the easiest to work with, as they are durable, easy to cut, and hold their shape well. Investing in good fabrics will make your quilting process smoother and enhance the final appearance of your house quilt block.
When selecting fabrics, think about contrast. The roof should stand out from the walls, and the door and windows should be clearly distinguishable. Strong contrast helps each component of your house quilt block pop, giving the quilt a polished and professional look.
Consider coordinating colors with the overall quilt. If your block will be part of a larger quilt, ensure that the fabrics harmonize with other blocks. Planning your color scheme in advance helps maintain visual balance and cohesion across your entire quilt project.
Finally, prewash your fabrics to prevent shrinkage and color bleeding. Prewashing ensures that your house quilt block retains its size and color vibrancy even after multiple washes, keeping your quilt looking beautiful for years.
Accurate cutting is essential when making a house quilt block. Begin by carefully measuring and cutting each piece according to your pattern. Using a rotary cutter, ruler, and cutting mat helps achieve precise shapes and straight edges. Accuracy in cutting directly affects the final alignment of your block.
Once the pieces are cut, it’s time to piece them together. Start by sewing smaller components, such as the roof and walls, before combining them into the larger block. Use a consistent seam allowance, typically 1/4 inch, to ensure all pieces fit together correctly.
Pinning the pieces before sewing can prevent shifting and misalignment. Secure the fabric layers with straight pins or clips, especially at corners and intersections where multiple seams meet. This extra step helps maintain the integrity of your house quilt block.
Press your seams carefully as you sew. Pressing toward the darker fabric prevents color transfer and keeps your block neat. Open or finger-pressed seams can also be used, depending on your preference and the complexity of the design.
Take your time when piecing the block. Rushing may lead to uneven seams or mismatched corners. Precision is more important than speed, especially when working on a detailed house quilt block.
Finally, check the block’s dimensions after sewing. Ensuring the finished size matches your pattern is crucial for maintaining consistency when incorporating multiple blocks into a quilt. Any adjustments should be made early to prevent issues later in the project.
The charm of a house quilt block often comes from the small details. Windows, doors, and other decorative elements bring the house to life. These can be added using applique techniques, embroidery, or pieced shapes.
For applique, cut shapes from fabric scraps and attach them to the block using fusible web or hand stitching. This technique allows for creative freedom and makes it easier to add intricate details without complicated piecing.
Embroidery can add texture and character. Simple stitches such as satin stitch or backstitch are perfect for outlining doors, adding windowpanes, or creating decorative shutters. These small touches enhance the overall appeal of your house quilt block.
Pieced details require careful planning and precise cutting. Small rectangles for doors and squares for windows must align perfectly with the main house structure. Using a template ensures uniformity across multiple blocks.
Experiment with decorative stitching along the roofline or around the edges of the house. These subtle embellishments give your house quilt block a unique, handcrafted look that stands out in your quilt.
Finally, remember to balance detail with simplicity. Overloading the block with too many elements can make it appear cluttered. Focus on key features that define the house and enhance its charm.
Once your house quilt block is complete, you can incorporate it into your quilt. Consider the layout carefully to create a harmonious and visually appealing quilt design. Blocks can be arranged in a grid, scattered randomly, or combined with other themed blocks.
Sashing, borders, and cornerstones can help frame the house quilt block and provide a professional finish. Choose coordinating fabrics that complement the block without overshadowing it. These additions enhance the overall design and make the quilt visually balanced.
Layering your quilt sandwich—backing, batting, and top—is the next step. Pin or baste the layers together to prevent shifting during quilting. Proper preparation ensures a smooth quilting process and a well-finished quilt.
Quilting techniques vary depending on your preference. You can quilt around the edges of the house quilt block, follow a geometric pattern, or use free-motion quilting to add texture and dimension. Each method brings a different aesthetic to your finished quilt.
Binding the quilt is the final touch. Choose a binding fabric that complements the block colors and carefully sew it to the edges. This step not only secures the quilt layers but also gives the finished project a polished, professional look.
After completing the quilt, give it a gentle wash and press to remove any creases or markings. Your house quilt block is now ready to be admired, gifted, or proudly displayed in your home.
Q1: What fabrics are best for a house quilt block?
A: Cotton fabrics are ideal because they are durable, easy to cut, and hold their shape well. Mixing solids and subtle prints adds depth without overwhelming the block design.
Q2: Can I make a house quilt block without a sewing machine?
A: Yes, hand piecing and applique are possible. It may take longer, but careful stitching can achieve excellent results.
Q3: How do I prevent my pieces from shifting while sewing?
A: Pin or clip the pieces before sewing, and press seams carefully. Accurate cutting and consistent seam allowances also help maintain alignment.
Q4: Can I use a house quilt block in larger quilt projects?
A: Absolutely. These blocks are versatile and can be arranged in grids, combined with other blocks, or used as focal points in larger quilts.
Q5: How do I add windows and doors to my house quilt block?
A: You can use applique, embroidery, or pieced shapes to add details. Small details enhance the block’s charm and make it visually appealing.
Q6: What is the ideal size for a house quilt block?
A: Sizes vary depending on your quilt design. Common sizes range from 6 inches to 12 inches square, but you can adjust based on your project.
Learning how to make a house quilt block is both a creative and rewarding experience. This article has guided you through fabric selection, cutting, piecing, adding details, and assembling your final quilt.
By following these steps and applying precision and care, you can create a block that brings charm and personality to your quilting projects.
Now that you have the knowledge and tools, try creating your own house quilt block and experiment with colors, patterns, and details.
Quilting is a journey, and each block you make is a step toward mastering this beautiful craft. Leave your honest opinions and suggestions in the comments, and share your experience—your insights can inspire and help fellow quilters enhance their skills.
Creating a house quilt block is a fun and rewarding project, and the best part is that it can be adapted in many ways to suit your style.


