
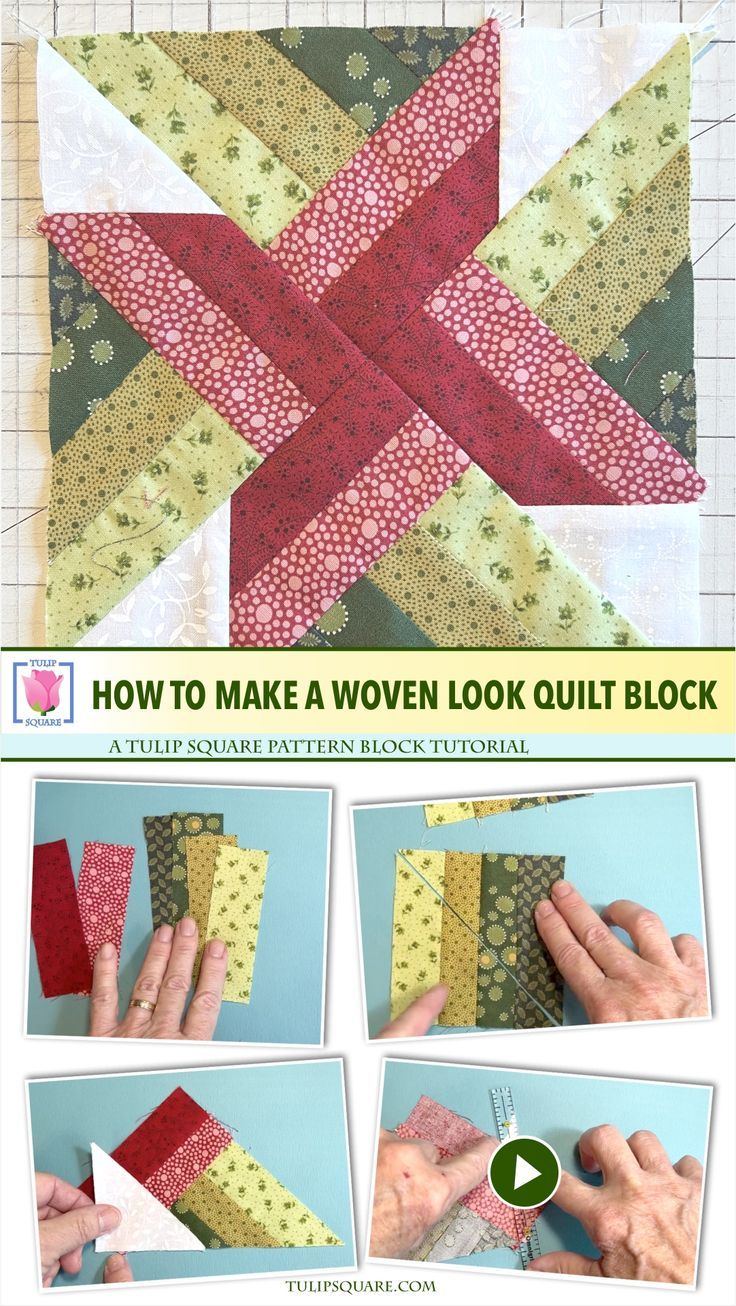
Learning how to make a woven quilt block can transform your quilting projects from simple patterns into stunning, textured designs.
Tulip Square’s video tutorial provides a step-by-step guide that makes even complex-looking woven blocks accessible to both beginners and experienced quilters.
With clear instructions and visual demonstrations, this tutorial ensures you can recreate this intricate design with confidence.
The woven quilt block technique combines traditional patchwork with a lattice-like appearance, creating a unique visual texture.
Unlike standard quilt blocks, the woven style looks intricate but is surprisingly simple when you follow the proper steps. Tulip Square’s video tutorial demonstrates the precise placement of strips, weaving techniques, and finishing tips to ensure a polished and professional result.
Woven quilt blocks are perfect for adding depth and interest to your quilts. They can be incorporated into larger quilt designs or stand alone as individual decorative pieces. By watching the video tutorial by Tulip Square, you’ll gain a hands-on understanding of the weaving process, how to organize fabric strips, and how to maintain consistent tension for even stitching.
Materials and Preparation
Before starting your woven quilt block, gather the necessary materials. You will need a selection of fabrics in coordinating colors, a rotary cutter or scissors, a cutting mat, a quilting ruler, pins, and a sewing machine or needle for hand stitching. Choosing high-quality cotton fabrics ensures durability and crisp lines for your block.
Organize your fabrics by color and tone. The woven effect relies on contrast between strips, so planning light and dark fabrics in advance will help you achieve a balanced, eye-catching design. Tulip Square’s video tutorial suggests arranging strips before sewing to visualize the final layout.
Cut your fabrics into uniform strips according to the tutorial’s specifications. Accuracy in cutting ensures the woven effect is precise and the block remains square. Using a rotary cutter and ruler can significantly speed up this process.
Before weaving, iron all fabric strips. Pressing removes wrinkles and helps the strips lay flat, making weaving smoother and stitches more consistent.
It’s helpful to review the video tutorial completely before beginning. Watching the entire process once allows you to understand the sequence of steps, from initial strip placement to finishing touches.
Finally, set up a clean, flat workspace with good lighting. Having all materials organized and visible ensures a smooth crafting process without unnecessary interruptions.
Step-by-Step Instructions
Begin your woven quilt block by laying out the vertical strips as indicated in the video tutorial by Tulip Square. Pin them lightly to hold their position if needed.
Next, weave the horizontal strips over and under the vertical ones. Alternate the weaving pattern for each row to create the classic woven effect. The video tutorial emphasizes maintaining consistent spacing between strips for a professional appearance.
Once the weaving is complete, carefully trim the edges to ensure a neat square. Accuracy in trimming ensures that all blocks fit together seamlessly when incorporated into a larger quilt.
Sew the woven block by stitching along the edges to secure the strips. You can use a straight stitch on a sewing machine or hand stitch for more control. Reinforce the corners to maintain the block’s structure.
Iron the finished block to flatten the weave and enhance crisp lines. Proper pressing helps the woven pattern stand out and gives the block a polished look.
Repeat the process to create additional blocks as needed. Tulip Square’s tutorial demonstrates how repeating the technique with different color combinations produces a variety of striking woven quilt designs.
Tips for Perfect Woven Quilt Blocks
Maintaining consistent strip width is crucial for a flawless woven quilt block. Uneven strips can distort the weaving and affect the final layout.
Use pins or clips to hold strips in place while weaving. This prevents slipping and ensures the pattern remains aligned.
Experiment with contrasting colors for a more pronounced woven effect. High contrast between light and dark fabrics makes the weave visually striking.
Press after each sewing step to keep strips flat. Proper pressing improves overall appearance and makes subsequent sewing easier.
Check alignment frequently as you sew. Ensuring strips are straight before stitching prevents skewed blocks and maintains a professional finish.
Take your time weaving each strip. Precision in the weaving process is key to achieving the intricate look that defines a woven quilt block.
Creative Variations
Once you’ve mastered the basic woven quilt block, there are several creative ways to adapt the design. Try using patterned fabrics or prints for some strips to add texture and visual interest.
Mix different colors within a single block to create gradient or rainbow effects. This adds depth and movement to your quilt.
Experiment with the size of strips. Narrow strips create a delicate, intricate weave, while wider strips produce a bold, graphic effect.
Combine woven blocks with traditional patchwork blocks for a quilt with varied textures and patterns. This technique adds complexity and artistic flair to your project.
You can also create mini woven blocks to use as coasters, placemats, or small decorative wall hangings. Scaling down the design allows you to explore new creative possibilities.
Try diagonal weaving or off-center layouts for a modern interpretation of the classic woven block. These variations make your quilt unique and personalized.
FAQ
Q: Is the woven quilt block suitable for beginners?
A: Yes. The video tutorial by Tulip Square provides clear, step-by-step instructions that guide beginners through the process.
Q: What fabrics work best for woven blocks?
A: Medium-weight cotton fabrics are ideal for stability and ease of weaving. Avoid fabrics that stretch excessively.
Q: How do I maintain even spacing between strips?
A: Use pins or clips and measure strips consistently. Watching the video tutorial carefully will help visualize proper spacing.
Q: Can I combine woven blocks with other quilt patterns?
A: Absolutely. Woven blocks blend beautifully with traditional patchwork, log cabin, or star blocks for a mixed quilt design.
Q: What size should each strip be?
A: Strip width depends on the desired block size. Standard widths range from 1.5 to 2.5 inches, but you can adjust based on your project.
Q: How do I prevent the block from warping?
A: Maintain even tension while weaving, press strips before stitching, and reinforce edges during sewing.
Q: Can I use patterned fabrics for some strips?
A: Yes, using prints adds texture and visual interest to your woven quilt blocks.
Conclusion
Learning how to make a woven quilt block – video tutorial by Tulip Square offers an engaging way to enhance your quilting skills. By mastering the weaving technique, you can create intricate, visually appealing blocks that elevate any quilt project. The tutorial’s step-by-step guidance ensures that quilters of all levels can achieve professional-looking results.
By following this guide, you’ve learned how to select fabrics, weave strips accurately, and finish your blocks with precision. Your woven quilt blocks can now be combined into larger quilts, decorative items, or personalized gifts.
Creating a woven quilt block is not only about following a pattern—it’s also an opportunity to develop patience, precision, and a keen eye for color coordination. Each strip you weave adds texture and depth, transforming simple fabric pieces into a visually striking, handcrafted masterpiece that reflects your creativity, dedication, and personal style.
Share your experience, feedback, and creative variations — your insights can inspire fellow quilters to explore the beauty of woven quilt blocks.