
Ballerina pencil case with zipper Pattern


Learning how to make a zipper pouch bag is a practical and fun sewing project that combines functionality and creativity. A zipper pouch bag is versatile, perfect for organizing makeup, stationery, toiletries, or small personal items.
Making your own bag allows you to choose colors, fabrics, and patterns to match your personal style or create a unique handmade gift.
The appeal of a zipper pouch bag lies in its simplicity and usefulness. Unlike larger bags, a zipper pouch is compact and easy to carry, making it ideal for travel, school, or everyday organization.
It also offers a great opportunity for beginners to practice sewing skills, such as working with zippers, lining fabrics, and creating neat seams.
This project is not only functional but also customizable. By experimenting with different fabrics, patterns, and sizes, you can create a variety of bags suited for different purposes. The zipper pouch bag is a beginner-friendly project, yet it allows for creative embellishments like embroidery, appliques, or decorative stitching for a professional and charming finish.
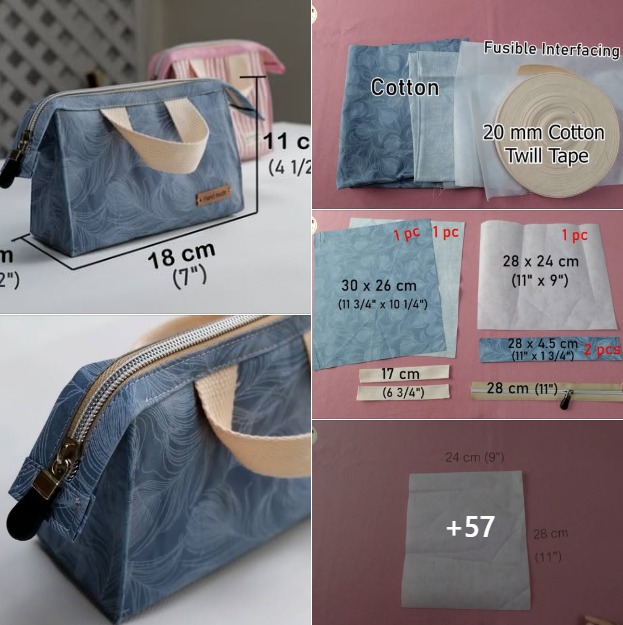
To start making your zipper pouch bag, gather the necessary materials. You will need: medium-weight fabric for the outer layer, such as cotton or canvas, and a coordinating fabric for the lining. These fabrics provide structure and durability while remaining easy to sew.
A zipper is essential. Choose a zipper length that matches the width of your pouch. Standard lengths range from 6 to 12 inches, but this depends on your design. Zippers can be plastic or metal, depending on preference, but plastic is easier for beginners.
Other tools include scissors, pins or clips, a sewing machine or needle for hand-sewing, and a measuring tape or ruler. Optional items like interfacing can add extra stiffness, giving the bag a more structured appearance. Thread matching your fabric and a seam ripper for corrections are also recommended.
Color and pattern choices are an important part of the design process. Choose fabrics that reflect your personal taste, whether it’s vibrant prints, classic neutrals, or a mix of textures. Contrasting colors for the lining can create a playful surprise when the pouch is opened.
Finally, decide on the pouch size. Standard pouches range from 6×8 inches for small items to 9×12 inches for larger items. Adjust measurements according to your needs and preferences, keeping in mind that a slightly larger pouch is more versatile.
Begin by cutting your fabrics. Cut two pieces of outer fabric and two pieces of lining fabric to your desired pouch size. If using interfacing, cut pieces to match the outer fabric dimensions and iron them onto the fabric according to the manufacturer’s instructions.
Next, prepare the zipper. Place one piece of outer fabric right side up, then lay the zipper face down along the top edge. Place one lining piece on top, right side down, sandwiching the zipper between the fabrics. Pin or clip in place to secure.
Sew along the edge using a zipper foot on your sewing machine. Ensure you sew close to the zipper teeth without hitting them. Repeat for the other side of the zipper with the remaining outer and lining pieces. Press the fabric away from the zipper for a neat appearance.
Once the zipper is attached, open the zipper halfway to allow turning the pouch later. Align the outer fabrics right sides together and the lining fabrics right sides together, then sew around the sides and bottom. Leave a small gap in the lining for turning.
Turn the pouch right side out through the lining gap. Push out the corners for a clean finish and press the seams. Hand-stitch or machine-stitch the lining gap closed. Ensure the zipper functions smoothly, and press the pouch one final time.
Optional embellishments include adding appliques, embroidery, or decorative stitching along the edges. You can also add a wrist strap or small handle for convenience. Personal touches make the zipper pouch bag more charming and unique.
When making a zipper pouch bag, creativity is endless. Try color-blocking by using two or more fabric colors for a modern, stylish look. This can be done by cutting the outer fabric into sections and sewing them together before adding the zipper.
Add pockets or compartments inside the lining to organize smaller items. Small card slots, pen holders, or coin pockets enhance functionality without complicating the overall design.
Experiment with different zipper styles. Exposed zippers, contrasting zipper colors, or decorative zipper pulls can elevate the bag’s aesthetic. Fun zipper pulls like charms, tassels, or beads add personality.
Decorative stitching or embroidery on the outer fabric can personalize your bag further. Embroidered initials, patterns, or motifs make the pouch ideal for gifts or personal use.
Another idea is to vary shapes. While rectangular pouches are standard, triangular, trapezoid, or curved designs create a unique and eye-catching bag. These shapes may require minor adjustments in sewing technique but provide a creative flair.
Finally, mix and match fabrics for texture. Pairing cotton with canvas, denim, or even faux leather creates a tactile contrast that enhances the bag’s visual appeal and durability.
Beginners learning how to make a zipper pouch bag should start with simple fabrics and a standard zipper. Avoid slippery fabrics like satin initially, as they can be challenging to control.
Use a zipper foot to sew close to the zipper teeth without hitting them. Practicing on a scrap piece of fabric helps achieve neat, straight seams.
Pin or clip layers carefully to prevent shifting while sewing. This ensures alignment, especially around corners and zipper edges.
Press seams at each step for a professional finish. Ironing the fabric flat before and after sewing helps maintain shape and crisp edges.
Take your time when turning the pouch through the lining gap. Use a blunt tool or chopstick to gently push out corners without tearing the fabric.
Measure and cut accurately. Even small inaccuracies can affect alignment and symmetry, particularly with color-blocked or patterned fabrics.
What fabric is best for a zipper pouch bag?
Medium-weight cotton or canvas is ideal for structure and durability. Lining fabric can be lightweight cotton for smooth inner surfaces.
Can beginners make a zipper pouch bag?
Yes, with simple techniques, straight seams, and a standard zipper, beginners can successfully make a functional and attractive pouch.
How do I attach the zipper?
Sandwich the zipper between the outer fabric and lining, then sew using a zipper foot close to the teeth. Repeat for both sides.
Can I add pockets inside?
Yes, small interior pockets, pen holders, or card slots can be sewn into the lining before assembling the pouch.
What size should I make?
Standard sizes range from 6×8 inches for small items to 9×12 inches for larger storage. Adjust according to your needs.
Can I add decorations?
Absolutely. Embroidery, appliques, tassels, and decorative stitching enhance appearance and personalization.
Is it machine washable?
Most cotton and canvas zipper pouch bags are machine washable, but always check fabric and zipper care instructions.
Can I make multiple sizes in one design?
Yes, the basic steps remain the same; simply adjust the dimensions of the fabric and zipper accordingly.
Knowing how to make a zipper pouch bag allows you to create functional, stylish, and personalized storage solutions. From gathering materials to finishing touches, each step contributes to a neat and charming final product.
By following the step-by-step instructions, utilizing tips for zipper installation, fabric selection, and embellishment ideas, even beginners can produce professional-looking bags. Experimenting with color, texture, size, and decorative elements ensures each pouch is unique and suited to your needs.


