
Ballerina pencil case with zipper Pattern


Creating retro style fabric bags is a wonderful way to express your creativity while crafting something practical and stylish. These bags are inspired by the charm of the past—featuring vibrant prints, classic patterns, and sturdy construction.
In this guide, you’ll learn how to make your own retro style fabric bag from start to finish, using easy sewing techniques and detailed steps that even beginners can follow.
The How to Make Retro Style Fabric Bags: Complete Step-by-Step Guide will help you design a unique accessory that reflects your personal taste and a touch of nostalgic fashion.
Retro style fabric bags are timeless because they mix functionality with fashion. From floral 70s prints to bold 80s geometric patterns, there’s a design for every personality.
These bags are perfect for everyday use, carrying books, groceries, or sewing supplies while still looking effortlessly chic. Plus, making your own gives you full control over the colors, patterns, and size—something store-bought bags can’t offer. Throughout this How to Make Retro Style Fabric Bags: Complete Step-by-Step Guide, you’ll find essential tips to achieve that authentic vintage look while ensuring your bag is durable and well-finished.
Before diving into the sewing process, it’s important to prepare your materials carefully. The right fabric, lining, and interfacing will define the structure and appearance of your retro style bag. Equally, choosing vintage-inspired buttons, zippers, or handles can elevate the final result. Let’s explore all the tools, materials, and techniques you’ll need to get started and bring your retro fabric bag idea to life.
The first step in this How to Make Retro Style Fabric Bags: Complete Step-by-Step Guide is gathering the right materials. Quality supplies ensure a professional-looking finish that lasts. Start by selecting a retro-style fabric—cotton canvas, denim, or heavy linen are great options for durability. Choose patterns that capture a nostalgic feel, such as polka dots, paisleys, or abstract florals.
Next, you’ll need a lining fabric that complements the exterior design. Lightweight cotton or muslin works well inside the bag. Don’t forget interfacing—this material adds stiffness and shape, helping your bag maintain its form. You can opt for fusible interfacing for easy application with an iron.
Basic sewing tools are essential: fabric scissors, sewing machine, pins, measuring tape, and a fabric marker. Having a rotary cutter and cutting mat can make your cuts cleaner and more accurate. Also, gather accessories like zippers, magnetic snaps, or buttons depending on your preferred closure type.
For straps or handles, you can use cotton webbing, matching fabric strips, or even repurpose old belts for a true vintage vibe. Adding decorative trims—such as lace or ribbon—can bring that authentic retro detail to your bag.
Lastly, always prewash and iron your fabrics before starting. This step prevents shrinkage and gives your materials a smoother surface for sewing. Proper preparation ensures that your retro style bag looks polished and lasts for years.
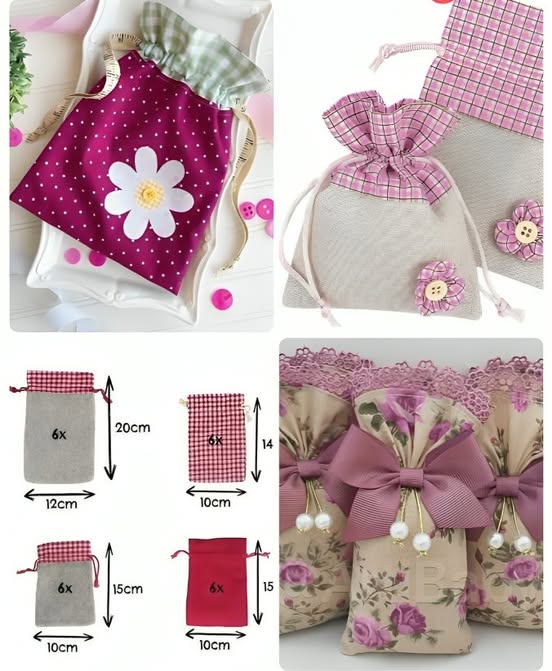
With your materials ready, it’s time to cut the pieces for your retro style fabric bag. Begin by measuring your desired bag size—most tote-style bags are around 15 inches wide and 14 inches tall. You’ll need two outer pieces, two lining pieces, and two interfacing pieces cut to the same dimensions.
If your design includes pockets, cut those separately. A front pocket made of contrasting fabric can add a beautiful vintage touch. For added style, consider diagonal cuts or patchwork sections using multiple retro prints. These combinations create a truly personalized design.
Fuse the interfacing to the wrong side of your outer fabric pieces using an iron. Make sure to press evenly, avoiding wrinkles or bubbles. This reinforcement step is key to achieving a structured look and professional feel.
Mark the seam allowances—typically ½ inch—and note where your straps or pockets will be positioned. If you’re adding a zipper, draw its placement carefully before sewing. Accurate markings ensure everything aligns neatly once assembled.
You can also round the bottom corners slightly to give your bag a softer, more natural shape. Use a plate or cup to trace a gentle curve, then cut carefully along the line. This detail enhances the aesthetic and makes the bag easier to turn right side out later.
Before you begin sewing, double-check all your pieces for consistency. Matching edges and corners precisely is essential for a clean final product. Precision cutting will make every next step easier in this How to Make Retro Style Fabric Bags: Complete Step-by-Step Guide.
Now comes the exciting part—assembling your retro style fabric bag. Start by sewing any pockets onto the outer fabric panels. Pin them in place and topstitch around the edges for a secure hold. If you’re adding decorative trims or lace, sew them at this stage before the panels are joined.
Next, place the two outer fabric pieces right sides together and sew along the sides and bottom. Repeat this process with the lining fabric, but leave a 3-inch opening at the bottom for turning the bag later. Clip the corners to reduce bulk, being careful not to cut through the stitches.
Turn the outer bag right side out and press the seams flat. Insert the lining inside the outer bag, right sides facing each other. Align the top edges and pin them securely. If your design includes a zipper or magnetic snap, position it at this step.
Sew around the top edge of the bag, making sure all layers are even. Once complete, pull the outer bag through the opening in the lining to turn it right side out. Hand-stitch or machine-sew the lining’s opening closed, then tuck it neatly inside.
Finish by topstitching around the upper edge of your bag for a polished look. This also reinforces the seams, ensuring durability. Press the entire bag once more to give it a crisp finish.
Finally, attach the straps—either by sewing them directly or using metal rings for a more refined touch. With your stitches neat and even, your retro style bag is now complete and ready to show off!
What makes the retro style fabric bag so special is the attention to detail. The finishing touches transform a simple tote into a fashion statement. Consider adding appliqué patches, vintage buttons, or embroidery that reflect your personality.
You can also play with color contrast—pair bold 70s orange tones with cream linings or soft pastels with dark trims. If you’re going for an authentic retro look, use large floral or checkered patterns that remind you of old-fashioned upholstery or dresses.
Adding labels or small tags with your initials is another fun customization idea. It gives a handmade feel that makes your creation truly one-of-a-kind.
If you love the classic look of structured handbags, try using metal frames or rivets to strengthen corners. These small touches not only look professional but also make your retro bag more durable.
For eco-friendly quilters, consider upcycling old curtains, tablecloths, or vintage dresses into your bag project. This sustainable approach gives fabrics a second life and adds character that new materials can’t replicate.
Finally, remember that sewing is both art and practice. Each project improves your technique and helps you refine your style. Your retro style fabric bag will soon become one of your favorite accessories—because you made it with your own hands.
1. What type of fabric is best for retro style bags?
Cotton canvas, denim, and heavy linen are ideal for structure and durability. Choose fabrics with vintage prints like florals, paisleys, or bold stripes for an authentic retro feel.
2. Can I make this bag without a sewing machine?
Yes, you can hand-sew your retro style fabric bag, but it will take more time. Use strong backstitches for durability and double-thread your needle for reinforcement.
3. How do I add structure to my bag?
Adding interfacing or fusible fleece between the fabric layers helps your bag keep its shape. This step is essential for a professional and sturdy finish.
4. Can I wash my handmade fabric bag?
Yes, but always check the fabric type first. Machine wash on gentle cycle or hand wash in cold water to preserve the colors and structure. Avoid tumble drying.
5. How can I make my bag look more vintage?
Use retro-inspired prints, add lace trims, or use old-fashioned buttons and buckles. You can also distress the fabric slightly for a faded, vintage appearance.
6. Are retro style bags suitable for beginners?
Absolutely! This How to Make Retro Style Fabric Bags: Complete Step-by-Step Guide is designed for all skill levels, with simple steps and clear instructions to help beginners achieve great results.
7. What size should I make my bag?
It depends on its purpose. For a daily tote, 15×14 inches works well, but you can adjust the size based on how much you plan to carry.
8. Can I use recycled fabrics?
Definitely! Upcycling old garments or textiles is an eco-friendly way to make your retro fabric bag while adding unique textures and stories to your project.
9. How do I choose the right lining?
Pick a lightweight cotton that complements your exterior print. A solid color lining often enhances busy or bold outer patterns.
10. What are the best ways to close my retro style bag?
You can use zippers, magnetic snaps, or buttons depending on your preference. Zippers offer more security, while buttons give a more vintage look.
Making your own retro style fabric bag is both fun and rewarding. This How to Make Retro Style Fabric Bags: Complete Step-by-Step Guide has walked you through every stage—from choosing fabrics and cutting pieces to sewing and adding finishing details.
Whether you’re creating a daily tote or a stylish accessory, the result will always carry your creativity and individuality. Take your time, enjoy the process, and be proud of your handmade work. If you found this guide helpful, leave your honest opinion and share your suggestions to inspire other sewing enthusiasts!


