
Ballerina pencil case with zipper Pattern


The Log Cabin Quilt – Free Tutorial is a timeless guide to one of the most beloved quilt patterns in history. This traditional design, featuring a central square surrounded by strips of fabric arranged like a cabin’s logs, continues to inspire both beginner and experienced quilters.
Whether you’re creating a classic heirloom or experimenting with modern colors and layouts, the Log Cabin Quilt offers endless creativity and satisfaction.
Making a Log Cabin Quilt is more than just stitching pieces of fabric together — it’s about storytelling, patience, and artistry. Each block represents warmth, comfort, and home.
With this free tutorial, you’ll learn how to craft your very own quilt step-by-step, from selecting fabrics to piecing and finishing, all while exploring different variations that make the Log Cabin design so versatile.
The Log Cabin Quilt – Free Tutorial is ideal for quilters who enjoy blending tradition with innovation. The pattern is known for its simple structure yet impressive results. Once you understand the basic layout, you can customize it in countless ways — from color gradients to creative arrangements — resulting in a one-of-a-kind quilt that truly reflects your personal style.
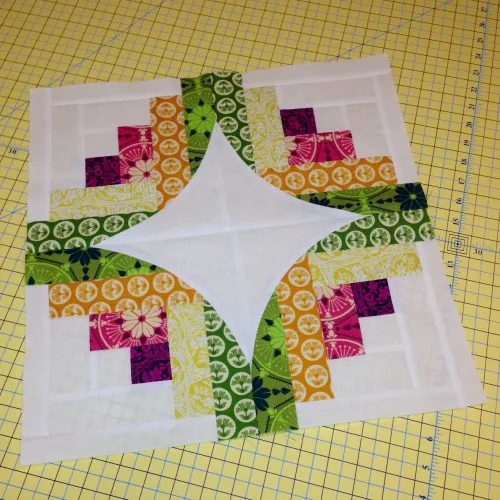
The Log Cabin Quilt dates back to the 19th century and symbolizes warmth and stability. Each block begins with a small central square, often called the “hearth,” representing the heart of the home. From there, strips of fabric, or “logs,” are added around the center in a spiral fashion. The balance of light and dark fabrics gives the design its distinct geometric beauty.
Traditionally, the central square was made of red fabric to symbolize fire or love, but modern quilters often experiment with colors that match their theme or décor. The placement of light and dark strips defines the final layout, creating stunning visual effects such as diamonds, zigzags, or radiating beams.
This Log Cabin Quilt – Free Tutorial focuses on the classic method of strip piecing, a technique that allows for speed and accuracy. By using pre-cut strips (such as jelly rolls), even beginners can achieve perfect results with minimal effort.
The magic of the Log Cabin design lies in its adaptability. You can use scrap fabrics for a rustic look or coordinated fabrics for a polished appearance. From minimalist neutral tones to bold contrasts, the possibilities are endless.
Before you begin, make sure to press all your fabrics and organize your strips by color and value. Accurate cutting and ironing are key to achieving crisp, well-aligned blocks.
Once your materials are ready, you can start assembling your first Log Cabin block — the foundation of your quilt masterpiece.
Creating a Log Cabin Quilt follows a simple yet satisfying process that even beginners can enjoy. Follow these steps to make your quilt from start to finish.
Step 1: Prepare Your Fabrics
Select fabrics that complement one another. Choose light, medium, and dark shades to create contrast. Cut your strips into uniform widths — typically 2.5 inches — and ensure they are neatly pressed.
Step 2: Create the Center Square
Begin with a small square, usually measuring about 2.5 x 2.5 inches. This will be the heart of your Log Cabin block. Place it in the center of your workspace as your starting point.
Step 3: Add the First Log
Sew your first strip (or log) to one side of the center square. Press the seam flat, then trim the edges neatly. Rotate the block and add another strip to the next side, continuing clockwise.
Step 4: Continue Building the Layers
Keep adding strips, one at a time, alternating between light and dark fabrics. Each new round of logs expands the block and enhances its contrast. Maintain consistent seam allowances for even construction.
Step 5: Square Up the Block
Once your block reaches the desired size, trim it to a perfect square. Most quilters prefer blocks that measure 10 to 12 inches, but you can adjust this to fit your project.
Step 6: Assemble the Quilt Top
Arrange your blocks on a large surface to visualize the final design. Experiment with different layouts, such as Barn Raising, Fields and Furrows, or Courthouse Steps. Once satisfied, join the blocks together using a quarter-inch seam.
Step 7: Add the Border and Batting
Attach borders to frame your quilt top, then layer it with batting and backing fabric. Smooth out any wrinkles before basting the layers together.
Step 8: Quilting and Binding
Quilt your layers by hand or machine using straight-line or free-motion techniques. Finally, finish your quilt with a clean, sturdy binding around the edges.
Your Log Cabin Quilt – Free Tutorial project is now complete, ready to display or gift to someone special.
Achieving flawless results with the Log Cabin Quilt requires patience and attention to detail. Here are a few expert tips to make your project shine.
Start by maintaining accurate seam allowances. Consistent quarter-inch seams ensure all blocks align perfectly. Small inconsistencies can distort the overall layout.
Color planning is crucial. Arrange your fabric strips before sewing to visualize how the light and dark sections will interact. This step helps create depth and symmetry in your design.
Press every seam as you go. Ironing each log before adding the next keeps the fabric flat and prevents bulkiness. Use steam or a dry iron depending on your fabric type.
When joining blocks, use pins to keep seams aligned. This ensures clean intersections and professional-looking results.
Experiment with different block arrangements before final assembly. Simply rotating or flipping a few blocks can dramatically change your quilt’s overall look.
Finally, take your time with the quilting stage. Straight-line quilting enhances the geometry of the design, while curved or decorative stitches can add softness and flair.
One reason the Log Cabin Quilt has remained popular for centuries is its adaptability. Once you master the basic construction, you can explore endless variations to suit your taste and style.
The Traditional Log Cabin layout uses a red center square surrounded by alternating light and dark fabrics, creating a striking contrast.
The Courthouse Steps variation alternates strips on opposite sides of the center, resulting in a bold, stepped effect.
The Barn Raising layout arranges blocks to form concentric diamond shapes — a visually stunning pattern that draws the eye to the center.
For a modern twist, try the Scrappy Log Cabin, using leftover fabric pieces in various colors and prints. This version adds personality and charm, perfect for eco-friendly quilters who love to repurpose materials.
Another popular adaptation is the Off-Center Log Cabin, where strips are sewn unevenly around the center square, creating a dynamic and asymmetrical look.
The possibilities are limitless, and each variation tells a different story. The Log Cabin Quilt – Free Tutorial encourages you to explore and find your own creative voice within this timeless design.
Q: Is the Log Cabin Quilt beginner-friendly?
A: Yes, it’s one of the best patterns for beginners. The repetitive structure makes it easy to follow, and you can start with small projects like pillow covers or table runners.
Q: What size should each fabric strip be?
A: Standard strips are 2.5 inches wide, but you can adjust based on your preferred block size or overall quilt dimensions.
Q: Can I use pre-cut fabrics like jelly rolls?
A: Absolutely! Pre-cut strips save time and ensure uniform width, making the process faster and more enjoyable.
Q: How many blocks do I need for a full quilt?
A: The number of blocks depends on your desired quilt size. For a twin quilt, you’ll typically need around 30–35 blocks.
Q: What’s the best way to press seams in a Log Cabin Quilt?
A: Press seams away from the center after each log. This reduces bulk and keeps the block flat and even.
Q: Can I mix fabrics of different textures?
A: Yes, mixing cottons, linens, and batiks can add visual interest, but ensure they have similar weights to maintain even stitching.
Q: How do I keep my blocks from warping?
A: Maintain consistent tension while sewing, avoid stretching strips, and trim blocks after each round to keep edges square.
The Log Cabin Quilt – Free Tutorial is a celebration of craftsmanship, tradition, and creativity. From its humble origins to modern interpretations, the Log Cabin pattern remains a favorite among quilters worldwide. Its simple construction, combined with limitless design possibilities, makes it perfect for anyone eager to create something both meaningful and beautiful.
By following this tutorial, you’ve learned how to choose fabrics, assemble blocks, and finish a quilt that radiates warmth and elegance. Whether you stick to traditional layouts or explore modern designs, your Log Cabin Quilt will reflect your passion for quilting and your unique artistic touch.


