
Ballerina pencil case with zipper Pattern


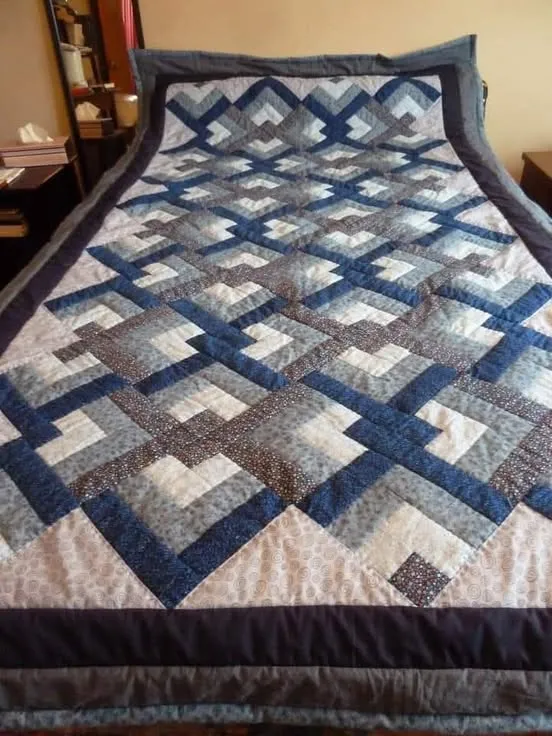
The Lovers Knot Quilt – Tutorial is a timeless pattern that combines elegance, craftsmanship, and symbolism. Representing unity, love, and eternal connection, this quilt pattern has been cherished by crafters and quilting enthusiasts for generations.
In this guide, we will explore how to create your own beautiful Lovers Knot Quilt, from choosing the right fabrics to mastering the interlocking design that gives this quilt its unique charm.
Whether you are a beginner or an experienced quilter, this tutorial will help you achieve stunning results while enjoying every step of the creative process.
Creating a Lovers Knot Quilt is more than just sewing pieces of fabric together—it’s about weaving emotion, patience, and artistry into a meaningful project.
The intricate knot design symbolizes the bond between two souls, making it a perfect handmade gift for weddings, anniversaries, or family heirlooms. With the right guidance, even a novice can bring this classic design to life with precision and grace.
In this Lovers Knot Quilt – Tutorial, we’ll guide you through every step of the process, from preparation to finishing touches. You’ll learn how to select fabrics that enhance the pattern’s depth, cut and piece accurately, and stitch with confidence. By the end, you’ll not only have a breathtaking quilt but also a rewarding experience that connects you to the long-standing tradition of quilting craftsmanship.
The Lovers Knot Quilt pattern features a complex yet mesmerizing interwoven design. Each “knot” appears to loop into the next, creating a continuous, graceful flow. This illusion of movement and unity is what makes this quilt so visually captivating. Understanding the structure of the pattern is key before you begin cutting or sewing.
Traditionally, this pattern uses contrasting colors to emphasize the knot’s movement. Many quilters choose two dominant colors—one light and one dark—to bring the loops to life. However, modern variations may include gradients or multiple shades for a more dynamic effect. Whatever palette you choose, ensure there’s enough contrast between fabrics to make the design pop.
The pattern consists of repeated blocks, each containing sections of the interlocking knot. By aligning and joining these blocks precisely, you achieve the full “woven” illusion across the quilt. This requires careful measuring and cutting to maintain consistency throughout your project. Taking your time during this stage ensures clean, professional-looking results later on.
To simplify the process, some crafters use templates or pre-cut fabric sets that follow the Lovers Knot design. This can help beginners focus on the sewing and piecing without worrying about precision cutting. However, if you’re confident in your skills, creating your own templates adds a personal touch and allows for greater creative freedom.
Once you understand the Lovers Knot Quilt pattern, you can begin planning your layout. Some prefer a traditional repeating pattern, while others experiment with larger knots or mixed arrangements. The design’s versatility means you can adapt it to suit any occasion, theme, or color story, making each quilt uniquely yours.
Before you start sewing your Lovers Knot Quilt, gathering the right materials and tools is essential. The success of your project largely depends on fabric selection, color harmony, and having reliable quilting tools at your disposal.
Start with high-quality quilting cotton—it’s durable, easy to handle, and holds its shape well during sewing. Select colors that complement each other while maintaining enough contrast to highlight the intricate knot design. Many quilters prefer pairing a neutral background with bold accent colors for a striking visual effect.
You will also need essential tools like a rotary cutter, self-healing cutting mat, and quilting ruler for accurate measurements. Precision is crucial in this pattern because even small misalignments can disrupt the knot’s appearance. Sharp scissors, fine pins, and a reliable sewing machine with a consistent stitch setting will make your work smoother and more enjoyable.
Don’t forget your thread selection—choose a color that blends well with your fabric to ensure neat, seamless stitching. For a decorative touch, consider using metallic or variegated thread to enhance certain sections of the knot and add subtle texture.
Batting and backing fabrics are equally important. A soft cotton or cotton-blend batting gives the quilt structure and warmth, while a smooth backing ensures comfortable use. You can match your backing fabric to your quilt’s dominant color or pick a contrasting tone for visual interest.
Finally, organize your workspace before you begin. A clean, well-lit, and clutter-free area will help you stay focused. Keep your iron and ironing board nearby, as pressing each seam after sewing improves accuracy and gives your Lovers Knot Quilt a professional finish.
Once you’ve prepared your materials, it’s time to bring your Lovers Knot Quilt – Tutorial to life. The process may seem complex at first, but with patience and attention to detail, each stage becomes manageable and deeply satisfying.
Step 1: Cutting the Fabric
Begin by cutting your chosen fabrics into strips or shapes according to your pattern layout. Consistency in measurements is key. Double-check every cut to ensure uniformity across your quilt blocks.
Step 2: Creating the Knot Units
Each block of the Lovers Knot Quilt contains interlocking segments. Follow your pattern carefully as you join the smaller pieces to form each section of the knot. Use pins to secure the fabric before stitching, and press seams flat after sewing to maintain smooth edges.
Step 3: Assembling the Blocks
Once all knot units are complete, lay them out to visualize the entire quilt. Make adjustments to balance colors and ensure the knot pattern flows correctly. Join the blocks together in rows, pressing seams after each step for a clean look.
Step 4: Adding Borders (Optional)
Adding borders can frame your design beautifully. Choose complementary fabrics that enhance the central pattern. Straight borders are simplest, but mitered corners add a professional touch if you’re up for the challenge.
Step 5: Quilting the Layers
Layer your quilt top, batting, and backing together. Use safety pins or basting spray to hold them in place. Then, quilt through all layers—either by hand or machine—following the knot’s curves or creating a custom design.
Step 6: Binding the Quilt
Finish your project by attaching the binding around the edges. Fold and stitch carefully to secure the border, ensuring neat corners. Once complete, give your quilt a final press and admire your stunning creation.
The beauty of the Lovers Knot Quilt lies in its adaptability. Whether you want a classic two-color design or a modern multicolored masterpiece, this pattern invites creativity. Experimenting with color, texture, and quilting styles can transform a simple layout into a true work of art.
For a romantic theme, consider using shades of red, pink, and cream. If you prefer something more contemporary, try blues, greens, and neutrals for a calming effect. Adding small floral prints or textured fabrics can give your quilt extra dimension and personality.
Quilting techniques can also vary. You may choose to emphasize the knot’s curves by echo quilting along its outline, or add free-motion quilting designs like swirls or feathers for extra flair. These details elevate your work from beautiful to breathtaking.
If you’re making the quilt as a gift, consider personalizing it. Add embroidered initials, meaningful dates, or small appliqué hearts in the corners to symbolize love and connection. These subtle additions make your Lovers Knot Quilt even more special.
Don’t rush the finishing touches. Take your time binding the edges and giving the quilt a final press. Once complete, display it proudly or wrap it beautifully as a heartfelt handmade gift. Remember, the journey of quilting is as rewarding as the final product.
Lastly, store your quilt properly to preserve its beauty. Keep it in a dry, cool place away from direct sunlight. Wash gently and air dry when needed to maintain the fabric’s integrity and color vibrancy for years to come.
1. What is the meaning behind the Lovers Knot Quilt?
The Lovers Knot Quilt symbolizes love, unity, and eternal connection, making it a meaningful project for couples or families.
2. Is this pattern suitable for beginners?
Yes, with patience and following this Lovers Knot Quilt – Tutorial, even beginners can create a stunning quilt. Start with larger blocks for easier assembly.
3. How many fabrics do I need?
Typically, you’ll need two or more contrasting fabrics to highlight the knot design, plus backing, batting, and binding fabric.
4. Can I sew this quilt by hand?
Absolutely. Hand sewing adds a traditional touch, though using a sewing machine can save time and ensure uniform stitches.
5. How can I make the knot stand out more?
Use bold contrasting colors and precise stitching. Adding light quilting around the knot’s outline enhances its appearance.
6. What size should my Lovers Knot Quilt be?
That depends on its purpose. Baby quilts may measure around 36″x36″, while bed-size quilts range from twin to king dimensions.
7. Can I use patterned fabrics?
Yes, but ensure patterns don’t overpower the knot’s shape. Subtle prints work best for maintaining the design’s clarity.
8. How do I care for my Lovers Knot Quilt?
Wash gently in cold water, avoid bleach, and air dry. Store folded loosely in a breathable fabric bag to prevent fading.
The Lovers Knot Quilt – Tutorial is more than a sewing project—it’s an artistic expression of love, patience, and tradition. By following each step carefully and infusing your personal style, you can create a masterpiece that tells a heartfelt story. From fabric selection to final binding, every stage is a chance to learn, grow, and create something truly special.
If this guide helped you or inspired you to start your own Lovers Knot Quilt, share your honest thoughts and suggestions below. Your feedback helps keep the quilting community creative and connected. Happy quilting, and may every stitch reflect the love woven into your craft!
As we dive deeper, you will learn the technique behind the knotting, cutting, and stitching that makes this design truly unique. Whether you’re aiming for a traditional or modern look, this quilt pattern offers endless possibilities.


