
Ballerina pencil case with zipper Pattern


If you are passionate about quilting, the Maia Star Block Pattern – FREE PATTERN is a perfect project to enhance your skills and create a stunning quilt block.
This star design combines traditional geometry with a modern flair, making it ideal for beginners and experienced quilters alike.
The pattern is versatile, allowing you to choose vibrant fabrics or soft tones to match your personal style. Following this tutorial will guide you step by step to complete your first star block successfully.
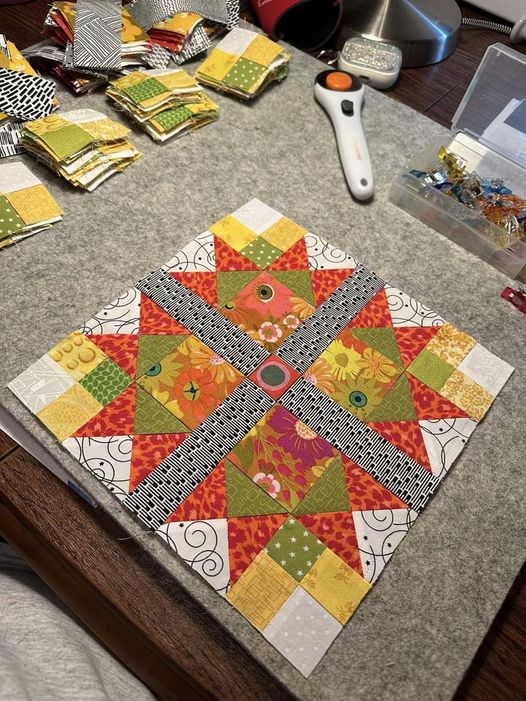
The beauty of the Maia Star Block lies in its combination of precision and creativity. Each point of the star must align perfectly with surrounding pieces to achieve the iconic look.
Understanding color contrast and fabric selection is crucial when working with this pattern. This FREE PATTERN gives you the flexibility to experiment with different layouts, creating a unique quilt every time you try it.
In this guide, you will learn everything about the Maia Star Block Pattern – FREE PATTERN, from cutting and piecing to pressing and assembling. We’ll cover the essential tools, step-by-step instructions, and tips for achieving professional results. By the end of this tutorial, you’ll be confident in creating star blocks for any quilt project, whether small wall hangings or full-size bed quilts.
To start the Maia Star Block Pattern – FREE PATTERN, gather the right tools and materials to ensure accuracy and ease. High-quality cotton fabrics in contrasting colors work best for the star effect. You’ll need at least two or three shades to highlight the star points and background.
A rotary cutter, self-healing cutting mat, and quilting ruler are essential for precise cuts. Accuracy in cutting ensures that the star points align perfectly when pieced together. Small errors can distort the overall shape of the block.
Thread choice is also important. Use cotton or polyester thread that blends well with your fabrics. Consistent thread weight helps maintain smooth seams and prevents puckering.
A reliable sewing machine with a straight stitch is highly recommended. While hand-sewing is an option, machine stitching ensures uniformity and speed, especially for larger projects.
An iron and pressing board are necessary for flattening seams and maintaining block shape. Proper pressing contributes to the overall professional look of your star block.
Additional supplies like pins, a seam ripper, and a fabric pencil or marking tool can help in assembling the pieces accurately. Planning ahead with these tools makes the process smoother and more enjoyable.
The first step in the Maia Star Block Pattern – FREE PATTERN is cutting your fabric accurately. Begin by measuring and cutting squares and triangles according to the star pattern diagram. Accuracy in this stage ensures the star points fit together perfectly.
Arrange the cut pieces on a flat surface to visualize the star design. Experiment with color placement until you are satisfied with the look. This step allows you to make adjustments before sewing.
Cotton is the preferred fabric for quilting because it’s easy to handle, presses well, and holds its shape. Stick to 100% cotton quilting fabric for best results and longevity.
Basic tools you’ll need include a rotary cutter, cutting mat, quilting ruler, iron, and sewing machine. These tools ensure precise cuts and accurate seams, which are essential for the crisp points in the star block.
Sew the triangles together carefully to form the star points. Use a ¼-inch seam allowance, the standard in quilting, to maintain consistent sizing. Chain piecing can speed up the process and keep your pieces organized.
Press each seam as you go. Pressing instead of ironing avoids stretching or distorting the fabric, keeping the star block symmetrical and sharp.
Once all star points are assembled, join them to the background squares. Take your time aligning the points with the surrounding blocks for a precise finish.
Check your block dimensions and make minor trims if necessary to ensure the completed block is square and ready for assembly into a quilt top.
After piecing your Maia Star Block, it’s time to assemble the complete block. Lay out all components and ensure every point aligns perfectly. Proper alignment is key for the star to look crisp and balanced.
Sew the star sections to the background squares, maintaining consistent seam allowances. Use pins to hold pieces together if needed, ensuring accurate stitching.
Once sewn, press each seam flat to maintain the block’s shape. Pressing carefully ensures all points remain sharp and the star appears uniform.
Check for any gaps or uneven edges. Trim excess fabric if necessary to maintain a clean finish. A perfectly squared block is easier to incorporate into your quilt top.
Joining multiple Maia Star Blocks can create a stunning quilt layout. Experiment with alternating colors, rotating blocks, or arranging them diagonally for unique designs.
Final assembly may include adding sashing or borders to complete the quilt top. Planning the layout beforehand ensures harmony in color and pattern distribution.
The Maia Star Block Pattern – FREE PATTERN is highly versatile. Beyond traditional quilts, these blocks can be used for table runners, pillow covers, wall hangings, or gift items.
Consider using different fabric textures to add depth and interest. Combining solids with prints enhances the visual impact of the star.
For a modern touch, play with negative space. Let the background fabric dominate certain areas to make the star points stand out more dramatically.
Experiment with block rotation and color inversion to create optical illusions or secondary patterns within the quilt. This makes your project unique and visually striking.
Adding decorative quilting stitches after assembling the star blocks enhances texture and brings out the geometric pattern. Hand quilting or machine quilting are both excellent options.
Always take time for precision. Accurate cutting, stitching, and pressing ensure that each star block is professional-looking and ready to be cherished for years.
1. What size is the Maia Star Block?
Block size can vary depending on your pattern choice. Standard blocks are often 12 inches square but can be adjusted to fit your project.
2. Is this pattern suitable for beginners?
Yes. While some precision is needed, the Maia Star Block Pattern – FREE PATTERN includes simple geometric shapes that beginners can follow easily.
3. What fabrics are best?
High-quality cotton fabrics work best. Use contrasting colors for the star and background to highlight the design.
4. Can I make multiple star blocks for a quilt?
Absolutely. Repeat the block to create a quilt top of any size. Rotate or invert blocks for creative layouts.
5. How do I ensure perfect star points?
Accurate cutting, consistent ¼-inch seam allowances, and careful pressing are key to achieving sharp star points.
6. Can I add borders to the block?
Yes, adding borders can frame the star and enhance the overall quilt design. Choose colors that complement the star pattern.
7. Is it necessary to prewash the fabrics?
Yes. Prewashing prevents shrinkage and color bleeding, ensuring your finished quilt maintains its shape and appearance.
Creating the Maia Star Block Pattern – FREE PATTERN is a rewarding experience that combines precision, creativity, and quilting tradition. You have learned how to cut, piece, assemble, and enhance your star blocks for beautiful results. Each block reflects careful craftsmanship and artistic expression.
Try making multiple blocks to complete a quilt or explore smaller projects like pillow covers or table runners. Share your experiences, ideas, and suggestions to inspire fellow quilters and continue the rich tradition of quilting artistry.


