
Ballerina pencil case with zipper Pattern


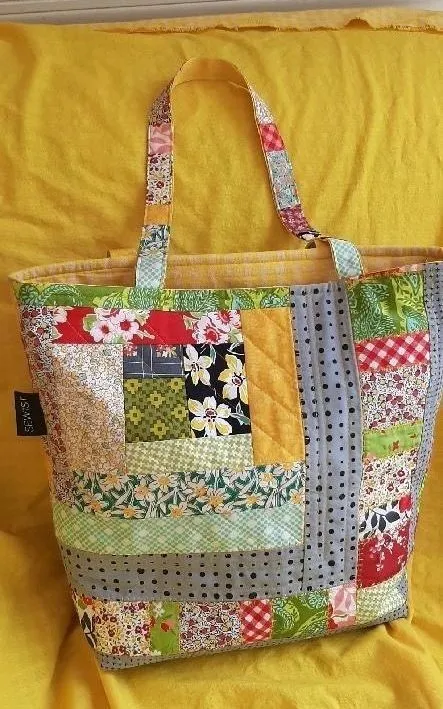
The Patchwork Carryall Pattern is a versatile and stylish project that combines practicality with creativity. This pattern allows you to transform fabric scraps, colors, and textures into a functional bag perfect for everyday use.
Whether you are a beginner or an experienced sewer, this Patchwork Carryall Pattern will guide you step by step in creating a carryall that is both fashionable and durable.
Creating a patchwork carryall is not only a fun sewing project but also an excellent way to repurpose fabric remnants. Each patch contributes to a unique design, giving your bag a personalized and handcrafted appearance.
Following a PDF or written Patchwork Carryall Pattern ensures precision and consistency while making the process accessible for crafters at any skill level.
The beauty of this project lies in its adaptability. You can adjust the size to make a tote, a weekend bag, or even a travel carryall. By carefully choosing fabrics and colors, you can match your carryall to your wardrobe or give it as a thoughtful gift. The Patchwork Carryall Pattern helps you organize your design, assemble your pieces, and finish the bag professionally.
Patchwork carryalls are not only visually appealing but also functional. They typically feature sturdy construction, spacious interiors, and pockets for organization. With this pattern, you can combine style with practicality, ensuring your bag is perfect for shopping, work, or travel.
Now that your fabric pieces are ready, it’s time to assemble the Patchwork Carryall. Begin by sewing the fabric pieces together. Use a quarter-inch seam allowance, which is standard for quilting, to join your fabric squares. Make sure to align the edges carefully to avoid uneven seams.
The Patchwork Carryall Pattern is based on combining individual fabric pieces into larger panels that form the exterior of the bag. Each patch can vary in shape, size, and color, making the final product a unique mosaic of fabrics.
Before starting, gather your fabric scraps or selected materials. It is recommended to have a mix of light, medium, and dark tones to create depth and interest. The pattern will guide you on cutting and arranging these pieces.
The pattern usually divides the bag into three main sections: the front panel, back panel, and bottom. Side panels and handles are added separately, but each section follows the same patchwork principles, ensuring uniformity and cohesion.
For beginners, following a Patchwork Carryall Pattern ensures that patches are sewn evenly and seams align perfectly. This results in a polished, professional look even if it’s your first attempt at patchwork bag construction.
The type of fabric is important for durability. Quilting cotton, canvas, or sturdy linen are excellent choices. Using fabrics with similar weight helps prevent distortion and ensures the bag holds its shape.
The fun part of a patchwork carryall is mixing textures and patterns. Small floral prints, polka dots, or geometric patterns work beautifully together when balanced with solid fabrics. The Patchwork Carryall Pattern guides you in arranging your fabrics for optimal visual impact.
Begin by selecting and cutting all fabric patches according to the pattern instructions. Accurate measurements are essential to ensure that each patch aligns correctly during assembly.
Assemble your patches for the front panel. Lay them out on a flat surface, experimenting with color placement until you are satisfied with the design. This step allows you to visualize the final look before sewing.
Sew the patches together using a quarter-inch seam allowance. Press each seam flat to prevent bulk and maintain smooth edges. Repeat this process for the back panel and any other patchwork sections.
Once all panels are complete, attach the front and back panels to the bottom panel. Make sure the seams match and the bag maintains a rectangular or square base. Accuracy in this step ensures a professional finish.
Next, add side panels if included in your Patchwork Carryall Pattern. These panels provide extra width and structure. Align seams carefully and reinforce corners for durability.
Finally, attach the handles. Depending on the pattern, handles can be short or long, fabric or webbing. Reinforce stitching at the base of each handle to ensure the bag can hold weight. Finish the interior with lining and optional pockets for additional organization.
Always prewash fabrics to prevent shrinking or color bleeding. This is especially important when combining multiple fabric types.
Use high-quality thread and sharp needles. Strong stitching ensures the carryall can withstand daily use and heavy loads.
Press seams consistently. Flat seams contribute to the bag’s structural integrity and create a professional appearance.
Balance patterns and colors for visual appeal. Avoid placing large, bold patterns next to each other, as this can overwhelm the design.
Reinforce stress points. The base, corners, and handle attachments should have extra stitching to increase durability.
Experiment with quilting techniques. Adding quilted lines to panels not only enhances aesthetics but also provides additional structure to the bag.
Patchwork carryalls are highly adaptable. You can create themed bags using seasonal fabrics or personalized patterns for gifts.
Mix and match patch sizes. The Patchwork Carryall Pattern allows for various patch dimensions, creating a dynamic and playful design.
Add embellishments such as appliqués, embroidery, or fabric paint to individual patches for a unique touch.
Combine textures. Use a combination of cotton, denim, and canvas to create a bag with a tactile, layered look.
Try reversible designs. By following a pattern, you can create a carryall that looks great on both sides.
Include internal compartments, zippers, or magnetic closures for added functionality while maintaining style.
Scrap fabrics from previous projects are perfect for a patchwork carryall. This approach is both eco-friendly and creative, ensuring each bag is one-of-a-kind.
Q: Is the Patchwork Carryall Pattern suitable for beginners?
A: Yes! The pattern provides detailed instructions, making it easy to follow even for first-time bag makers.
Q: What fabrics work best for a patchwork carryall?
A: Medium-weight fabrics such as quilting cotton, canvas, or linen are ideal for durability and structure.
Q: Can I adjust the size of the carryall?
A: Absolutely. You can scale up or down by adding or reducing patch sizes and panel dimensions.
Q: How do I reinforce the handles?
A: Sew multiple rows at the attachment points and consider using interfacing or webbing for extra strength.
Q: Can I mix different fabric textures?
A: Yes, but ensure fabrics have similar weight to maintain structure and prevent distortion.
Q: How long does it take to make a patchwork carryall?
A: Depending on size and experience, a carryall may take a few hours to several days.
Q: Can I add lining and pockets?
A: Yes. The pattern can include instructions for lining and internal pockets to increase functionality.
The Patchwork Carryall Pattern is a versatile project that combines creativity, practicality, and craftsmanship. By following this pattern, you can transform leftover fabrics into a unique, functional bag that is perfect for everyday use or gifting.
This tutorial has guided you through selecting fabrics, assembling patches, constructing panels, and finishing your carryall. With attention to detail and creativity, your patchwork bag will be both stylish and durable.
Share your experience and tips! Let others know how you personalized your carryall, which fabrics worked best, and any clever modifications. Your feedback could inspire others to start their own patchwork project and explore the world of creative sewing.


