
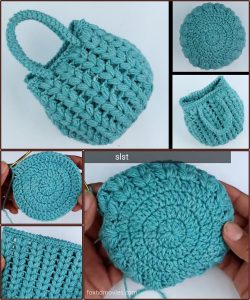
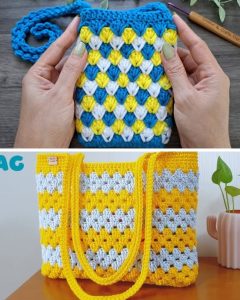
Ballerina pencil case with zipper Pattern


Creating the perfect Peach of a Machine Cover Pattern – Tutorial can transform your sewing machine into a charming centerpiece while also protecting it from dust and damage.
Many sewing enthusiasts often overlook the importance of a well-crafted cover, but this tutorial shows you how a simple yet elegant design can make a significant difference.
Whether you are a beginner or an experienced crocheter, this guide provides step-by-step instructions to help you achieve a stunning and functional result.

The Peach of a Machine Cover Pattern – Tutorial is designed to be accessible for everyone. You don’t need advanced skills to create a beautiful cover; all you need is patience, basic crochet knowledge, and a bit of creativity.
The pattern focuses on a peach-inspired design, offering a unique aesthetic that blends perfectly with any sewing room décor. Using this tutorial, you can craft a cover that is both practical and visually appealing.
Additionally, this Peach of a Machine Cover Pattern – Tutorial encourages personalization. You can adjust colors, yarn types, and decorative elements to match your style. This not only enhances the overall look but also gives a sense of satisfaction and pride in creating something unique. By following this guide, you’ll not only protect your sewing machine but also showcase your craftsmanship in a delightful way.
The first step in mastering the Peach of a Machine Cover Pattern – Tutorial is understanding its components. The pattern is composed of several essential parts: the main body, the peach-shaped accents, and the finishing details. Each element plays a role in ensuring that the cover fits snugly and looks elegant. Choosing the right materials, such as soft cotton yarn, ensures durability and a comfortable touch.
The main body of the cover is designed to fit a standard sewing machine. It provides full coverage while allowing easy access to controls. By following the instructions carefully, you can create a tailored fit that protects your machine from dust, scratches, and minor bumps. This aspect is crucial for maintaining the longevity of your sewing equipment.
The peach-shaped accents are what make this pattern truly stand out. These decorative features give the cover a unique charm that distinguishes it from standard protective covers. Crafting these details requires precision, but the tutorial provides step-by-step guidance, ensuring that even beginners can achieve beautiful results.
Finishing touches, such as scalloped edges or small embroidered details, enhance the overall look. These elements may seem minor, but they significantly elevate the design. By investing time in these details, you turn a practical cover into a decorative piece that complements your sewing space.
This Peach of a Machine Cover Pattern – Tutorial is not just about aesthetics. It also emphasizes functionality, offering a balance between beauty and utility. With the right approach, your machine cover can become a conversation starter, showcasing your dedication to craft and style.
Customization is a key feature of this pattern. You can experiment with different color schemes, such as a soft pastel peach or a more vibrant tone, to match your personal taste. Adding ribbons or small floral embellishments can further personalize the cover, making it uniquely yours.
Before starting the Peach of a Machine Cover Pattern – Tutorial, gathering the right materials is essential. High-quality yarn is crucial for both appearance and durability. Cotton yarn is highly recommended due to its softness, ease of use, and resistance to wear over time.
Crochet hooks in appropriate sizes are necessary for achieving the correct tension and stitch consistency. Using the wrong hook size may result in a cover that is either too loose or too tight. The tutorial specifies the exact hook size for optimal results, ensuring a professional finish.
Scissors, measuring tape, and stitch markers are additional tools that simplify the process. Accurate measurements guarantee that the cover will fit your machine perfectly, while stitch markers help track progress, especially when working on complex sections.
Optional decorative elements such as buttons, beads, or embroidery threads allow for further personalization. These materials give the Peach of a Machine Cover Pattern – Tutorial a distinctive flair, allowing your creativity to shine.
Yarn colors play a significant role in the design. Choosing shades that reflect a natural peach tone adds realism to the pattern. Combining complementary colors can also create depth and visual interest, enhancing the overall aesthetic of the cover.
By preparing these materials in advance, you ensure a smooth and enjoyable crafting experience. Proper preparation prevents interruptions and helps maintain focus, which is essential for achieving a high-quality finished product.
The Peach of a Machine Cover Pattern – Tutorial is designed to be simple to follow. Begin by creating the base using single crochet stitches, ensuring a flat and even foundation. Maintaining consistent stitch tension throughout this stage is critical for achieving a professional look.
Once the base is complete, start shaping the peach accents. These small decorative pieces require precise stitch work, but following the tutorial step by step makes the process manageable. Taking your time here will result in beautifully crafted details that stand out.
Attach the peach accents to the main body using slip stitches or sewing, depending on preference. Positioning is important; even placement enhances symmetry and visual appeal. Ensuring the decorations are securely attached prevents them from detaching with use.
Next, work on the finishing edges. Adding scalloped or textured borders not only strengthens the cover but also adds an elegant touch. This stage allows for creativity, as you can choose from various edge styles to complement the overall design.
Check the cover for proper fit by gently placing it over your sewing machine. Adjustments may be necessary, and small tweaks can make a big difference. Ensuring a snug fit enhances both protection and aesthetic appeal.
Finally, incorporate any optional decorative elements such as embroidered leaves or small beads. These final touches elevate the Peach of a Machine Cover Pattern – Tutorial from a simple protective cover to a beautifully designed piece that reflects your personality and skill.
Maintaining your Peach of a Machine Cover Pattern – Tutorial is just as important as creating it. Regular cleaning keeps the yarn looking fresh and prevents dust accumulation. Hand washing with mild detergent is recommended to preserve the softness and color integrity.
Avoid exposing the cover to direct sunlight for extended periods, as this can fade the yarn. Storing the cover in a shaded area helps maintain its vibrant colors and extends its lifespan.
When using the cover, ensure that all decorations are secure to prevent accidental damage. Loose elements can snag or detach, reducing both functionality and visual appeal. Regularly inspecting the cover helps identify and fix minor issues before they become significant problems.
Rotating the cover between different sewing machines, if applicable, allows you to protect multiple machines without needing separate covers. This approach maximizes the usefulness of your handmade creation.
Consider incorporating seasonal or thematic changes to the cover. For example, you can add small removable decorations to match holidays or special events, making the Peach of a Machine Cover Pattern – Tutorial versatile and engaging year-round.
Finally, share your creations with friends, family, or sewing communities. Receiving feedback and exchanging ideas encourages continuous improvement and inspires new design variations.
Q1: Is this pattern suitable for beginners?
Yes, the Peach of a Machine Cover Pattern – Tutorial is designed to be beginner-friendly. The instructions are step-by-step, and even first-time crocheters can achieve excellent results with patience.
Q2: Can I use yarn other than cotton?
While cotton yarn is recommended for durability and softness, you can experiment with acrylic or blended yarns. Just ensure the texture and thickness are appropriate for the pattern.
Q3: How long does it take to complete the cover?
Completion time varies depending on experience and pace. On average, beginners may need 8–12 hours, while experienced crocheters can finish in 5–7 hours.
Q4: Can the size be adjusted for larger machines?
Yes, the pattern can be scaled by increasing the base measurements and adjusting the peach accents accordingly. Always measure your machine before starting.
Q5: How do I clean the finished cover?
Hand washing with mild detergent is recommended. Avoid wringing; instead, gently squeeze excess water and air dry in a shaded area.
Q6: Can I add custom decorations?
Absolutely! Adding beads, embroidery, or small appliques is encouraged to personalize the Peach of a Machine Cover Pattern – Tutorial and make it uniquely yours.
The Peach of a Machine Cover Pattern – Tutorial provides a perfect blend of functionality and charm, transforming your sewing machine into a protected and visually appealing centerpiece. By following this detailed guide, you’ve learned how to create the base, craft the peach accents, add finishing touches, and maintain your cover for long-lasting use.
This pattern encourages creativity, allowing you to customize colors, decorations, and size according to your preferences. With attention to detail and a bit of patience, you can create a cover that reflects both skill and personality.
We hope this tutorial inspires you to craft your own Peach of a Machine Cover Pattern – Tutorial. Share your thoughts, suggestions, and experiences in the comments to help others learn and grow. Your feedback is valuable, and we look forward to seeing your beautiful creations.


