
Ballerina pencil case with zipper Pattern


Poinsettia Quilt – Free Pattern is a delightful way to bring the festive spirit into your home with a handmade touch. Whether you are an experienced quilter or a beginner eager to explore seasonal projects, this guide will show you how to create a beautiful quilt featuring the classic poinsettia design, perfect for Christmas décor or as a heartfelt gift.
Using this free pattern, you can enjoy the process of piecing together vibrant fabrics to form a stunning floral quilt that brightens any room.
Quilting is a rewarding craft that combines creativity, precision, and patience. With the Poinsettia Quilt – Free Pattern, you will learn how to arrange your fabrics, cut pieces accurately, and assemble them into intricate floral motifs.
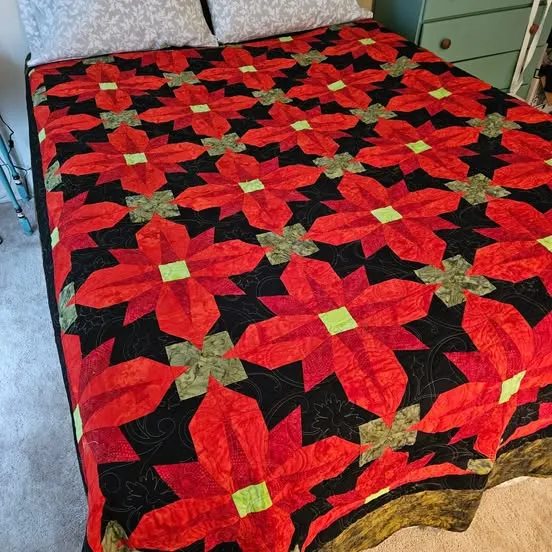
The poinsettia, known for its rich red petals and green leaves, provides a classic seasonal theme that is both visually striking and versatile for various quilt sizes. This tutorial makes it easy to follow the pattern and achieve professional-looking results.
Creating a quilt using this free poinsettia design also allows you to experiment with color combinations and fabric textures. You can choose traditional reds and greens or mix in metallic fabrics, soft pastels, or patterned textiles to give your quilt a unique, modern twist. By following this pattern, you will gain confidence in quilting techniques, improve your patchwork skills, and have a charming piece of handmade art to display or gift.
When starting your Poinsettia Quilt – Free Pattern, selecting the right fabrics is essential. Quality cotton fabrics are ideal because they are easy to cut, sew, and press. You can also experiment with blends or textured fabrics for added depth. Ensure you have contrasting colors for the poinsettia petals, leaves, and background to make the design pop.
Consider the durability of your fabrics if you plan to use the quilt frequently. Pre-wash all fabrics to prevent shrinkage and color bleeding during the quilting process. The right choice of fabrics will not only enhance the appearance of your quilt but also make it more enjoyable to work with.
Mixing patterns and solids can add visual interest. Use solid colors for petals and leaves and subtle prints for the background to highlight the poinsettia design. Play with color gradients to give your quilt a sense of depth and dimension.
Matching thread colors with your fabrics is also crucial. Using complementary threads can blend your seams seamlessly, while contrasting threads can emphasize the shapes and patterns of your quilt blocks.
Fabric selection extends to the quilt backing and batting. Choose a soft backing that complements your design, and select a batting that provides the right warmth and loft for your intended use.
Finally, organizing your fabrics before starting will make assembly easier. Cutting and labeling pieces ahead of time can streamline the quilting process and ensure your Poinsettia Quilt – Free Pattern comes together smoothly.
Accurate cutting is the foundation of any quilt project. Use a rotary cutter, cutting mat, and clear ruler to achieve precise shapes for your Poinsettia Quilt – Free Pattern. Precision ensures your blocks align perfectly and your finished quilt looks polished.
Start by cutting the petals, leaves, and background squares according to the pattern’s specifications. Consistent seam allowances are critical; typically, a ¼-inch seam is standard for quilting.
Piecing the quilt involves sewing the individual fabric shapes together. Start with the poinsettia petals, then attach the leaves, and finally join them with the background pieces. Press seams carefully after each step to maintain flat, even blocks.
Using pins or clips can help keep fabric layers aligned while sewing. This is especially important when working with curved or pointed edges like poinsettia petals.
Chain piecing is an efficient technique to sew multiple pieces quickly while maintaining consistency. This method saves time and keeps your workflow organized for the Poinsettia Quilt – Free Pattern.
Check your work regularly as you piece the quilt. Aligning points accurately and correcting mistakes early prevents larger issues during assembly, ensuring your quilt turns out as intended.
Once your quilt top is complete, it’s time to layer it with batting and backing. Smooth out wrinkles and baste the layers together using pins, spray adhesive, or hand basting. Proper basting prevents shifting during quilting.
Choose a quilting method that complements the poinsettia design. Simple straight-line quilting highlights the floral pattern, while free-motion quilting can add texture and dimension to the petals and leaves.
Pay attention to quilt edges when quilting. Ensure your stitches are even and consistent to create a professional finish. Quilting along the seams of the poinsettia blocks enhances the design and adds stability.
After quilting, trim excess batting and backing to align with the quilt top. This step prepares your quilt for binding and ensures neat edges.
Binding your quilt involves sewing a fabric strip around the perimeter. Fold the binding over the edges and stitch it down by hand or machine for a clean, polished finish.
Labeling your quilt with the date and maker’s name is a thoughtful touch, especially for gifting. Your Poinsettia Quilt – Free Pattern will become a cherished handmade item for years to come.
The Poinsettia Quilt – Free Pattern can be customized in numerous ways. Change the size of the quilt by adjusting the number of blocks or the dimensions of each block to suit your needs.
Experiment with different color palettes. While traditional reds and greens are festive, modern combinations like pinks, purples, or blues create a fresh twist on the classic design.
Add embellishments like embroidery, beads, or appliqué to enhance your quilt. These details can highlight the center of the poinsettia or add sparkle for a festive touch.
Try mixing fabrics with different textures, such as velvet or satin, to create a luxurious feel. Combining textures adds depth and tactile interest to your quilt.
Consider using a themed backing fabric that complements the front design. Seasonal prints, subtle patterns, or matching colors tie the entire quilt together.
Finally, involve family or friends in the quilting process. Working together can make the project more enjoyable and memorable, creating a quilt that carries sentimental value.
Q: Do I need advanced quilting skills to make the Poinsettia Quilt?
A: No, this free pattern is designed for beginners and intermediate quilters. Clear instructions and step-by-step guidance make it accessible for all skill levels.
Q: What type of fabric works best for this quilt?
A: Cotton fabrics are ideal due to their ease of handling and durability. Pre-wash your fabrics to prevent shrinkage and color bleeding.
Q: Can I adjust the size of the quilt?
A: Yes, you can change the number of blocks or the size of each block to create a small lap quilt or a large bed quilt.
Q: How do I quilt the layers together?
A: You can use straight-line quilting, free-motion quilting, or stitch-in-the-ditch techniques depending on your preference and skill level.
Q: What is the best batting to use?
A: Choose a soft, medium-loft batting that provides warmth and structure. Cotton or cotton-poly blends work well.
Q: Can I gift a quilt made using this pattern?
A: Absolutely! Handmade quilts make thoughtful, cherished gifts for family and friends.
The Poinsettia Quilt – Free Pattern offers a rewarding project that combines creativity, precision, and festive charm. By following this guide, you have learned how to select fabrics, cut and piece blocks, quilt, and finish a beautiful poinsettia-themed quilt.
Handmade quilts provide warmth, style, and a personal touch that store-bought items cannot match. Share your completed quilt, enjoy the satisfaction of your hard work, and don’t forget to leave your honest opinion and suggestions to help others improve their quilting journey.


