
Ballerina pencil case with zipper Pattern


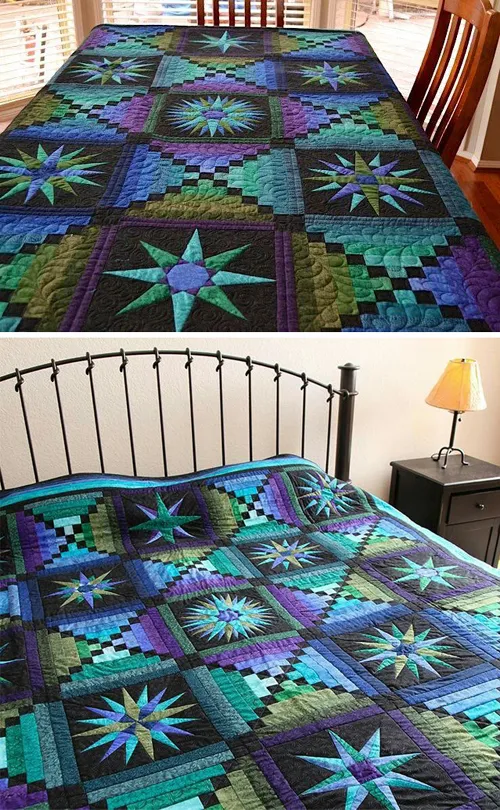
The Rainbow Star Mini Quilt is a vibrant and joyful project that brings together color, geometry, and creativity in one small but beautiful piece of art.
This delightful quilt design captures the essence of patchwork and the joy of playing with fabrics, making it a perfect project for both beginners and experienced quilters.
Whether you’re looking for a weekend craft or a meaningful handmade gift, the Rainbow Star Mini Quilt is a wonderful way to explore your love for quilting while adding a splash of color to your home decor.
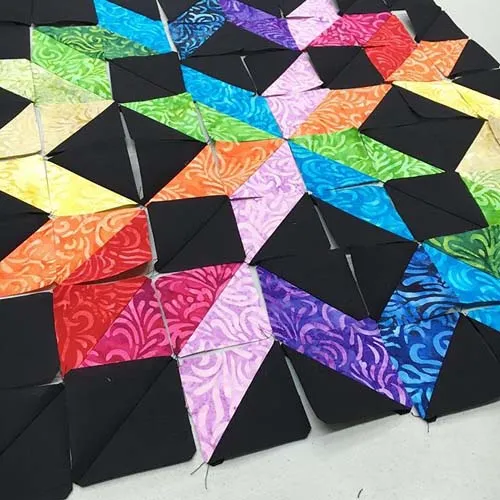
What makes the Rainbow Star Mini Quilt so special is its combination of bright tones arranged in a star pattern that shines like a piece of the rainbow.
Each small section comes together harmoniously to form a stunning centerpiece that celebrates both precision and creativity. The versatility of this quilt allows you to experiment with different fabric scraps, color gradients, and patterns to create a piece that is truly unique.
Another reason many crafters love this project is its manageable size. Unlike large quilts that can take months to complete, the Rainbow Star Mini Quilt offers the satisfaction of finishing a colorful and detailed piece in just a few days. It’s an ideal project to practice piecing techniques, color placement, and machine or hand quilting without feeling overwhelmed. You can hang it on a wall, place it on a table, or even gift it to someone special—it’s a small quilt that delivers a big impact.
Selecting the right fabrics is one of the most exciting parts of creating a Rainbow Star Mini Quilt. Since color plays such an important role, it’s worth spending time choosing hues that blend beautifully together. Start with seven to nine fabrics in different colors that represent the spectrum of a rainbow—red, orange, yellow, green, blue, indigo, and violet. You can also use lighter or darker tones of each color to create depth and dimension.
Cotton fabrics are a classic choice for quilting because they are durable, easy to sew, and come in endless patterns. When selecting your materials, consider mixing solids and subtle prints to add visual interest without overwhelming the design. The key is to keep balance—too many busy prints can distract from the star shape, while too many solids may make the quilt look flat.
If you prefer a more modern look, try working with tonal gradients, like a rainbow that softly transitions from one shade to another. This can create a calming, contemporary feel. Alternatively, you can embrace bold contrasts by using bright, saturated colors that make each section of the Rainbow Star Mini Quilt pop. The choice depends entirely on your personal taste and the mood you want your quilt to convey.
Before cutting your fabrics, it’s a good idea to wash and press them. Prewashing prevents shrinkage later on and ensures that your colors won’t bleed. After pressing, lay your fabrics out on a flat surface and experiment with the color order. Move pieces around until you find the perfect arrangement that feels balanced and cheerful. Taking photos during this stage can help you visualize the finished quilt before you start sewing.
One great tip is to include a neutral background fabric to make your star stand out. White, cream, gray, or even black can provide a striking contrast that highlights the rainbow tones. This background will frame your Rainbow Star Mini Quilt, giving it structure and elegance.
Finally, don’t forget that fabric choice can also reflect your personality. Whether you go for a bold rainbow explosion or a soft pastel version, your fabric selection is what makes your Rainbow Star Mini Quilt truly yours.
Once your fabrics are ready, it’s time to start piecing your Rainbow Star Mini Quilt together. Precision is key to achieving those clean lines and sharp points that define a star pattern. Begin by cutting your fabrics according to your pattern template, ensuring that each piece is measured accurately. Using a rotary cutter, ruler, and self-healing mat can make this process faster and more precise.
Lay out your pieces before sewing to ensure the star sections are properly aligned. Working from the center outward can help maintain symmetry. When sewing, use a quarter-inch seam allowance for consistency. Press each seam flat as you go—either open or to one side—depending on your preference and the thickness of your fabrics.
For beginners, using a foundation paper piecing technique can make assembling the Rainbow Star Mini Quilt much easier. This method provides a printed guide that helps you align your fabric sections accurately. Once all sections are sewn, you can carefully remove the paper backing and press the quilt top for a smooth finish.
Next, assemble the background pieces around your star. This step helps frame your design and ensures that the star sits perfectly centered. If you notice slight misalignments, don’t worry—small imperfections often disappear after quilting and pressing.
Once the quilt top is complete, layer it with batting and backing fabric. Pin or baste the layers together to keep them from shifting during quilting. For a mini quilt, even a simple straight-line or diagonal quilting design can beautifully enhance the overall appearance.
Take your time with the stitching—it’s not about speed, but about enjoying the process. The Rainbow Star Mini Quilt is as much about creativity and mindfulness as it is about the final result.
The finishing stage of your Rainbow Star Mini Quilt is where your hard work truly shines. After quilting, trim any excess fabric and square up the edges. Then, add the binding—this frames your quilt and gives it a polished, professional look. You can use one of the colors from your star or a contrasting hue to make the border stand out.
Sew the binding using your preferred method, either by machine or by hand. Many quilters enjoy hand-stitching the final edge because it gives a soft, invisible finish that feels luxurious. Once your binding is attached, give your mini quilt a final press to smooth out any wrinkles.
Now it’s time to decide how you want to display your masterpiece. The Rainbow Star Mini Quilt looks stunning hung on a wall, especially in craft rooms, living spaces, or children’s bedrooms. You can attach small loops to the back or use a wooden dowel for easy hanging.
Another popular option is to use it as a colorful table topper or centerpiece. The bright rainbow tones instantly bring warmth and joy to any setting. Mini quilts also make thoughtful handmade gifts for birthdays, baby showers, or housewarmings—especially when personalized with a small embroidered message or date.
If you’re part of a quilting group or guild, the Rainbow Star Mini Quilt can also be an inspiring group challenge. Each member can create their own version using different color palettes, resulting in a stunning collection of unique interpretations.
And don’t forget to label your quilt! Adding your name, date, and project title not only marks it as your work but also preserves its story for the future.
One of the best aspects of the Rainbow Star Mini Quilt is its flexibility for personalization. You can change the size, play with layouts, or even add embroidery and appliqué details for extra flair. This project welcomes experimentation, making it perfect for anyone who loves to put their personal touch on handmade creations.
If you’re drawn to traditional quilting, try using classic fabrics like calico or batik. For a modern approach, go for bold solids or ombré patterns that transition seamlessly between colors. You can also scale up the design to make a throw quilt or downsize it for a mug rug or coaster.
Adding embellishments can take your quilt to the next level. Tiny beads, sequins, or decorative stitches around the star points can create beautiful texture. Just remember to keep embellishments balanced so they complement rather than overwhelm the main design.
For quilters who enjoy storytelling through fabric, each section of the Rainbow Star Mini Quilt can represent something meaningful—emotions, memories, or even the people who inspire you. In this way, your quilt becomes not only a decorative item but also a symbolic piece of art.
Experimenting with texture is another exciting option. Try mixing cotton with linen or velvet for a tactile contrast. You might also explore hand quilting using colorful threads that echo the rainbow theme.
Personalization is the heart of quilting. With each choice—color, fabric, stitch—you infuse your Rainbow Star Mini Quilt with creativity and love, transforming it into something one-of-a-kind.
1. What size is a mini quilt?
A mini quilt typically ranges from 12 to 24 inches on each side, though you can adjust the size to your preference. The Rainbow Star Mini Quilt often measures around 18 inches square, making it easy to handle and display.
2. Is the Rainbow Star Mini Quilt suitable for beginners?
Yes! This pattern is ideal for beginners who want to practice color coordination and piecing skills without committing to a large project.
3. Can I make the Rainbow Star Mini Quilt by hand?
Absolutely. While machine sewing is faster, hand-piecing and hand-quilting give the project a charming, traditional look.
4. How do I keep my fabrics from shrinking or bleeding?
Prewashing your fabrics before cutting helps prevent these issues. It’s also best to use color catchers the first few times you wash your finished quilt.
5. What’s the best batting for a mini quilt?
Lightweight cotton or cotton-blend batting works perfectly for small quilts. It provides structure without adding too much bulk.
6. Can I sell my Rainbow Star Mini Quilt?
Yes, as long as it’s your own handmade work. Many quilters sell their creations at craft fairs or online marketplaces.
Creating a Rainbow Star Mini Quilt is a joyful experience that combines artistry, patience, and creativity. From choosing fabrics and piecing the design to adding those final stitches, every step brings satisfaction and beauty. This project proves that even a small quilt can hold great artistic value and emotional meaning.
If you’ve been inspired by this tutorial, take some time to experiment with your own version of the Rainbow Star Mini Quilt. Let your imagination guide your colors, textures, and patterns.
We hope this guide has helped you feel more confident and inspired to start your next quilting adventure. Please share your honest opinion and suggestions—we’d love to hear how your Rainbow Star Mini Quilt turns out!


