
Ballerina pencil case with zipper Pattern


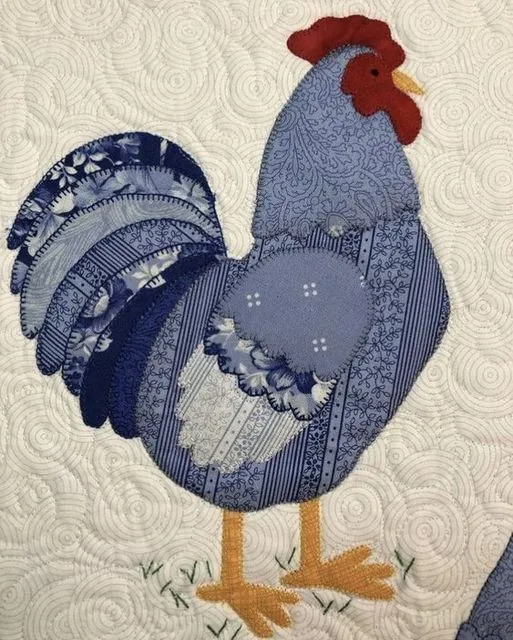
The Rooster Quilt Block Free Pattern is a delightful and vibrant design that brings charm, warmth, and a touch of farmhouse elegance to any quilting project.
Whether you are a seasoned quilter or just beginning your creative journey, this pattern offers a fun way to combine colors, textures, and precision stitching to create a truly unique piece.
The rooster quilt block is not only symbolic of early mornings and country life, but it also represents energy, courage, and the beauty of handcrafted artistry.
Using this free pattern, you can add a cheerful focal point to wall hangings, table runners, or even large quilts that celebrate rural charm and creativity.
Creating a rooster quilt block involves combining traditional quilting techniques with artistic detail. The pattern’s appeal lies in its versatility—quilters can experiment with bold color contrasts, fabric scraps, or intricate appliqué to bring the rooster to life. What makes this project special is that it’s both visually impressive and deeply personal. Each block can tell a story, showcasing the quilter’s personality through fabric choices and stitching style. The Rooster Quilt Block Free Pattern encourages creativity and provides an excellent opportunity to refine precision cutting, piecing, and color coordination skills.
One of the greatest joys of working with the Rooster Quilt Block Free Pattern is how it connects modern quilters to traditional craftsmanship. Roosters have long been a popular motif in folk art and home décor, symbolizing pride, vigilance, and rural beauty. When transformed into a quilt block, the rooster becomes a piece of living art—an emblem of handmade passion and timeless design. Whether you’re making it as a gift or as part of a larger quilt project, this pattern will brighten any room and bring a sense of coziness and accomplishment.
Selecting the right fabrics is the foundation of a beautiful rooster quilt block. Because roosters are naturally colorful, you have the freedom to play with a wide palette. Deep reds, golden yellows, bold oranges, and deep blues make striking combinations that capture the rooster’s lively nature. To make your quilt visually appealing, use contrasting shades for the body, feathers, and background to ensure every detail stands out. For beginners, using pre-cut fabric squares can simplify the process and reduce waste.
When planning your color scheme, think about the overall mood of your quilt. A Rooster Quilt Block Free Pattern designed with earthy tones like browns, creams, and muted reds can give a rustic farmhouse feel, while bright and modern fabrics create a more playful, contemporary look. The key is balance—using a mixture of solid fabrics for structure and patterned ones for character ensures your quilt block has both depth and personality.
Texture is another aspect to consider. Mixing cotton with linen or flannel can add richness to the design. You can also introduce small pieces of metallic fabric or embroidery to highlight the rooster’s comb or feathers, giving your quilt a hint of shimmer and sophistication. When working with multiple textures, make sure all fabrics are prewashed to prevent uneven shrinking and color bleeding later on.
For the background, choose colors that contrast with the rooster’s body to make the design pop. Light neutral fabrics such as cream, pale blue, or light gray are ideal, as they draw attention to the bold rooster without overpowering it. Avoid overly busy prints that may distract from the main motif. The simplicity of the background will allow your rooster quilt block to stand out beautifully.
Don’t hesitate to experiment with scraps or leftovers from other projects. The Rooster Quilt Block Free Pattern is perfect for using up small pieces of fabric. Scrap quilting not only adds charm and variety but also makes your project more sustainable and budget-friendly. Every piece tells a story, and your quilt becomes a collage of memories and creativity.
Finally, always make a test block before starting your full quilt. This helps ensure your chosen colors work well together and that the pattern is the right size for your intended project. Making adjustments early will save you time and frustration later, ensuring your final rooster quilt block looks polished and professional.
Before you begin, gather your materials: printed Rooster Quilt Block Free Pattern, chosen fabrics, rotary cutter, quilting ruler, cutting mat, sewing machine, and matching thread. Precise cutting is crucial—small inaccuracies can lead to misaligned seams. Start by carefully cutting your fabric pieces according to the pattern measurements. Double-check each piece before sewing to ensure a perfect fit.
Begin assembling the quilt block by joining smaller sections, such as the rooster’s tail and head. Working in sections makes it easier to handle and reduces errors. Press seams flat after each step using an iron; this creates clean lines and makes it easier to align pieces later. When joining sections, pin carefully and sew with a consistent seam allowance—typically ¼ inch—to maintain uniformity.
The most exciting part of the rooster quilt block is watching the rooster take shape as you sew each part together. The body and feathers come alive through color placement and careful alignment. If you’re a beginner, take your time with curves and angles, using a slower sewing speed for better control. Accuracy matters more than speed in quilting.
Once your rooster design is complete, add the background pieces to frame it. This step brings the entire block together and gives it a clean, balanced look. After piecing everything, give your block a final press to flatten seams and remove wrinkles. Your finished block should lie perfectly flat without puckering.
If you’re making multiple blocks for a larger quilt, ensure all blocks are trimmed to the same size before joining them. Consistency will make the final quilt easier to assemble and quilt. You can then add sashing, borders, or cornerstones to enhance the overall design and tie all the blocks together.
After assembling the quilt top, layer it with batting and backing fabric, then quilt as desired. Straight-line quilting works well for a simple look, while free-motion quilting adds intricate detail. Finish the edges with binding to complete your rooster masterpiece. The Rooster Quilt Block Free Pattern provides endless room for personalization, so let your imagination lead the way.
The beauty of the Rooster Quilt Block Free Pattern is its adaptability. Beyond quilts, this charming design can be used in various creative projects to add a touch of rustic warmth to your home décor. One popular option is turning a single block into a wall hanging. With a small border and a hanging sleeve, your rooster becomes a stunning piece of textile art for your kitchen or dining room.
You can also use the pattern to make decorative pillow covers. A single rooster block framed with a border makes a perfect farmhouse-style cushion for a couch or chair. It’s a small project that brings big personality to any space. Adding embroidery details or button eyes can enhance its texture and charm.
Table runners and placemats are another great use for the rooster quilt block. Combine several blocks in a row, or alternate them with solid squares for a balanced design. These pieces make your dining area cozy and festive, especially for country-themed gatherings or holiday dinners.
If you love gifting handmade items, the Rooster Quilt Block Free Pattern can be transformed into thoughtful presents. Create a tote bag with a rooster block on the front, or sew a set of quilted potholders and coasters. Handmade gifts carry personal meaning and showcase your skills beautifully.
For quilters who enjoy mixing modern and traditional aesthetics, the rooster block can be used in larger quilts alongside geometric or floral designs. This contrast creates a visually interesting composition that feels both nostalgic and fresh.
Finally, don’t be afraid to scale the pattern. Enlarging or shrinking the rooster quilt block allows you to create matching accessories, from mini mug rugs to full-size bed quilts. The versatility of the design makes it suitable for endless applications.
To achieve professional results, precision and patience are key. Always double-check your measurements before cutting. Even a small mistake can throw off the entire block’s alignment. Use a sharp rotary blade and a reliable quilting ruler for clean edges. Keeping your tools in top condition ensures smoother work and better accuracy.
Pressing is just as important as stitching. After each seam, use an iron to press the fabric flat. Press toward the darker fabric to prevent shadowing through lighter pieces. A well-pressed block will lay flatter and look neater when assembled.
When working with multiple colors, label each piece before sewing. This simple step helps you avoid mixing up parts of the rooster’s body, wings, and tail. Staying organized throughout the process saves time and minimizes frustration.
If you’re new to quilting, use chain piecing to speed up sewing without sacrificing accuracy. It involves sewing multiple pieces continuously without cutting the thread in between, making your workflow smoother and more efficient.
Take the time to practice color placement before stitching. Lay out all pieces on a flat surface to visualize how your rooster quilt block will look. Adjust colors if needed until you’re satisfied with the composition.
Lastly, always enjoy the process. Quilting is an art form that rewards patience and creativity. The Rooster Quilt Block Free Pattern is more than just a project—it’s a chance to express yourself and create something truly one-of-a-kind.
1. What size is the standard Rooster Quilt Block Free Pattern?
Most patterns measure between 12×12 and 15×15 inches, but you can resize them to fit your project needs.
2. Can beginners try this pattern?
Yes! The Rooster Quilt Block Free Pattern is beginner-friendly with basic piecing techniques and clear instructions.
3. What fabrics work best for this design?
Cotton fabrics are ideal because they are easy to cut, sew, and press. You can mix prints and solids for added texture.
4. How long does it take to complete one block?
Depending on skill level, it usually takes 2–4 hours to finish one block, including cutting, sewing, and pressing.
5. Can I make this pattern using fabric scraps?
Absolutely. The rooster quilt block is perfect for using leftover fabric scraps, making it economical and eco-friendly.
6. How should I quilt the finished block?
You can use straight-line quilting for a classic look or free-motion stitching for added flair and texture.
The Rooster Quilt Block Free Pattern combines creativity, tradition, and personal expression in one beautiful project. From choosing vibrant fabrics to stitching the final seam, each step offers joy and satisfaction.
This timeless design can enhance any space, whether displayed as a wall hanging, part of a quilt, or a handmade gift. Remember, quilting is about more than perfection—it’s about passion, patience, and storytelling through fabric.
If you enjoyed this tutorial, share your thoughts below and let us know your experiences or suggestions. Your feedback inspires new creations and helps keep the quilting spirit alive!


