
Ballerina pencil case with zipper Pattern


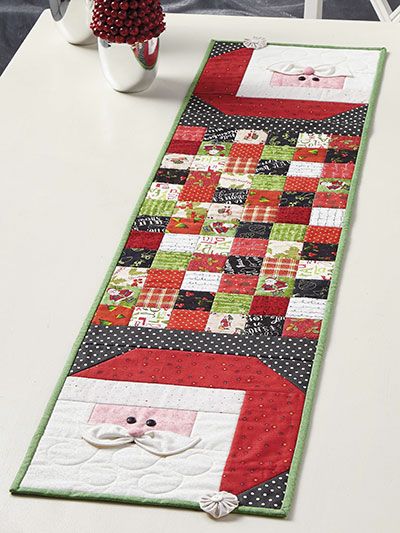
The holiday season is the perfect time to add a touch of creativity to your home décor, and the Santa Claus Mat – TUTORIAL is an ideal way to do just that. This festive crochet or sewing project allows you to bring the joy and warmth of Santa Claus directly into your living room, kitchen, or entryway.
With its charming design, it not only serves a practical purpose but also becomes a conversation piece that adds character to your holiday decorations.
By following the Santa Claus Mat – TUTORIAL, you can create a handmade item that reflects the spirit of Christmas. The cheerful red suit, snowy white beard, and festive hat make the mat instantly recognizable.
Whether you are planning to use it as a welcome mat at your door or as a cozy accent under your Christmas tree, this project is a delightful way to combine crafting skills with seasonal joy.
What makes the Santa Claus Mat – TUTORIAL even more appealing is its flexibility. It can be adapted to different skill levels and styles. Beginners can follow a simple version with basic shapes and stitches, while advanced crafters can experiment with textures, appliqués, and color variations.
No matter your experience, the result will be a holiday treasure that brightens up your home.
The main reason to try the Santa Claus Mat – TUTORIAL is the festive spirit it brings into your home. A handmade mat adds warmth, charm, and personality that store-bought decorations often lack. Each stitch and detail reflects your creativity, making it a meaningful addition to your Christmas setup.
Another benefit of creating this mat is its versatility. You can use it as a doormat to greet visitors with a festive touch, as a centerpiece under your holiday tree, or even as a decorative accent in your living room or dining area. Its multipurpose nature makes it a worthwhile project that can be enjoyed in many spaces.
The tutorial itself is also a wonderful learning experience. It introduces you to techniques that can improve your crafting skills, whether in crochet, sewing, or mixed fabric projects. Following clear instructions allows you to build confidence and gain new skills while completing a fun and rewarding design.
Additionally, the Santa Claus Mat – TUTORIAL can be a fantastic handmade gift. Giving someone a holiday mat that you created adds a special, personal touch that no store-bought item can replace. Friends and family members are sure to appreciate the time, effort, and creativity behind such a thoughtful present.
For those who care about sustainability, making your own mat also helps reduce waste. Many crafters enjoy using leftover yarn, fabric scraps, or recycled materials for this project. This makes it an eco-friendly and budget-friendly way to decorate your home for the holidays.
Lastly, creating this mat can be a relaxing and therapeutic activity. The holiday season can be stressful, and sitting down to craft something festive helps bring joy and mindfulness. The repetitive nature of crochet or sewing can be calming, and the finished project is a reminder of the joy of handmade traditions.
The first step in following the Santa Claus Mat – TUTORIAL is gathering the right materials. For crochet versions, you will need yarn in classic Christmas colors: red for Santa’s suit, white for his beard and trim, black for his boots and belt, and a touch of gold or yellow for the buckle. Choosing a durable yarn like cotton or acrylic ensures the mat will last for many seasons.
A crochet hook that matches your yarn weight is essential. Most patterns recommend a medium-sized hook for worsted weight yarn, but you can adjust depending on the thickness of your yarn or the size of the mat you want to create.
For sewing or fabric versions of the mat, felt or fleece in similar colors works well. These fabrics are easy to cut and sew, making them ideal for beginner-friendly projects. Adding a non-slip backing ensures that the mat stays in place, especially if used at a doorway.
Other tools you’ll need include scissors for trimming yarn or fabric, a yarn needle for weaving in ends, and fabric glue or sewing needles if you’re working with cloth. Embellishments like buttons, sequins, or pom-poms can add playful details, such as Santa’s belt buckle or the fluffy tip of his hat.
A printed or written copy of the Santa Claus Mat – TUTORIAL can be helpful to keep track of steps. Making notes about stitch counts or assembly techniques is a good way to stay organized and ensure consistency if you decide to make multiple mats.
Optional materials include foam or batting if you want to add cushioning, making the mat extra soft and comfortable. This is especially nice if the mat will be used in a cozy corner of your home rather than as a doormat.
The first step of the Santa Claus Mat – TUTORIAL involves creating the base shape. For crochet projects, this may start with a round or oval base worked in continuous rounds. For fabric versions, you might begin by cutting a large circle or rectangle to serve as the foundation of the mat.
Next, you will begin forming Santa’s signature red suit. This typically involves working in red yarn or attaching red fabric to cover the majority of the mat. The bold red instantly gives the project its festive character and makes it easy to identify as Santa-inspired.
Once the red suit is in place, you can add the white details. This includes the beard, the trim of Santa’s hat, and the fur lining of his coat. Crochet versions often use fluffy yarn or special stitches to create a soft texture, while fabric versions may use fleece or felt for a similar effect.
After completing the beard and trim, the focus moves to Santa’s black boots and belt. The belt usually stretches across the middle of the mat, with a gold or yellow buckle for contrast. This detail is what ties the design together and gives it the iconic Santa Claus look.
The next step is assembling all the pieces. If you’re crocheting, you’ll sew or crochet the separate parts onto the base. If you’re sewing, fabric glue or hand stitching will secure the elements in place. Taking care with alignment ensures that the final result looks polished and professional.
Finally, add finishing touches such as Santa’s rosy cheeks, a button nose, or the fluffy pom-pom on his hat. These small details make the mat come to life and give it a whimsical charm. Once completed, your Santa Claus Mat – TUTORIAL will be ready to brighten your home.
The most common use for the Santa Claus Mat – TUTORIAL is as a holiday doormat. Placing it at your front door gives guests a warm and festive welcome, instantly putting them in the holiday spirit.
Another creative use is to place the mat under your Christmas tree. It provides a soft and decorative base that enhances the festive setup while protecting your floor from tree stands or falling pine needles.
You can also use the mat as a wall hanging or decorative accent in your living room. By attaching loops or hooks, it can be displayed like a holiday tapestry, adding a cozy and handmade feel to your decorations.
Some crafters enjoy using the mat as a playful rug in children’s rooms. Kids often love Santa Claus, and having a themed mat makes the space feel magical during the holidays.
If you create a smaller version of the Santa Claus Mat – TUTORIAL, it can double as a table centerpiece or a base for holiday displays. Adding candles, figurines, or ornaments on top creates a festive scene.
Lastly, the mat can be gifted to friends, family, or coworkers. A handmade mat is not only functional but also a thoughtful gesture that spreads holiday cheer.
Q: Is the Santa Claus Mat project beginner-friendly?
A: Yes, the tutorial is suitable for beginners. With basic stitches or simple fabric techniques, even new crafters can complete it successfully.
Q: How long does it take to make one mat?
A: Depending on the method and details, it can take anywhere from 3 to 6 hours. Simpler versions are faster, while more detailed designs may take longer.
Q: Can I wash the Santa Claus Mat?
A: If made with washable yarn or fabric, the mat can be gently hand-washed and laid flat to dry. Always check your material’s care instructions.
Q: What size should I make the mat?
A: The size depends on its intended use. A doormat may be larger, around 18×30 inches, while a table centerpiece version can be much smaller.
Q: Can I customize the colors of the mat?
A: Yes, while traditional red, white, and black are common, you can experiment with different colors to match your home décor.
Q: Do I need special tools to complete this tutorial?
A: No special tools are required beyond standard crochet hooks, yarn needles, or sewing supplies. The project is designed to be accessible.
The Santa Claus Mat – TUTORIAL is a festive, creative, and practical project that combines holiday charm with handmade artistry. Whether you use it as a doormat, tree base, or decorative accent, it adds a joyful touch to your Christmas décor.
In this article, we explored the reasons to make this mat, the materials needed, the step-by-step guide, creative uses, and answers to common questions. By following the tutorial, you not only create something beautiful but also enjoy the process of crafting during the most wonderful time of the year.
Now it’s your turn to try the Santa Claus Mat – TUTORIAL and share your results. We’d love to hear your honest opinions and suggestions. Your feedback helps keep the tradition of handmade holiday crafts alive and inspires others to join in the fun.


