
Ballerina pencil case with zipper Pattern


The Schoolhouse Block Tutorial is one of the most beloved and nostalgic quilt patterns in traditional patchwork. It brings back memories of old country schools, charming barns, and cozy handmade quilts.
This timeless design blends classic quilting techniques with creative possibilities, making it perfect for both beginners and experienced quilters.
Whether you’re exploring quilting for the first time or seeking to improve your precision piecing skills, this tutorial will walk you through the entire process, step by step.
Creating a schoolhouse quilt block is not only about sewing fabric together—it’s about storytelling. Each block captures the rustic charm of a countryside schoolhouse, symbolizing community, learning, and simplicity.
Many quilters love to use this pattern for family heirloom quilts, wall hangings, or teaching projects because of its strong visual appeal and traditional roots. By mastering this pattern, you’ll gain essential quilting skills that can be applied to many other designs.
In this Schoolhouse Block Tutorial, we’ll explore the history behind the pattern, the materials and measurements you’ll need, how to assemble the block accurately, and tips for customizing it with colors and fabrics that reflect your personal style. You’ll also find a helpful FAQ section with the most common questions about making a schoolhouse block and practical answers for every skill level.
The schoolhouse block has a long and meaningful history in American quilting. Originating in the late 1800s, this design represented education, community values, and pride in craftsmanship. It was often created by rural women who wanted to celebrate their towns and the small schools that shaped generations. The block typically features a small house with a roof, walls, and windows—each section representing learning, warmth, and creativity.
Over time, the Schoolhouse Block Tutorial became more than just a sewing guide—it evolved into a teaching tool passed down through families. Many quilters use it as a way to introduce children to quilting because it tells a story and teaches geometry, color coordination, and patience. Each piece of fabric represents part of a foundation, much like the bricks of an actual schoolhouse.
Another reason this block remains so popular is its versatility. You can make a single block as a centerpiece or combine many to create a full quilt. Some quilters like to alternate schoolhouse blocks with solid color squares or other patterns for a balanced and visually striking design.
Modern quilting has given this classic a new life. Today, you can find variations of the schoolhouse quilt block using modern fabrics, bright colors, and minimalist layouts. The traditional red schoolhouse may now appear in blues, pinks, or neutrals, making it suitable for all types of décor and tastes.
The design’s geometry is also an excellent learning exercise. Quilters gain experience in working with triangles, rectangles, and precise angles. Each section contributes to building the familiar shape of the schoolhouse, which is both rewarding and satisfying when completed.
For many, the Schoolhouse Block Tutorial symbolizes tradition meeting creativity. It bridges generations—allowing modern makers to preserve the heart of an old art while expressing their own style and innovation.
Before starting your Schoolhouse Block Tutorial, it’s important to prepare your tools and materials carefully. A successful block depends on precise cutting, accurate measurements, and well-coordinated colors.
To make a standard 12-inch finished block, you’ll need three primary fabric colors: one for the schoolhouse walls, one for the roof, and another for the background (often white or light beige). You can also add a contrasting fabric for doors or windows if you wish. Pre-washing fabrics is always recommended to prevent shrinking or bleeding later.
Here’s a basic materials list for one block:
Accuracy is essential. When following a Schoolhouse Block Tutorial, always check your seam allowance. The standard is ¼ inch for quilting projects. Small inconsistencies can distort the final block shape, especially when assembling multiple blocks for a full quilt.
Cut all your pieces before sewing. Labeling each section (such as roof, wall, and background) helps keep your workspace organized. Many quilters find it useful to lay out the block design on a flat surface before stitching to visualize how the final schoolhouse will look.
Pressing is another key element. After sewing each seam, press it flat toward the darker fabric. This reduces bulk and ensures crisp, clean lines. Well-pressed seams make assembling the final quilt top much easier and more professional.
Lastly, always double-check your measurements before cutting. The schoolhouse quilt block relies on geometric precision, so even a small mistake can affect alignment later. Taking a few extra minutes to measure carefully will save you frustration down the line.
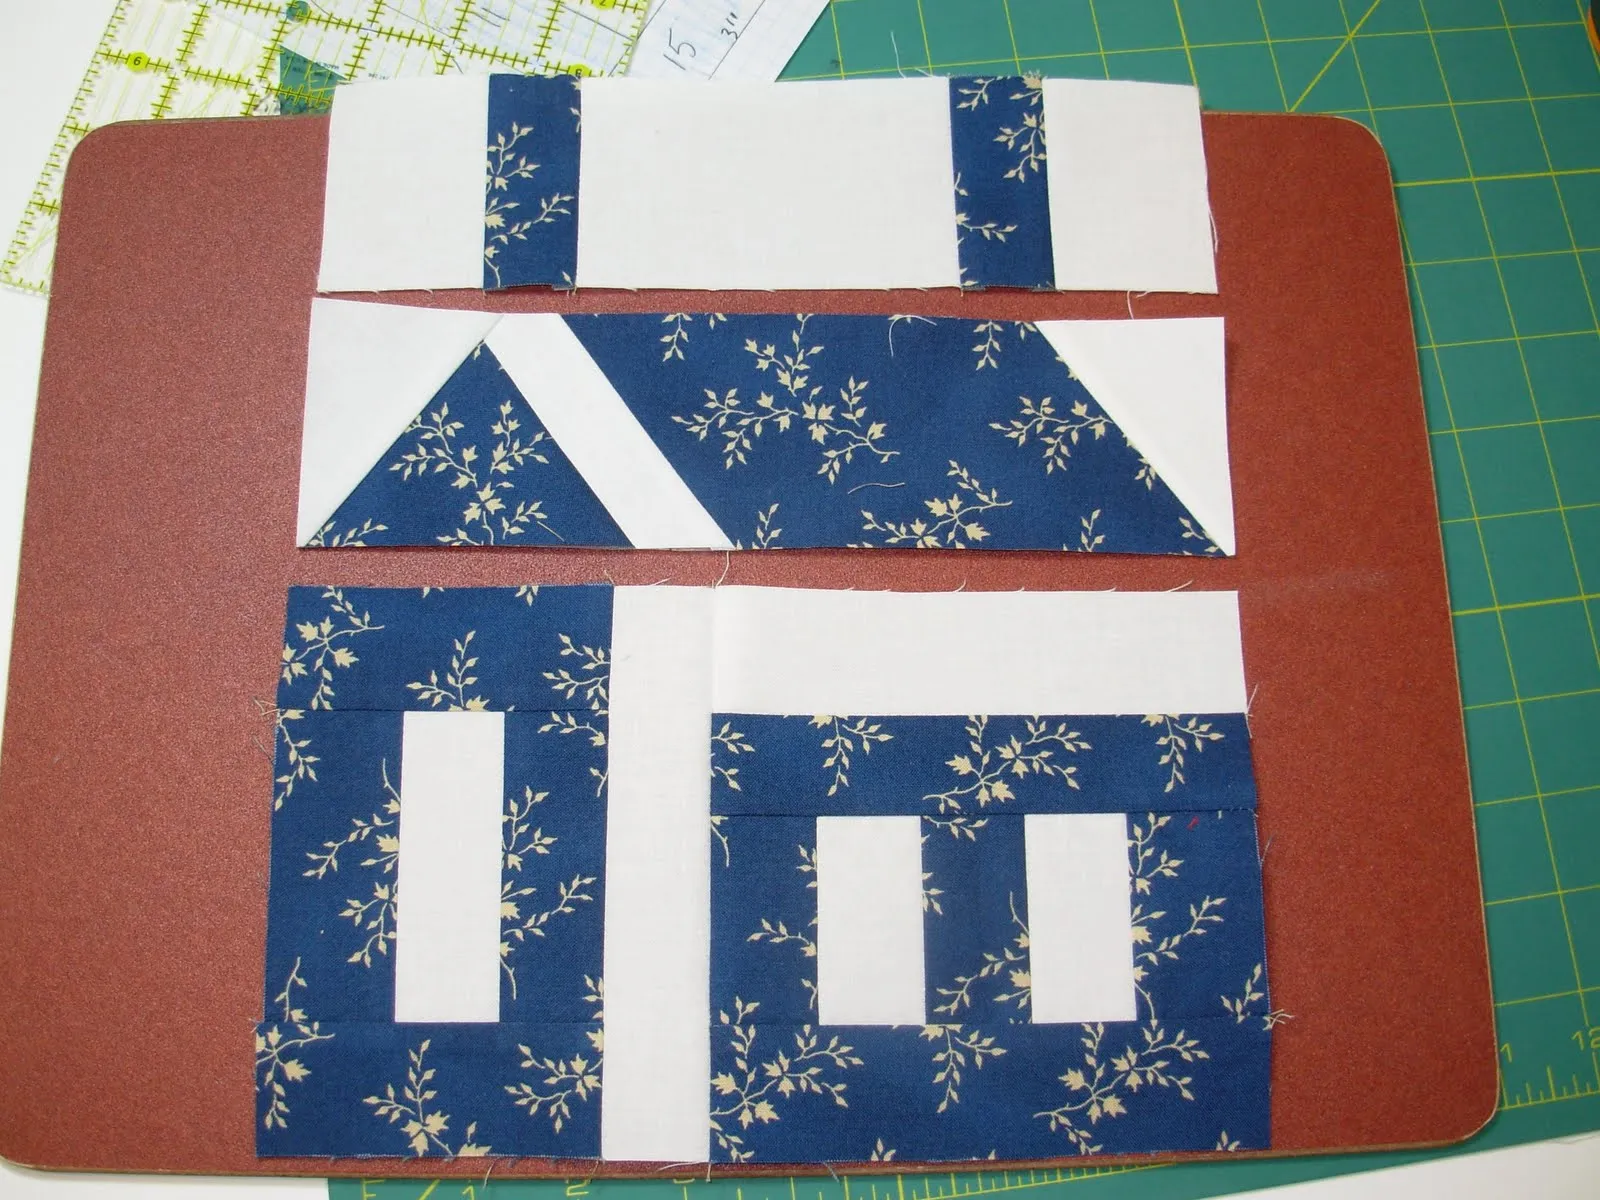
Now that you’ve gathered your materials, it’s time to start sewing your Schoolhouse Block Tutorial. This step-by-step guide focuses on creating a clean and symmetrical block, emphasizing precision and patience.
Step 1: Begin by sewing the roof triangle to the top of the house rectangle. Use a ¼-inch seam allowance, and make sure the points align perfectly. Press the seam open or toward the darker fabric.
Step 2: Add the background triangles on both sides of the roof. This will form the top section of your schoolhouse. Ensure both sides are even and that the roof peak remains centered.
Step 3: Stitch the wall section below the roof. Depending on your pattern, this may include the door or window cutouts. If you’re adding small details like windows, piece those sections together first before attaching them to the main wall.
Step 4: Attach the base or ground strip to the bottom. This helps frame the building and gives it a balanced appearance when combined with other blocks.
Step 5: Square up your block. Using a quilting ruler, trim the edges so the block measures the correct finished size—usually 12½ inches before sewing it into a quilt. This step is vital for ensuring uniformity when joining multiple blocks.
Step 6: Press everything one final time. The smoother your seams, the easier it will be to assemble your quilt top. At this point, you can admire your work—you’ve created your first schoolhouse block, a classic piece of quilting history.
As you gain confidence, try creating variations using different color schemes or adding embellishments like embroidered doors or appliqué windows. This allows you to make each schoolhouse quilt block unique and meaningful.
One of the joys of the Schoolhouse Block Tutorial is how adaptable it can be. Whether you prefer vintage styles or modern aesthetics, you can personalize your block in countless ways.
Try experimenting with fabric patterns. Using plaid or gingham for the roof gives your schoolhouse a rustic, country look. Floral prints can create a soft, cottage-style effect, while bold solids make the design more contemporary.
You can also adjust the size. Miniature schoolhouse blocks are perfect for table runners, placemats, or small wall art. Larger versions work beautifully in quilts or as decorative pillow covers.
Some quilters like to tell a story through their quilt layouts—adding names, dates, or embroidered details that connect to memories of childhood or learning. This gives the quilt an emotional value that goes beyond its visual beauty.
Color placement is another way to personalize your work. Traditional schoolhouses are red, but you might choose blues for a nautical look or grays for a farmhouse aesthetic. The background can be neutral for contrast or bright for a playful design.
You can even combine the schoolhouse block with other classic quilt patterns like stars, nine-patches, or log cabins. Mixing styles brings texture and depth to your finished project while honoring multiple quilting traditions.
Finally, don’t forget the finishing touches. Add a border, quilt stitching, or hand embroidery to highlight specific details. The Schoolhouse Block Tutorial gives you a foundation—but your imagination will make it truly special.
1. What is the finished size of a standard schoolhouse block?
A standard schoolhouse quilt block finishes at 12 inches square, but you can adjust the size based on your project by resizing your templates proportionally.
2. Can beginners make a schoolhouse block?
Yes! The Schoolhouse Block Tutorial is great for beginners who want to learn precision piecing. Just take your time with cutting and alignment.
3. What are the best fabrics to use?
100% cotton quilting fabrics work best because they are stable, easy to press, and maintain shape during sewing and washing.
4. How many blocks do I need for a full quilt?
That depends on your desired quilt size. For a twin quilt, you may need around 20–25 schoolhouse blocks, depending on sashing and borders.
5. Can I make the schoolhouse block by hand instead of by machine?
Absolutely. Hand-piecing gives a traditional touch, though it takes longer. Ensure your stitches are small and consistent for strength and neatness.
6. How can I make my points align perfectly?
Use pins at key intersections and check your ¼-inch seam allowance carefully. Pressing after each step also helps maintain accuracy.
The Schoolhouse Block Tutorial brings together tradition, creativity, and craftsmanship in one satisfying quilting project. By learning this block, you’re not just making a quilt—you’re continuing a legacy of artistry that has inspired generations. Each stitch and fabric choice tells a story, connecting the past to the present through color and texture.
Whether you’re quilting for fun, teaching, or preserving a family tradition, this pattern offers endless possibilities. Try different color schemes, add personal details, and most importantly, enjoy the process of creating something beautiful by hand.


