
Ballerina pencil case with zipper Pattern


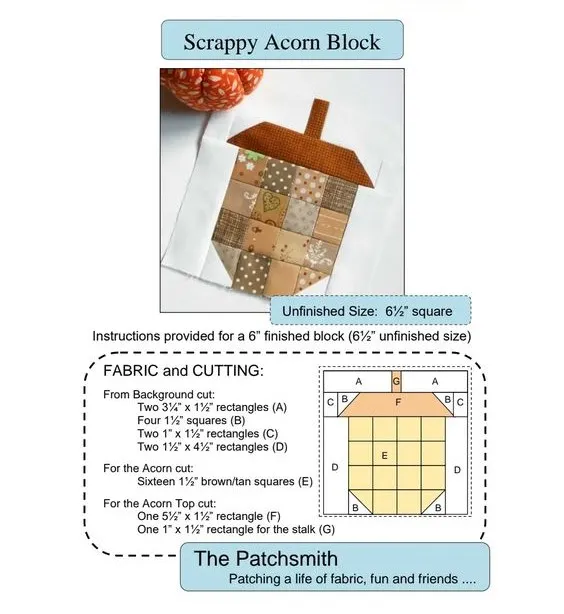
The Scrappy Acorn Quilt Block Tutorial is an exciting way to bring creativity and charm into your quilting projects. Whether you are a beginner or an experienced quilter, learning to make this unique block allows you to use leftover fabric pieces in a fun and practical way.
The Scrappy Acorn Quilt Block Tutorial not only teaches essential quilting techniques but also encourages improvisation and artistic expression. This project is ideal for those who love combining colors, textures, and patterns to create something truly special.
One of the best aspects of the Scrappy Acorn Quilt Block Tutorial is that it allows quilters to use scraps that would otherwise go to waste. By repurposing small pieces of fabric, you can create a quilt that is vibrant, colorful, and completely personalized.
The tutorial also emphasizes precise cutting, piecing, and sewing techniques, which are crucial skills in quilting. Following this tutorial will help you improve your accuracy and consistency, ensuring that each acorn block fits perfectly within your overall quilt design.
Another reason the Scrappy Acorn Quilt Block Tutorial is so popular is its versatility. You can adjust the size of the acorns, mix fabrics with different textures, or even add decorative stitching for extra flair. This block is perfect for seasonal quilts, fall-themed projects, or any quilt where you want to add a touch of whimsy. Using the techniques outlined in this tutorial, you can create a quilt that is not only functional but also a beautiful piece of art that reflects your personal style.
Before diving into the Scrappy Acorn Quilt Block Tutorial, it’s important to gather your materials and prepare your workspace. You will need a selection of fabric scraps, a rotary cutter, cutting mat, quilting ruler, pins, and a sewing machine. Choosing fabrics with contrasting colors will make your acorn block stand out, while coordinating tones will create a more subtle and harmonious effect.
The first step in the Scrappy Acorn Quilt Block Tutorial is to cut your fabric pieces according to the block’s pattern. Typically, the acorn top is made from a darker fabric, while the acorn body can be created with lighter, scrappier pieces. Make sure to cut the pieces accurately to ensure the block assembles correctly. Small variations can be corrected during piecing, but precise cutting will save time and frustration later.
Once your fabric is cut, the next stage is piecing. Start by sewing the smaller pieces together to form the acorn body. Use a consistent seam allowance, usually ¼ inch, to maintain uniformity. The Scrappy Acorn Quilt Block Tutorial emphasizes careful alignment of seams to ensure the final block is square and symmetrical. Pressing the seams after each step is crucial to achieve a professional finish.
The final part of this stage involves attaching the acorn top to the body. Align the top piece carefully and sew along the seam, pressing it open or to one side depending on your preference. The beauty of the Scrappy Acorn Quilt Block Tutorial lies in its flexibility—you can experiment with fabric placement, orientation, and even size to match your quilt’s overall design.
In the Scrappy Acorn Quilt Block Tutorial, mastering piecing techniques is key. Proper piecing ensures that your quilt block lies flat and looks polished. Beginners should focus on keeping seams straight and maintaining accurate seam allowances throughout the project. Consistency is more important than speed at this stage.
Another essential technique is chain piecing, which allows you to sew multiple small sections efficiently. By feeding one piece after another without cutting the thread, you save time and maintain uniform stitches. Chain piecing is particularly useful when making multiple acorn blocks for a larger quilt.
Pressing seams properly is another critical part of the Scrappy Acorn Quilt Block Tutorial. Pressing rather than ironing keeps the fabric from stretching and maintains the block’s shape. Press seams open for a flatter block or press to one side for a traditional finish. Experiment with different pressing methods to see which works best for your quilt.
Accurate alignment of points is also emphasized in this tutorial. When joining the acorn top to the body, make sure the edges match perfectly. Pinning or using clips can help prevent shifting during sewing. Over time, you will develop a feel for how to handle small pieces and achieve sharp points.
For those looking to add a creative touch, consider using contrasting thread colors or decorative stitches along the seams. While optional, this step can make your Scrappy Acorn Quilt Block Tutorial project truly unique and eye-catching. Always test stitches on a scrap piece before sewing the final block.
Finally, take time to trim the block once it’s complete. Use a ruler and rotary cutter to ensure the block is square and the edges are even. Proper trimming will make assembly into the quilt top much easier and improve the overall look of your finished quilt.
The choice of fabrics significantly impacts the visual appeal of the Scrappy Acorn Quilt Block Tutorial. Cotton fabrics are the most common choice because they are easy to work with and provide a clean finish. Mixing prints and solids can create a dynamic and textured appearance.
When selecting scraps, consider color balance. Darker fabrics for the acorn top help define the shape, while lighter, brighter fabrics for the body create contrast. Using multiple scrappy fabrics adds charm and variety to the quilt, making each block distinct.
Texture also plays a role in enhancing the final appearance. Combining smooth cottons with subtle textures can add depth and dimension to your acorn blocks. Avoid overly thick fabrics that may make piecing more difficult.
Another tip is to coordinate your fabrics with the quilt’s overall theme. For a fall-themed quilt, choose warm tones like browns, oranges, and yellows. Seasonal or thematic fabrics can make your Scrappy Acorn Quilt Block Tutorial project more engaging and meaningful.
Fabric preparation is crucial. Wash and iron all scraps before starting the project to prevent shrinkage and ensure accurate cutting. Pre-washing also removes any chemical finishes that might affect the sewing process.
Lastly, don’t be afraid to experiment. The beauty of the Scrappy Acorn Quilt Block Tutorial lies in its flexibility. Mixing unexpected colors or patterns can create a playful and modern look, making your quilt stand out.
Once multiple acorn blocks are complete, it’s time to assemble the quilt top. Lay out the blocks on a design wall or flat surface to plan the arrangement. This step allows you to see how colors and patterns interact and make adjustments before sewing.
Sew the blocks together in rows, taking care to align seams accurately. Use consistent seam allowances and check alignment frequently. The Scrappy Acorn Quilt Block Tutorial emphasizes patience and precision in this stage to achieve a professional-looking quilt top.
After sewing the rows together, press the entire quilt top flat. Pressing ensures that the quilt lays evenly and prepares it for layering with batting and backing. Accurate pressing also improves the overall visual impact of the acorn blocks.
Adding borders is optional but can frame the quilt beautifully. Choose fabrics that complement the acorn blocks, either by picking a solid color or using coordinating prints. Borders can enhance the overall design and give the quilt a finished, polished look.
Finally, layer the quilt top with batting and backing for quilting. You can quilt by hand or machine, using simple straight lines or decorative motifs. Quilting reinforces the structure of the quilt and adds texture, enhancing the overall appearance of your Scrappy Acorn Quilt Block Tutorial.
Binding completes the quilt, giving it a clean edge and professional finish. Choose a binding fabric that coordinates with your quilt’s colors. Sew the binding carefully to ensure even corners and secure edges.
Q1: What skill level is needed for this tutorial?
A1: The Scrappy Acorn Quilt Block Tutorial is suitable for beginners with basic sewing skills, but intermediate quilters will also enjoy experimenting with scraps and creative fabric combinations.
Q2: Can I use any type of fabric scraps?
A2: While cotton fabrics are recommended, you can use other light-to-medium weight fabrics. Avoid very thick fabrics that may be difficult to piece together.
Q3: How do I ensure my acorn blocks are uniform in size?
A3: Accurate cutting, consistent seam allowances, and careful pressing are key. Trim blocks as needed to maintain uniformity before assembling the quilt top.
Q4: Can I make a quilt using only scrappy fabrics?
A4: Absolutely! Using scrappy fabrics is a central part of this tutorial. Mixing colors and textures creates a vibrant, unique quilt.
Q5: Is hand quilting recommended for this project?
A5: Both hand and machine quilting work well. Hand quilting adds a traditional touch, while machine quilting saves time and allows for precise stitching.
Q6: How do I choose fabrics for a visually appealing acorn block?
A6: Use darker fabrics for the acorn top and lighter, scrappy pieces for the body. Mixing patterns, solids, and textures can enhance the block’s visual interest.
The Scrappy Acorn Quilt Block Tutorial provides a fun, creative, and practical way to make beautiful quilt blocks using leftover fabrics. By following this guide, you have learned essential techniques for cutting, piecing, pressing, and assembling acorn blocks.
You also discovered tips for choosing fabrics, adding borders, and completing the quilt with professional finishing touches. Each step encourages experimentation, allowing your personal style to shine through in every block.


