
Ballerina pencil case with zipper Pattern


The Scrappy “Lifesaver” Blocks are a colorful and fun way to add charm to your quilting projects. Known for their vibrant, circular design resembling a lifesaver candy, these blocks are perfect for using up fabric scraps while creating eye-catching quilts.
Whether you are a beginner quilter or an experienced sewist, this pattern allows you to combine creativity with practicality, producing quilts that are both playful and stylish.
Quilting Scrappy “Lifesaver” Blocks is an excellent method to make the most of leftover fabrics. The blocks use small pieces of fabric sewn into a circular motif, giving the quilt a cheerful and lively appearance.
The versatility of this pattern means you can mix colors freely, creating blocks that are entirely unique. Each block becomes a miniature work of art, showcasing your creativity and quilting skills.
These blocks are not only visually appealing but also offer an opportunity to explore new techniques. The circular piecing requires careful sewing, precise alignment, and attention to detail. However, once mastered, the Scrappy “Lifesaver” Blocks pattern allows you to make quilts quickly and efficiently, turning scrap fabrics into coordinated, cohesive designs.
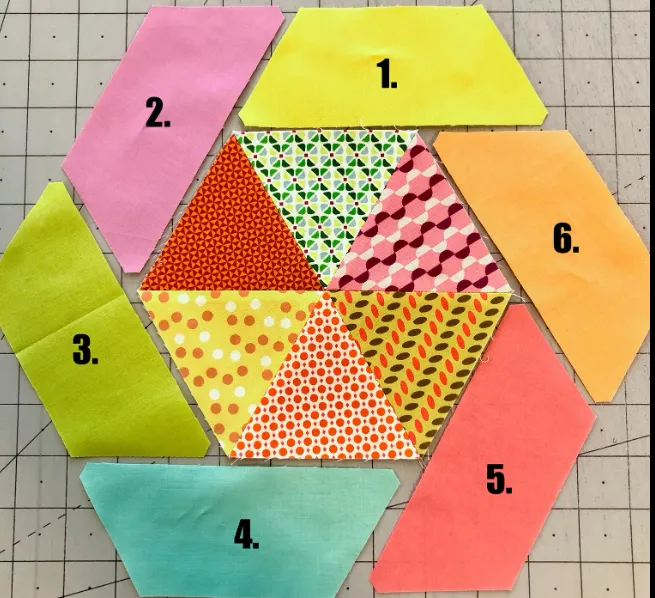
The Scrappy “Lifesaver” Blocks consist of a central circle surrounded by alternating fabric pieces to form a rounded, candy-like design. Traditionally, quilters use small, contrasting scraps to create a vibrant, playful effect. Each block typically measures 6–12 inches, though the size can be customized depending on your project.
When creating these blocks, it is essential to choose fabrics that provide good contrast. Bright, bold colors work well for the central circle, while coordinating prints or solids make the surrounding wedges pop. This combination emphasizes the “lifesaver” effect, giving your quilt a dynamic and cheerful appearance.
Piecing the circular center can be done by cutting fabric wedges and sewing them together, or by using foundation paper piecing for more precision. Both methods produce excellent results, and the choice depends on your comfort level and desired accuracy.
The scrappy nature of these blocks means that no two blocks need to look exactly the same. Mixing prints, textures, and colors ensures that your quilt has a lively, eclectic charm. This flexibility makes the pattern perfect for using up small remnants from previous projects.
Finishing the blocks requires careful pressing and trimming. Ensure that each block has straight edges for easier assembly into rows or quilt tops. Attention to detail during this stage helps maintain a professional look in the finished quilt.
Finally, arranging your Scrappy “Lifesaver” Blocks before sewing them together allows you to experiment with color balance and placement. This layout step ensures that your quilt flows harmoniously and that no color dominates the design.
To create your Scrappy “Lifesaver” Blocks, start by gathering your fabric scraps. Aim for a mix of bright and neutral colors to create contrast. Cutting your pieces into wedges and circles will simplify the assembly process.
Step 1: Cut a small circle for the center of the block. This circle is the focal point and can be any color you like. A bright or bold fabric is recommended for maximum impact.
Step 2: Cut wedge-shaped pieces for the outer ring. Each block typically requires 8–12 wedges, depending on the size and design. Make sure all wedges are consistent in size for a uniform block.
Step 3: Sew the wedges together around the central circle. Use a quarter-inch seam allowance and pin pieces carefully to maintain alignment. Precision in this step ensures the circular pattern remains smooth and even.
Step 4: Press all seams toward the outer wedges to reduce bulk in the center. Proper pressing prevents puckering and helps the block lay flat.
Step 5: Trim the block to the desired square size. Most Scrappy “Lifesaver” Blocks are trimmed to 6 or 8 inches, making them easy to assemble into rows.
Step 6: Repeat the process to create as many blocks as needed for your quilt. The beauty of this pattern is that each block can feature different fabrics, making your quilt vibrant and varied.
Arranging blocks in a color-coordinated way before final assembly ensures a balanced quilt top. Experiment with diagonal or alternating layouts to emphasize the circular motif.
Finally, sew blocks together row by row, maintaining straight seam lines. Once assembled, add borders and quilt as desired to finish your project beautifully.
Maintaining consistency is key when working on Scrappy “Lifesaver” Blocks. Use a template for cutting circles and wedges to ensure uniformity.
Always press seams carefully to prevent bulk, especially around the center circle. Using a smaller seam allowance can also help reduce thickness at the junction.
When choosing fabrics, aim for a balance between patterned and solid fabrics. Too many prints can make the design look chaotic, while solids can provide a visual rest between colors.
Consider mixing fabric textures. Combining cottons, batiks, or light linen blends adds depth and tactile interest to your quilt.
Use pins or clips when sewing wedges together to prevent shifting. Accurate alignment is essential for keeping the circular motif smooth.
Finally, plan your quilt layout before joining blocks. Visualizing the final quilt helps ensure a harmonious flow of colors and shapes across the entire piece.
Scrappy “Lifesaver” Blocks can be adapted in many creative ways. You can experiment with color gradation, making the outer wedges progressively lighter or darker than the center.
Mixing wedge shapes and sizes can create dynamic effects, giving the quilt a modern, abstract look.
Adding appliqué or embroidery to the blocks further personalizes your project. Small accents on the center circle or wedges enhance visual interest.
Blocks can also be arranged to form diagonal or circular patterns across the quilt top, emphasizing the candy-like motif.
Combining different block sizes in one quilt adds dimension and movement. Large blocks can dominate a focal area, while smaller blocks fill spaces around the border.
Finally, using this pattern for smaller projects like placemats, table runners, or cushion covers allows you to enjoy the scrappy style without committing to a full quilt.
Q: Are Scrappy “Lifesaver” Blocks suitable for beginners?
A: Yes, they are beginner-friendly with careful cutting and sewing. Using templates simplifies the circular shapes.
Q: What fabric types work best?
A: Quilting cotton is ideal, but small scraps of batik, linen, or lightweight fabrics can be incorporated for variety.
Q: How do I ensure blocks are uniform?
A: Use templates for circles and wedges and press seams consistently.
Q: Can I make different sizes of blocks?
A: Absolutely. Blocks can range from 6 inches to 12 inches, depending on your quilt size.
Q: How do I arrange blocks for a balanced quilt?
A: Lay out all blocks before sewing, alternating colors and patterns to prevent clustering of similar fabrics.
Q: Can I use this pattern for small projects?
A: Yes, it works perfectly for placemats, table runners, pillows, or wall hangings.
Q: How do I finish the quilt after assembling the blocks?
A: Add borders as desired, quilt the top with batting and backing, then bind edges to complete your project.
The Scrappy “Lifesaver” Blocks pattern is a creative and enjoyable way to use up fabric scraps while producing cheerful, colorful quilts. By mastering circular piecing and arranging wedges thoughtfully, you can create quilts that are both playful and professional-looking. This pattern offers flexibility, allowing you to experiment with color, texture, and size while producing a finished piece you can be proud of.
Now that you’ve learned how to create Scrappy “Lifesaver” Blocks, gather your fabric scraps, and start making vibrant, candy-inspired quilts! Share your experience, leave suggestions, or offer tips for fellow quilters — your feedback helps inspire others and celebrates the joy of handmade quilting.


