
Ballerina pencil case with zipper Pattern


Shoulder Bag Tutorial is a detailed guide that shows you how to create a stylish, functional, and personalized shoulder bag. The Shoulder Bag Tutorial is designed for crafters of all levels, from beginners to experienced makers.
By following this tutorial, you will learn how to combine creativity with practicality, producing a bag that not only looks professional but is also sturdy and usable for everyday activities.
This tutorial emphasizes customization, allowing you to choose fabrics, colors, straps, and decorative elements to reflect your personal style. Creating a shoulder bag using this tutorial is both satisfying and practical, giving you a versatile accessory that can be used, gifted, or even sold as a handmade item.
The Shoulder Bag Tutorial encourages creative experimentation while providing structured guidance. It focuses on essential skills such as cutting, stitching, assembling, and finishing, making it accessible for beginners while still offering opportunities for advanced crafters to add unique details.
By following this tutorial, you will gain confidence in handling fabrics, understanding sewing techniques, and producing consistent, high-quality results. Whether you want a bag for daily use, a special event, or a gift, this tutorial equips you with the knowledge to make a bag that meets your needs.
Creating a shoulder bag with the Shoulder Bag Tutorial also emphasizes durability and functionality. The finished bag is designed to carry personal items safely while maintaining its shape and aesthetic appeal. The tutorial covers reinforcement techniques, such as interfacing or padding, to ensure your bag withstands daily wear and tear. By following each step carefully, you will produce a shoulder bag that is practical, stylish, and long-lasting. The Shoulder Bag Tutorial also highlights how simple details like stitching alignment and strap attachment can transform a basic bag into a polished, professional accessory.
The tutorial also addresses personalization and style choices. You can select fabric colors, patterns, textures, and decorative elements to match your preferences. Optional embellishments such as embroidery, patches, or buttons can be incorporated to make the bag unique. The Shoulder Bag Tutorial guides you on how to apply these elements effectively while maintaining durability and balance. Personalization adds character and individuality to your bag, making it a reflection of your creativity and skill.
To complete the Shoulder Bag Tutorial, you will need specific materials that ensure your bag is both functional and stylish. Sturdy fabrics like cotton, denim, canvas, or linen are ideal because they hold their shape and provide durability. The tutorial recommends choosing fabrics that complement your desired style and color scheme.
Thread that matches or contrasts with your fabric is essential for both functionality and design. Strong, high-quality thread ensures secure stitching, especially in high-stress areas like straps and seams. Optional decorative threads can also be used for embroidery or stitching accents.
Interfacing or padding is recommended to reinforce the bag and maintain its shape. The tutorial explains how to apply interfacing effectively to panels and straps for enhanced structure. Scissors, pins, measuring tape, and sewing needles are necessary tools for cutting, securing, and stitching your fabric accurately.
A sewing machine is suggested for faster and stronger stitching, though hand-sewing is possible, especially for beginners or decorative details. The Shoulder Bag Tutorial provides guidance for both methods, ensuring that all skill levels can follow along. Optional hardware such as zippers, magnetic snaps, or adjustable buckles can be added for functionality. The tutorial shows how to attach hardware securely while maintaining style and ease of use.
Organization and preparation are emphasized throughout the tutorial. Pre-cutting fabric pieces, laying out tools, and planning embellishments ahead of time create a smoother workflow and reduce errors. The Shoulder Bag Tutorial also highlights the importance of patience and attention to detail to achieve a polished final product.
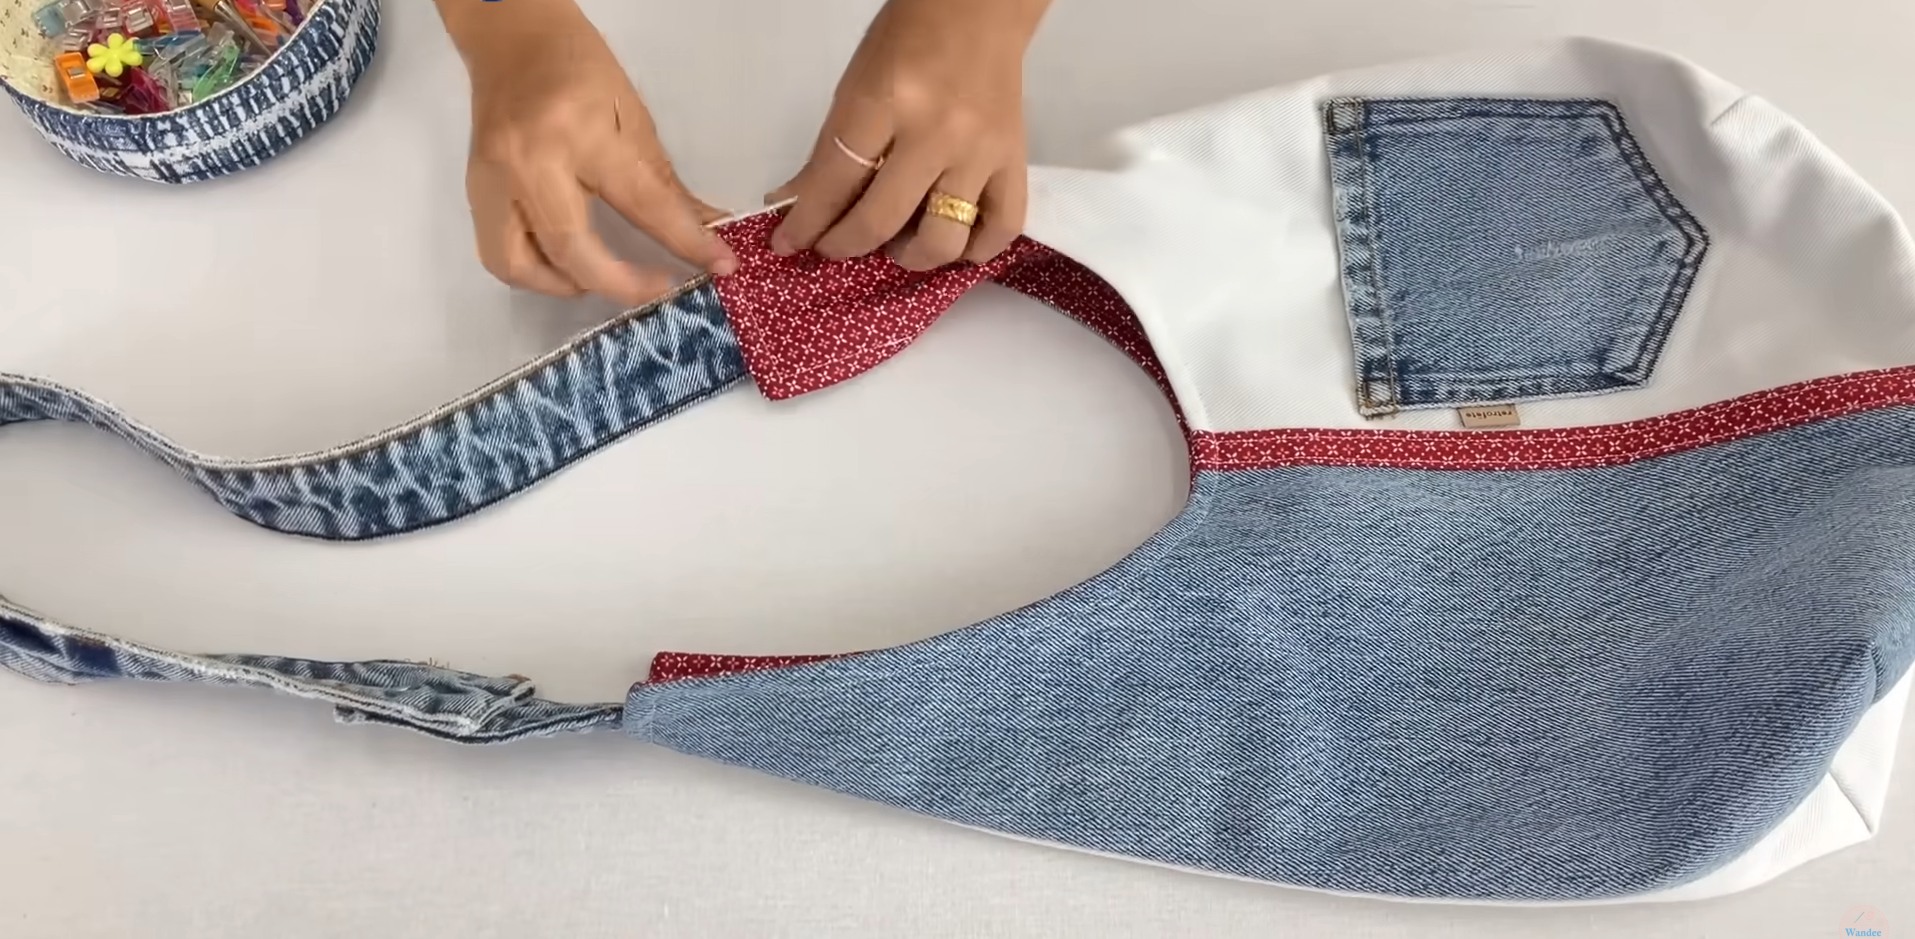
The Shoulder Bag Tutorial begins with cutting fabric pieces according to the pattern provided. Accurate cutting is crucial to ensure that all parts align correctly during assembly. The tutorial provides detailed measurements for main panels, lining, and straps, ensuring consistency across different bag sizes.
Next, assemble the bag panels by sewing the edges together. The tutorial emphasizes maintaining straight stitches and reinforcing seams in high-stress areas, such as corners and strap attachments. Reinforced stitching ensures that your bag is durable and long-lasting. The Shoulder Bag Tutorial also provides tips on managing fabric layers to avoid bulk and achieve smooth seams.
Attaching the lining comes next. Proper alignment between the main fabric and the lining ensures a clean, professional finish inside the bag. The tutorial explains step-by-step how to sew the lining securely while hiding raw edges and providing a smooth interior surface.
Straps are an essential component of the bag’s functionality and comfort. The tutorial demonstrates how to measure, cut, and attach fixed or adjustable straps securely. Proper strap placement ensures that the bag can comfortably support the weight of everyday items. Optional reinforcement stitches are suggested to increase durability.
Adding closures and hardware is the next step. Zippers, magnetic snaps, or buttons can be integrated to enhance functionality. The Shoulder Bag Tutorial provides clear guidance on placement, attachment, and finishing to ensure these elements work properly and look professional.
Finally, finishing touches complete the project. Loose threads are trimmed, seams are pressed, and optional embellishments such as embroidery, patches, or decorative stitching are added. The Shoulder Bag Tutorial ensures that your bag looks polished, attractive, and ready for use.
The Shoulder Bag Tutorial offers practical tips to make the project easier for beginners. Careful measurement and accurate cutting prevent uneven edges and misalignment during assembly. Using pins or clips to hold fabric layers together while sewing improves precision and reduces mistakes.
Maintaining consistent stitch length and tension is critical for a polished final result. Beginners are encouraged to practice stitching on scrap fabric before starting the bag to ensure even, straight stitches. Choosing the right fabric is also important. Sturdy fabrics provide structure, while lightweight fabrics may require additional interfacing or padding.
When adding hardware or closures, the tutorial recommends testing placement before stitching to avoid mistakes. Patience is emphasized throughout the process, allowing you to check alignment, seam straightness, and finishing touches carefully. Beginners are also encouraged to experiment with decorative elements such as embroidery, applique, or patches to personalize their bag. The Shoulder Bag Tutorial provides tips on combining creativity with practicality to achieve professional results.
The Shoulder Bag Tutorial allows for extensive personalization. Fabric selection, patterns, colors, and embellishments can be tailored to reflect individual style. Custom embroidery, patches, or decorative stitching can enhance the bag’s visual appeal and make it unique. Personalization adds a sense of ownership and creativity to your handmade project.
Shoulder bags created with this tutorial are versatile and functional. They are suitable for daily activities such as work, school, shopping, or travel. The combination of style and practicality makes the bag a useful accessory for a variety of situations.
These handmade bags are also ideal for gifting. Personalized fabrics, unique straps, and decorative details make each bag a thoughtful and memorable present. The Shoulder Bag Tutorial encourages creating bags that are both beautiful and meaningful.
Crafters interested in selling handmade bags can also benefit from this tutorial. Following the step-by-step instructions ensures professional-quality results suitable for craft fairs, online stores, or local boutiques. High-quality construction and attention to detail make these bags attractive to buyers.
Sharing completed bags within crafting communities can inspire others, provide feedback, and encourage collaboration. The Shoulder Bag Tutorial fosters creativity and skill development among crafters of all levels.
Q1: Is this tutorial suitable for beginners?
Yes, the tutorial provides step-by-step instructions that are easy to follow for all skill levels.
Q2: What fabric works best for the bag?
Sturdy fabrics like cotton, denim, canvas, or linen are recommended for durability and structure.
Q3: Can I customize the bag?
Absolutely! You can choose fabrics, colors, straps, closures, and embellishments to personalize your bag.
Q4: Is a sewing machine necessary?
No, hand-sewing is possible, though a machine can speed up the process and produce stronger seams.
Q5: Can this bag be used daily?
Yes, the tutorial ensures that the bag is durable and functional for everyday use.
Q6: How do I attach zippers or magnetic snaps?
The tutorial provides clear instructions for proper placement and secure attachment.
The Shoulder Bag Tutorial offers a comprehensive and detailed guide for creating a stylish, functional, and personalized shoulder bag.
From selecting materials and cutting fabric to stitching, assembling, and finishing, this tutorial equips crafters with the knowledge and skills needed to produce professional-quality bags.
By following each step carefully and incorporating personalization options, you can create a bag that is both practical and unique. We encourage readers to share their completed projects, provide honest feedback, and offer suggestions to inspire a community of creative crafters.
Handmade shoulder bags created using this tutorial are perfect for personal use, gifting, or selling, combining functionality, style, and individual creativity.


