
Ballerina pencil case with zipper Pattern


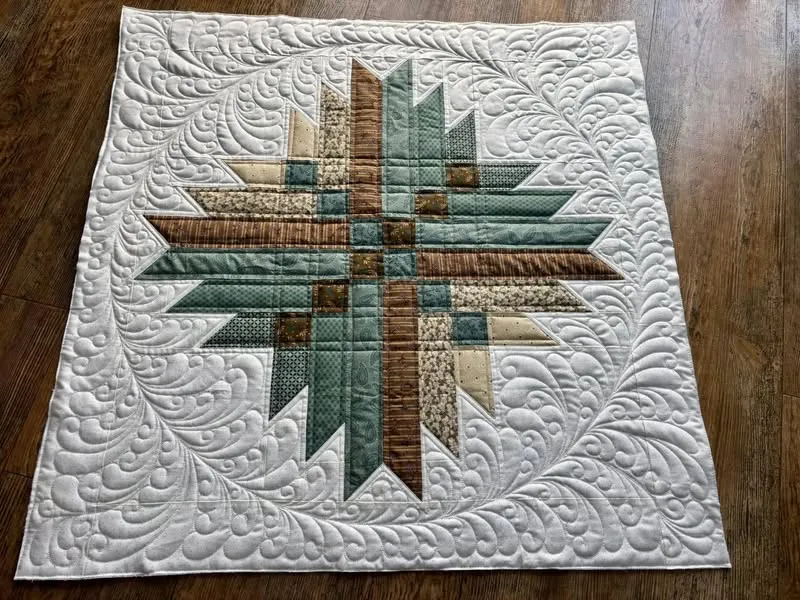
The beauty of quilting shines when you follow a Starry Night Block Quilt – Tutorial. This quilt design is both elegant and timeless, inspired by the patterns of the night sky. It combines traditional quilting techniques with a modern aesthetic, making it a favorite for both beginners and advanced quilters.
From selecting fabrics to stitching your first block, this tutorial guides you in creating a quilt that feels like a work of art.
When starting a Starry Night Block Quilt – Tutorial, you’ll discover how versatile this design can be. Its star-centered patterns allow you to play with colors, textures, and contrasts, creating a quilt that reflects your style.
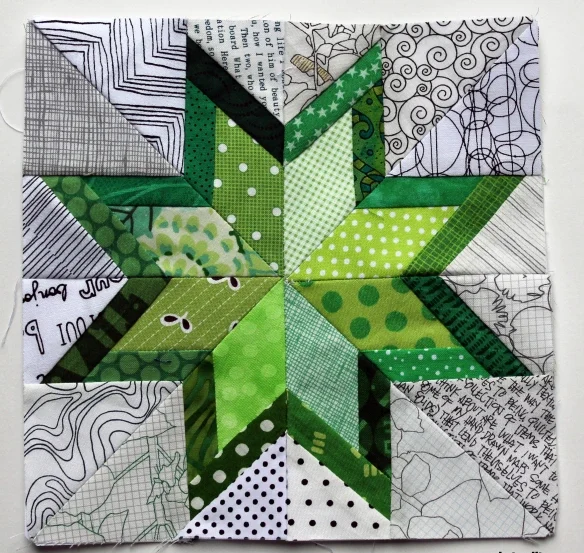
Whether you prefer bold tones or soft pastels, the star shapes stand out beautifully against any background. This flexibility makes the quilt perfect for gifts, home décor, or even heirlooms passed down through generations.
Another reason why a Starry Night Block Quilt – Tutorial is so rewarding is the sense of accomplishment it provides. Quilting is not just about sewing pieces of fabric together; it is about creating something meaningful.
Each stitch carries intention, care, and creativity. When you finish a quilt like this, you don’t just have a blanket—you have a handmade masterpiece filled with personal expression and charm.
The first step in any Starry Night Block Quilt – Tutorial is preparing your materials. Choosing the right fabrics is essential, as the colors will determine how the stars appear. Many quilters opt for dark backgrounds like navy or black to highlight the brightness of the star blocks. Others prefer lighter backgrounds for a softer, more subtle look.
You will also need essential quilting tools, including a rotary cutter, quilting ruler, and cutting mat. These tools help ensure your fabric pieces are cut precisely, which is crucial for the clean lines in a star block design. Precision is key to making sure the stars align correctly in the final quilt.
Batting and backing fabrics are equally important. Batting adds softness and warmth, while the backing fabric gives your quilt a polished finish. Consider fabrics that complement your star design so the back is as beautiful as the front.
Thread selection matters as well. While neutral threads often work best, you may want to use contrasting colors for decorative stitching. This allows you to highlight the star shapes even more.
In addition, it’s helpful to prepare a clear workspace. A clutter-free environment helps you focus on the steps of the tutorial without distraction. Keeping tools organized also makes the process smoother and more enjoyable.
Finally, always pre-wash your fabrics before starting. Pre-washing prevents shrinkage and color bleeding, ensuring that your Starry Night Block Quilt – Tutorial project remains durable and vibrant for years.
The first step of the Starry Night Block Quilt – Tutorial is cutting your fabric pieces. Most star blocks are composed of squares and triangles, so accuracy here is essential. Tutorials often provide cutting measurements, and following them closely ensures your blocks fit together perfectly.
Next, you will begin piecing the star points. This involves sewing triangles together to form sharp edges that create the iconic star shape. While it may look complex, breaking it down step by step makes the process simple and manageable.
After piecing the star points, you assemble them into a block by combining them with squares of background fabric. This is where your star begins to take form, and the design starts to show its charm. Precision in aligning seams makes the star appear crisp and symmetrical.
Once you have created several star blocks, the next step is arranging them into the overall quilt layout. This step gives you the freedom to play with color placement and block orientation, creating unique visual effects. Some quilters like symmetry, while others enjoy a more scattered starry look.
Sewing the blocks together is the next stage. Joining rows and columns carefully ensures that your stars align across the quilt. Pressing seams after each step keeps the quilt top flat and neat.
Finally, you’ll layer your quilt top with batting and backing, then quilt the layers together. Quilting stitches can be simple straight lines or more intricate patterns that mimic the night sky. Finishing with a binding around the edges completes your Starry Night Block Quilt – Tutorial project beautifully.
One of the best tips for success in a Starry Night Block Quilt – Tutorial is to take your time with cutting. The accuracy of your fabric pieces determines the overall precision of your blocks. A few extra minutes measuring and cutting can save hours of frustration later.
It’s also helpful to chain piece your fabrics. This technique, where you sew multiple pieces continuously without cutting the thread, saves time and keeps your workflow smooth. It’s particularly useful when making several identical star blocks.
Pressing your seams correctly is another essential tip. Pressing, rather than ironing, helps keep your fabric in shape and prevents stretching. Consistent pressing ensures your star points stay sharp and aligned.
Another tip is to experiment with color placement. While tutorials often suggest traditional color schemes, adding unexpected colors can give your quilt a modern twist. For example, using gradient fabrics can create the effect of stars glowing in the night sky.
If you’re new to quilting, practice with smaller projects before attempting a full quilt. Making just one or two star blocks helps you get comfortable with the techniques before committing to a larger piece.
Lastly, don’t forget to enjoy the process. Quilting can feel like a big project, but every block you finish brings you closer to your final masterpiece. Celebrate each step, knowing you are creating something truly special.
One variation of the Starry Night Block Quilt – Tutorial is to play with block sizes. Instead of making all stars the same size, you can create a dynamic quilt by combining large and small stars. This gives the effect of a real night sky with stars of different brightness levels.
Another variation is adding sashing between blocks. Sashing creates space between your stars, giving them room to shine individually. It also adds structure and symmetry to the overall quilt.
Appliqué techniques can also be incorporated. Adding moon or constellation shapes alongside your stars makes the quilt more thematic and personalized. This creative touch turns your project into a storytelling piece.
Experimenting with quilting patterns is another way to add variety. Instead of simple straight-line quilting, you can stitch patterns like swirls, spirals, or shooting stars. These designs enhance the night-sky theme of your quilt.
You can also create a scrappy version of the Starry Night Block Quilt – Tutorial. Using leftover fabrics from other projects adds charm and sustainability. Scrappy quilts often feel warmer and more personal, as each piece carries its own story.
Finally, consider making a smaller version of the quilt, like a wall hanging or table runner. These variations allow you to enjoy the starry night design without committing to a full quilt. They also make excellent handmade gifts for loved ones.
Q1: Is the Starry Night Block Quilt suitable for beginners?
Yes, many tutorials break down the steps, making it approachable even for new quilters.
Q2: What fabric works best for this quilt?
Cotton fabrics are the most popular choice because they are easy to work with and durable.
Q3: How long does it take to complete a Starry Night Block Quilt?
It depends on size and complexity. A small quilt can take a few weeks, while larger ones may take months.
Q4: Can I use pre-cut fabric for this tutorial?
Yes, pre-cuts like fat quarters or charm packs work well and save time in cutting.
Q5: Do I need a sewing machine to complete this quilt?
While it’s possible to sew by hand, a sewing machine makes the process faster and ensures stronger seams.
Q6: How do I keep my star points sharp?
Accurate cutting, precise sewing, and careful pressing help maintain sharp star points.
The Starry Night Block Quilt – Tutorial is a rewarding project that combines creativity, tradition, and craftsmanship. From choosing fabrics to stitching star blocks, every step brings joy and satisfaction. With practice and patience, you can create a quilt that not only keeps you warm but also fills your home with beauty and meaning.
If you’ve tried this tutorial or are planning to start, we’d love to hear from you. Share your honest opinions and suggestions, as your insights can inspire others to begin their own quilting journey.


