
Ballerina pencil case with zipper Pattern


Learning how to turn 5″ squares into a generously sized bag is a fantastic way to repurpose fabric scraps and create a practical, stylish accessory.
Whether you’re a quilting enthusiast or a crochet lover, this project allows you to combine small squares into a cohesive bag while showcasing your creativity. With careful planning, this technique can transform simple squares into a spacious, functional tote that suits everyday use.
Using 5″ squares to make a bag is not only fun but also practical. Many crafters often end up with leftover fabric or quilt blocks too small for other projects.
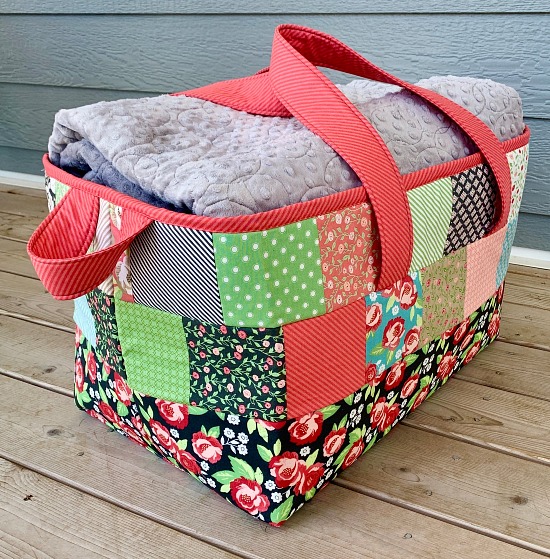
By joining these squares, you can create a larger item, such as a handbag, tote, or even a travel bag. The finished bag reflects your personal style while efficiently using fabric scraps.
A generously sized bag made from small squares also provides endless design possibilities. You can mix patterns, colors, and textures to produce a unique, eye-catching accessory. This project encourages creativity while honing sewing and assembly skills, making it perfect for both beginners and experienced crafters.
Before starting your bag from 5″ squares, gather your materials. You will need multiple 5″ squares, which can be leftover quilt blocks, fabric scraps, or pre-cut squares. Ensure the fabrics are sturdy enough to withstand the weight of a bag.
For the lining, select a durable fabric such as cotton, canvas, or denim. Lining ensures the bag has structure and protects your belongings. Interfacing or stabilizer can be added for extra support.
You will also need basic sewing tools: scissors, pins, measuring tape, and a sewing machine. Hand sewing is possible but may take longer, especially when joining multiple squares.
Thread should match your fabric colors for a clean finish. Optional embellishments include buttons, patches, or appliqué to personalize your bag. Straps can be made from fabric strips, webbing, or the same squares folded and sewn.
Finally, consider closures such as zippers, magnetic snaps, or buttons, depending on your preferred bag style. A zipper provides maximum security, while a magnetic snap is quick and easy to use.To give your bag a boxy bottom, use the boxed corner method. Pinch each bottom corner so that the side seam and bottom seam align, forming a triangle. Measure about 2″ from the tip and sew straight across. Repeat on both sides and then trim the excess.
Now it’s time to prepare the lining. Cut two pieces of fabric the same size as your outer panels. Follow the same process—sew along the sides and bottom, and box the corners. Leave a small opening in the bottom seam of the lining so you can turn the bag right-side out later.
Start your project by arranging your 5″ squares. Decide on the layout, whether using a symmetrical pattern or a random patchwork design. Lay the squares out on a flat surface to visualize the final bag shape.
Next, join the squares. Sew them together row by row, matching edges carefully. Press seams open or to the side to reduce bulk and achieve a flat, polished look. Continue until you have the desired width and height for the bag body.
Once all squares are joined, assemble the bag sides. You can sew the front and back panels to side strips or create a box-style bottom for extra depth. Adding a flat base gives the bag structure and makes it spacious enough for everyday use.
Prepare the lining by cutting pieces that match the size of the exterior bag. Sew any internal pockets or compartments onto the lining before assembly. This step ensures the bag is organized and functional.
Attach the lining to the exterior fabric. Place the lining inside the exterior bag with right sides facing each other, then sew along the top edge. Turn the bag right side out through an opening in the lining and sew it closed neatly.
Finally, add handles or straps. Attach them securely to the top edges, reinforcing the stitching at stress points. If desired, add closures, decorative touches, or topstitching to finish the bag and enhance durability.
There are countless ways to customize a bag made from 5″ squares. Try combining different fabric textures, such as denim with cotton or linen, for a visually interesting effect. Mixing solids with prints adds depth and contrast.
You can also create themed designs using seasonal fabrics or coordinating colors. For example, use bright floral prints for spring, warm tones for autumn, or festive patterns for holiday bags.
Adding decorative stitching or embroidery enhances your bag’s uniqueness. Embroidered flowers, initials, or geometric patterns bring a personal touch. Small appliqué pieces can also add dimension and charm.
Consider using the bag for multiple purposes. A larger bag made from squares can serve as a shopping tote, craft organizer, or even a small overnight bag. Functional versatility makes this project highly rewarding.
For a more modern look, try asymmetrical layouts, diagonal squares, or patchwork stripes. These design choices break from traditional patterns and create a contemporary, stylish accessory.
Finally, embellishments like tassels, buttons, or fabric-covered charms can further enhance the bag’s visual appeal. Personalizing these small details ensures your bag is truly one-of-a-kind.
Proper care ensures your generously sized bag made from 5″ squares remains functional and attractive. Most cotton or denim bags can be machine washed on a gentle cycle, but delicate fabrics may require spot cleaning.
Avoid overloading the bag to prevent strain on seams and handles. Reinforce stitches if necessary, particularly at stress points such as handles and corners.
Store the bag in a cool, dry place when not in use. Avoid direct sunlight, which can fade fabric colors over time. If the bag has a structured base, stuff it lightly during storage to maintain its shape.
Check for loose threads or fraying edges periodically. Repairing small issues early ensures your bag remains sturdy and extends its lifespan.
Finally, consider occasional pressing with a low heat iron if the fabric becomes wrinkled. Press carefully to preserve the shape of seams and maintain a polished appearance.
Can I use any fabric for the squares?
Yes, but sturdier fabrics like cotton, denim, or canvas are recommended for durability.
Do I need advanced sewing skills?
No. Beginners can follow step-by-step instructions, while experienced crafters can add embellishments and creative touches.
Can I make a large tote using small squares?
Absolutely. The number of squares and layout determine the final bag size.
Do I need to add interfacing?
Interfacing is optional but recommended for added structure, especially for larger bags.
Can I add inner pockets?
Yes. Sew pockets onto the lining before assembling the bag for organization.
How should I wash the bag?
Spot clean if possible. For machine washable fabrics, use a gentle cycle and air dry.
Can I decorate the bag?
Definitely. Embroidery, appliqué, buttons, and charms enhance its uniqueness.
Is this project eco-friendly?
Yes. Using fabric scraps or leftover squares reduces waste and promotes sustainable crafting.
Learning to turn 5″ squares into a generously sized bag is a creative and practical project. From joining small fabric squares to assembling the bag body, adding lining, and personalizing with pockets and embellishments, this technique transforms scraps into a functional, stylish accessory.
By following the steps outlined here, you can create a unique bag that reflects your style and efficiently uses leftover fabrics. Share your creations and ideas—your creativity can inspire others to explore patchwork bags and upcycling projects.


