
Ballerina pencil case with zipper Pattern


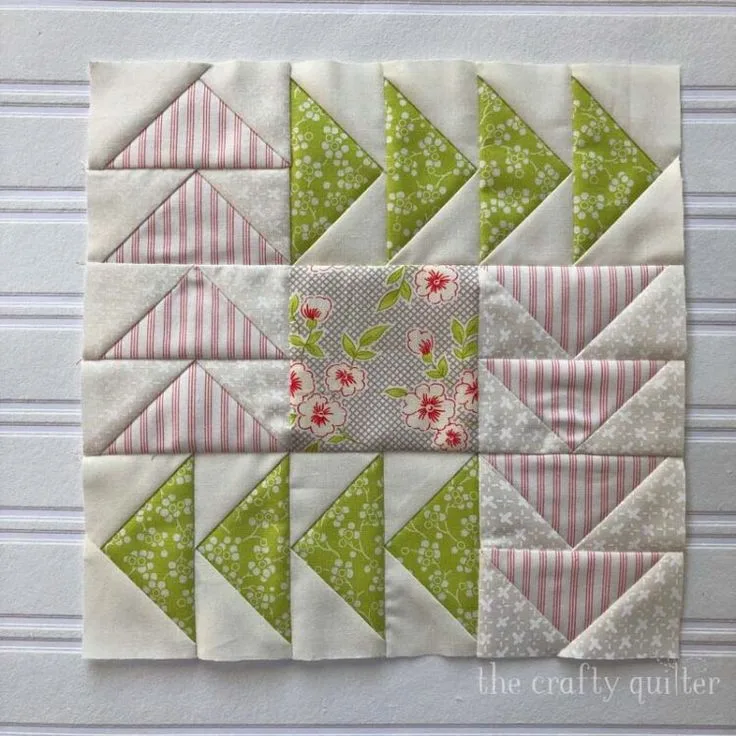
Two Methods for Oversized Flying Geese Including Cutting Charts – Tutorial is a must-read for quilters and sewing enthusiasts looking to create perfect oversized flying geese units with precision and ease.
If you’ve struggled with traditional flying geese techniques, this tutorial will open up two simple yet highly effective methods that save time and ensure your points are sharp every time.
Flying geese are fundamental quilt blocks, and mastering oversized versions can elevate your projects from standard to stunning.
With this guide, you’ll learn both the trim-and-sew method and the no-waste method, complete with cutting charts to make your process smoother.
Many quilters often feel intimidated by oversized flying geese because the larger fabric pieces can be tricky to handle, and mistakes are more visible. However, understanding the correct cutting and sewing methods can reduce frustration. This tutorial emphasizes accuracy, allowing you to achieve consistent units while minimizing fabric waste. Whether you are making a quilt top, a table runner, or a wall hanging, these methods will help you gain confidence and improve your piecing skills.
In addition, knowing how to work with cutting charts specifically designed for oversized flying geese can save hours of planning. These charts show exact measurements for various finished sizes, making it easy to choose the right method for your project. By combining accurate cutting, precise sewing, and easy-to-follow methods, you will be able to produce flawless oversized flying geese units every time. Let’s dive into the two methods and explore the best practices to achieve professional results.
The first method for creating oversized flying geese is the classic trim-and-sew technique, which involves sewing triangles onto a rectangle base. This method is preferred by many quilters for its simplicity and reliability. The key is to cut your triangles slightly larger than needed and trim them after sewing to achieve perfect points.
Start by preparing your cutting chart to determine the correct triangle and rectangle sizes. Oversized units usually require rectangles that are double the finished length plus seam allowances. The triangles must be large enough to cover the rectangle corners after sewing. Precision in cutting is critical to ensure that your final units are uniform and fit perfectly in your quilt design.
Sewing the first triangle onto the rectangle involves aligning the triangle’s edge with the rectangle corner and stitching along the diagonal. Repeat with the second triangle on the opposite side. The beauty of this method is that even if your first stitches are slightly off, trimming afterward corrects the alignment.
After sewing, use a ruler to trim the rectangle edges to the correct dimensions. Oversized units can benefit from a larger ruler with clear diagonal lines to maintain accuracy. Trimming ensures your oversized flying geese units will have crisp points and straight edges, making assembly into larger quilts seamless.
One of the advantages of the trim-and-sew method is its flexibility. You can use it for any fabric size or pattern, and it’s forgiving for beginners. Using the cutting charts guarantees that your fabric is cut correctly, preventing waste and saving time.
Finally, pressing the units correctly is crucial. Press seams toward the triangles to reduce bulk and enhance the overall appearance. With practice, the trim-and-sew method produces perfect oversized flying geese with clean points and precise dimensions every time.
The second method is the no-waste technique, which is ideal for quilters looking to maximize fabric efficiency. This method eliminates trimming by sewing triangles and rectangles in a specific sequence that automatically forms perfect points. It is slightly more advanced but incredibly effective for oversized units.
Begin by laying out your fabric pieces according to the cutting chart. In this method, precise measurements are even more critical because there is no trimming afterward. The pieces are sewn in pairs, then cut and pressed to create two flying geese units at once, minimizing fabric waste.
Sew the triangles to the rectangle using a diagonal seam, then mark the center line carefully. Cutting along this line separates the pieces into individual units. The advantage of this method is that you get identical oversized flying geese units with minimal effort.
This technique also works beautifully with patterned or directional fabrics. Since there is no trimming, your design placement remains intact, which is particularly important for intricate fabric prints. The no-waste method produces sharper points and more accurate units once mastered.
Pressing after sewing in the no-waste method is also important. Press seams toward the triangles to reduce bulk and maintain crisp lines. You’ll find that oversized flying geese created this way fit together perfectly in quilt blocks or larger patterns.
Finally, this method saves time and fabric, making it ideal for large quilts or projects that require many flying geese units. Combining the no-waste method with a clear cutting chart ensures efficiency without compromising accuracy, giving your quilt a professional finish.
Cutting charts are essential for quilters creating oversized flying geese units. They provide a reference for fabric sizes, seam allowances, and triangle dimensions. Using a cutting chart reduces errors and fabric waste, especially when scaling up traditional flying geese units.
A standard cutting chart includes measurements for rectangles and triangles based on the finished size of your flying geese units. For example, a finished 4×8-inch unit will require specific triangle sizes and a slightly larger rectangle. These charts account for the ¼-inch seam allowance standard in quilting.
When selecting your method, the cutting chart helps determine which approach is best. For the trim-and-sew method, the chart provides oversized pieces to trim afterward. For the no-waste method, the chart ensures the pieces are perfectly measured for precise cutting and sewing.
Cutting charts also allow quilters to plan fabric usage efficiently. Oversized units can quickly consume fabric, but a well-prepared chart ensures you cut just enough, leaving minimal scraps. This is both cost-effective and environmentally friendly.
Moreover, using cutting charts improves accuracy and consistency across multiple units. This is particularly important for quilts that include repeated flying geese patterns. Consistent unit sizes make assembly easier and result in a polished final product.
Finally, cutting charts are useful reference tools for both beginners and experienced quilters. They provide a visual and numerical guide that complements written instructions, helping anyone create oversized flying geese units with confidence and precision.
Achieving perfect oversized flying geese units requires attention to detail and a few practical tips. First, always use a rotary cutter and self-healing mat for clean, straight cuts. This ensures precision before sewing, which is crucial for larger pieces.
Next, accurate seam allowances are key. Whether you use the trim-and-sew or no-waste method, maintain a consistent ¼-inch seam. Oversized units exaggerate small mistakes, so accuracy makes a big difference.
Pressing correctly can dramatically improve the look of your flying geese units. Press seams toward the triangles to reduce bulk and make nesting seams easier during quilt assembly. Using a hot iron with steam works best.
When sewing large units, consider using a walking foot to prevent fabric shifting. Oversized triangles and rectangles are prone to movement, and a walking foot keeps layers aligned perfectly.
Cutting charts should be double-checked before cutting fabric. Measure twice, cut once is a mantra that ensures minimal waste and accurate results. Oversized units magnify measurement errors, so this step is crucial.
Finally, practice makes perfect. Start with a small batch of oversized flying geese to familiarize yourself with the chosen method. Once comfortable, scale up to larger projects, confident in your ability to create professional-looking units every time.
Q1: What is an oversized flying geese unit?
An oversized flying geese unit is a quilt block made of a rectangle with two triangles sewn on each short end, but larger than standard sizes, typically used for bold patterns or statement quilt designs.
Q2: Which method is better, trim-and-sew or no-waste?
Both methods work well. Trim-and-sew is beginner-friendly and forgiving, while no-waste is more efficient and precise once mastered. Choose based on your experience and project needs.
Q3: Can I use patterned fabrics for oversized flying geese?
Yes. Using the no-waste method preserves the design orientation, while trim-and-sew allows some flexibility. Always check fabric direction before cutting.
Q4: How do I choose the right size for my oversized units?
Decide the finished size based on your quilt design. Use a cutting chart to determine the exact dimensions of rectangles and triangles needed.
Q5: Do oversized flying geese take longer to sew?
They can take slightly longer due to the larger pieces, but using cutting charts and efficient methods like no-waste reduces sewing time.
Q6: How do I press seams for oversized flying geese?
Always press seams toward the triangles to reduce bulk and maintain crisp points, which ensures cleaner quilt assembly.
Creating oversized flying geese units can seem intimidating at first, but using the trim-and-sew or no-waste methods, along with precise cutting charts, makes the process manageable and enjoyable.
We’ve explored two effective techniques, the importance of cutting charts, and practical tips to achieve professional results. By following these methods, you can create consistent, sharp, and visually striking oversized flying geese units for any quilting project.
We would love to hear your thoughts! Share your experiences, suggestions, and tips in the comments. Did one method work better for you? Do you have any unique variations or shortcuts? Your feedback helps the quilting community grow and improve, and we can all learn from each other’s creativity.


