
Ballerina pencil case with zipper Pattern


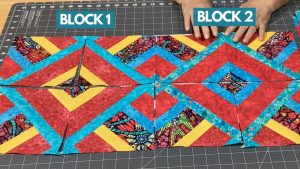
Weathervane Quilt Block Pattern is a classic yet striking design that adds elegance and personality to any quilt project. The Weathervane Quilt Block Pattern is known for its symmetrical, directional style, resembling the traditional weather vanes that adorn rooftops.
This pattern allows quilters to create visually engaging designs while practicing precision and technique. Whether you are a beginner or an experienced quilter, following this tutorial ensures your Weathervane Quilt Block Pattern will be both beautiful and functional.
The Weathervane Quilt Block Pattern offers versatility in color selection and layout. By choosing complementary fabrics, you can make your quilt block vibrant or subtle, depending on your project goals.

This pattern emphasizes accurate cutting and stitching to maintain sharp points and clean lines, which are essential for the classic directional look of the Weathervane Quilt Block Pattern.
Creativity is at the heart of the Weathervane Quilt Block Pattern. Quilters can experiment with traditional color schemes like reds, blues, and neutrals or create modern variations using bold or pastel tones. The pattern is suitable for individual blocks or for assembling into a larger quilt, allowing endless possibilities for design and personalization. By carefully following this tutorial, you can ensure every block aligns perfectly and produces a stunning finished quilt.
To create the Weathervane Quilt Block Pattern, you will need several essential materials. High-quality quilting cotton is recommended for durability and precision. This type of fabric is easy to cut, sew, and press, ensuring crisp lines for your quilt blocks.
Accurate cutting tools are essential. A rotary cutter, cutting mat, and quilting ruler help maintain consistent block sizes and precise angles. Precision in cutting is crucial for the Weathervane Quilt Block Pattern, where sharp points and symmetrical designs define the visual appeal.
Thread quality also plays a significant role. Using strong, high-quality cotton or polyester thread ensures your seams hold over time. Matching or coordinating thread colors can enhance the block’s appearance, highlighting key elements of the Weathervane Quilt Block Pattern.
Other tools include pins, fabric markers, and an iron. Pins secure pieces before stitching, preventing misalignment. Fabric markers help transfer patterns accurately. Pressing with an iron ensures seams are crisp and blocks lie flat, improving the overall finish.
Optional embellishments, such as decorative stitching or appliqué, can be added to personalize the Weathervane Quilt Block Pattern. While not required, these details add uniqueness and allow crafters to showcase their creativity.
Finally, a comfortable workspace with good lighting is essential. Proper ergonomics prevent fatigue, allowing quilters to focus on accuracy and enjoy the crafting process as they bring the Weathervane Quilt Block Pattern to life.
Creating the Weathervane Quilt Block Pattern begins with cutting your fabrics according to the pattern layout. Each piece should be precise in measurement to ensure alignment during assembly. Accuracy in this step prevents gaps, uneven seams, and misaligned points in your finished block.
Next, start sewing pieces together following the pattern instructions. The Weathervane Quilt Block Pattern typically involves triangular and square components arranged to create a directional effect. Maintaining consistent seam allowances ensures blocks fit together perfectly.
Pressing seams as you go is important. Press each seam flat or to one side according to the tutorial’s guidance. This step enhances accuracy and helps your Weathervane Quilt Block Pattern maintain clean, crisp lines throughout the assembly process.
Once individual sections are completed, join them to form the final block. Align points carefully and pin sections before sewing to prevent shifting. Attention to detail during this stage is critical to preserve the pattern’s symmetry.
Optional techniques, such as chain piecing, can save time and maintain consistency. This method allows quilters to sew multiple pieces in a continuous sequence without cutting the thread, improving efficiency without compromising quality.
Finally, check your completed Weathervane Quilt Block Pattern for accuracy. Ensure all points match and the block lies flat. Making minor adjustments before incorporating the block into a larger quilt helps maintain the overall aesthetic and structural integrity of your project.
Selecting the right fabrics is essential for enhancing the Weathervane Quilt Block Pattern. Traditional schemes include reds, blues, and neutrals, creating a timeless look. Modern variations can include pastels, bright tones, or monochromatic palettes. Choosing contrasting fabrics highlights the directional design, making the pattern visually striking.
Texture also matters. Combining smooth cottons with lightly textured fabrics can add depth without distracting from the pattern’s clarity. The Weathervane Quilt Block Pattern benefits from thoughtful contrast, which emphasizes the block’s geometric features.
When planning color placement, consider light, medium, and dark shades. Light fabrics highlight details, medium shades create balance, and dark fabrics define the block’s edges. This approach enhances the three-dimensional effect of the Weathervane Quilt Block Pattern.
Mixing prints and solids is another option. Solids can balance bold prints, ensuring the block remains cohesive while allowing creative flair. Following the tutorial ensures that any combination maintains symmetry and visual appeal.
The tutorial also recommends testing color layouts before stitching. Arranging cut pieces on a design wall or flat surface helps visualize the final block and prevents unintended clashes. This step guarantees a polished Weathervane Quilt Block Pattern.
Finally, consider the overall quilt design when choosing fabrics. Coordinating multiple blocks ensures a harmonious quilt layout. Consistency in fabric choices across blocks enhances the overall impact of the Weathervane Quilt Block Pattern.
Finishing the Weathervane Quilt Block Pattern involves ensuring all seams are secure and blocks are flat. Press each block carefully, checking for any puckering or misalignment. Proper finishing improves the overall appearance and ensures durability.
Adding a backing and quilting completes the project. Whether using hand quilting, machine quilting, or tying, this step enhances strength and texture. The Weathervane Quilt Block Pattern allows for both traditional and modern quilting techniques, depending on your preference.
Borders can frame the block and enhance visual appeal. Coordinating border fabrics add contrast or complement the existing palette, highlighting the directional design.
Binding the quilt edges provides a clean finish. The tutorial recommends precise cutting and stitching to ensure the edges are neat and durable. A well-finished binding completes the Weathervane Quilt Block Pattern professionally.
Optional embellishments, such as decorative stitches or applique, can be added at this stage. While not required, these enhancements provide personalization and creative expression.
Finally, maintain proper care for your finished quilt. Gentle washing, air drying, and careful storage help preserve both fabric quality and block integrity. Proper care ensures your Weathervane Quilt Block Pattern remains beautiful for years to come.
Q1: Is this pattern suitable for beginners?
Yes, the tutorial provides detailed, step-by-step instructions, making it accessible for all skill levels.
Q2: What fabrics work best?
High-quality quilting cotton is recommended for durability and precise stitching. Blends or textured fabrics can also be used creatively.
Q3: Can I adjust the size of the block?
Absolutely! Increase or decrease fabric pieces proportionally to achieve the desired block size.
Q4: Are embellishments necessary?
No, embellishments are optional. They can enhance aesthetics but are not required.
Q5: How should I care for my quilt?
Hand washing or gentle machine washing with mild detergent is recommended. Air drying or low-heat tumble drying preserves shape.
Q6: Can I use the pattern for a full quilt?
Yes, individual Weathervane Quilt Blocks can be combined into a larger quilt for a cohesive, striking design.
The Weathervane Quilt Block Pattern offers a timeless, versatile design that allows quilters to showcase creativity and precision. From selecting fabrics and colors to assembling blocks and adding finishing touches, this tutorial ensures a professional and beautiful result.
By following the steps and experimenting with personal touches, you can create a quilt that is both functional and visually stunning. Share your experience, leave honest feedback, and suggest improvements to inspire fellow quilters in the community.


