
Ballerina pencil case with zipper Pattern


Zig Zag Strips – Free Quilting Pattern is a fantastic way to add dynamic style and creativity to your quilt collection. Whether you are a beginner or an experienced quilter, this free quilting pattern makes it easy to create a visually striking zig zag design using strips of fabric.
Quilting enthusiasts love patterns that are both simple to follow and allow for endless customization, and the Zig Zag Strips pattern delivers exactly that. In this article, we will explore everything you need to know about this pattern, including materials, techniques, and tips for creating beautiful quilts.
The beauty of the Zig Zag Strips – Free Quilting Pattern lies in its versatility. You can use it for quilts of any size, from small baby quilts to large bedspreads.
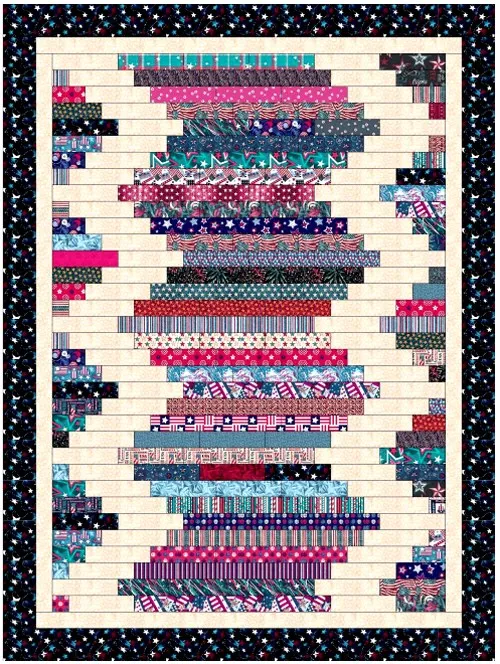
By combining colors strategically, the zig zag effect can create movement and depth, giving your quilt a professional and polished appearance.
Unlike more complicated patterns, the strip method reduces the need for precise piecing, which makes this pattern especially beginner-friendly while still satisfying advanced quilters looking for a quick project.
Another key feature of the Zig Zag Strips – Free Quilting Pattern is the ability to experiment with different fabrics, textures, and even seasonal colors. This pattern allows quilters to showcase their creativity, whether they prefer a modern geometric look or a more traditional patchwork style. Using the free pattern, you can mix solids, prints, and even recycled fabric strips to achieve a unique quilt design. It’s a great way to use up leftover fabrics while producing something functional and beautiful.
To begin your Zig Zag Strips – Free Quilting Pattern, it’s important to gather the right materials. Quality materials will ensure that your quilt looks professional and lasts for years.
You will need a selection of fabrics for the strips. Cotton fabrics are the most popular choice due to their durability and ease of use. You can pick coordinating colors or go bold with contrasting hues.
A cutting mat, rotary cutter, and quilting ruler are essential tools. These items help you cut strips accurately and maintain consistent widths, which is crucial for a neat zig zag design.
Thread selection also matters. Using a strong cotton or polyester thread ensures that your quilt pieces stay secure during both piecing and quilting. Matching the thread color to your fabric can create a seamless look.
A sewing machine is highly recommended, although hand-sewing is possible. A machine speeds up the process and provides more even stitches.
Lastly, quilting pins or clips will help hold the strips in place as you assemble the quilt. They prevent shifting and keep your zig zag pattern aligned.
Creating the Zig Zag Strips – Free Quilting Pattern is easier than it seems. By following a structured step-by-step approach, you can achieve a polished quilt in a manageable timeframe.
First, cut your fabric into strips of equal width. The width can vary depending on the desired final quilt size, but 2 to 3 inches is common for most projects.
Next, lay out your strips in the zig zag order. Alternate colors to enhance the visual impact, and experiment with diagonal placement for added interest.
Sew the strips together, right sides facing each other. Use a consistent seam allowance, typically ¼ inch, to ensure all pieces fit perfectly.
Press the seams flat with an iron. Pressing is crucial as it ensures the strips lie correctly, and the zig zag pattern remains crisp.
Once the top is assembled, layer it with batting and a backing fabric. Basting the layers together will prevent shifting during quilting.
Finally, quilt as desired. You can follow the zig zag lines or create complementary patterns. Finish by binding the edges to complete your Zig Zag Strips quilt.
The Zig Zag Strips – Free Quilting Pattern allows for endless color and fabric possibilities. Choosing the right combination enhances the final quilt’s appeal.
Begin by selecting a color palette that complements your space or intended recipient. Warm tones create a cozy feel, while cool tones can feel refreshing and modern.
Mixing prints and solids adds dimension. Using solid strips as a base with patterned strips interspersed can make the zig zag design pop.
Consider fabric texture as well. Combining smooth cottons with textured or woven fabrics adds visual interest and tactile appeal.
Pay attention to contrast. High-contrast colors emphasize the zig zag design, while low-contrast colors create a subtle, sophisticated look.
Finally, test your strip arrangement before sewing. Laying them out and adjusting colors can prevent any surprises and ensure the design flows beautifully.
Once you’re comfortable with the basics of the Zig Zag Strips – Free Quilting Pattern, there are advanced techniques to enhance your quilt.
Try varying strip widths within a single quilt. This technique adds complexity and visual interest, giving a modern twist to the classic zig zag pattern.
Incorporate diagonal piecing. Slightly offsetting strips can create a more dynamic and textured effect.
Add appliqué elements on top of the zig zag design for extra flair. Shapes like flowers or geometric designs complement the zig zag lines.
Experiment with quilting stitches. Using free-motion quilting or decorative stitch patterns can accentuate the zig zag effect and highlight specific colors.
Combine multiple zig zag blocks to create large quilt designs. By rotating and mirroring blocks, you can create intricate patterns that appear much more complex than they are.
Finally, consider quilting in layers. Layering additional fabric pieces or using batting variations can enhance texture and depth, giving your quilt a three-dimensional feel.
Q1: Can beginners follow the Zig Zag Strips – Free Quilting Pattern?
Yes, this pattern is beginner-friendly. The strip method reduces complicated piecing, making it easier for new quilters to achieve professional results.
Q2: What fabric types work best for this pattern?
Cotton fabrics are ideal due to their durability and ease of use. However, blends and textured fabrics can also work well depending on your desired look.
Q3: How do I maintain even zig zag lines?
Accurate cutting of strips and consistent seam allowances are key. Using a rotary cutter, quilting ruler, and proper pressing techniques will help maintain alignment.
Q4: Can I customize the zig zag pattern size?
Absolutely. You can adjust strip widths and the number of strips to fit any quilt size, from small lap quilts to large bedspreads.
Q5: How do I care for a quilt made with this pattern?
Machine wash on a gentle cycle with mild detergent and air dry or tumble dry low. Regular care keeps the quilt looking fresh and extends its lifespan.
Q6: Can I mix fabrics from different brands?
Yes. Mixing fabrics adds variety and dimension. Just ensure all fabrics are pre-washed and similar in weight to maintain even stitching.
The Zig Zag Strips – Free Quilting Pattern is a versatile, beginner-friendly, and visually appealing quilt design. By following the step-by-step tutorial, choosing the right fabrics and colors, and applying advanced techniques as desired, you can create a quilt that is both beautiful and functional.
This pattern allows endless customization, making it ideal for personal projects or gifts. We hope this guide has inspired you to try this fun quilting pattern. Leave a sincere opinion and share your suggestions—we would love to hear how your Zig Zag Strips quilt turned out!
If you’re looking for a free quilting pattern to experiment with, this one is a great choice to showcase your creativity and improve your quilting skills.


